Slowly Building Tension | Motivated Camera Moves

A film should always rise in tension until you get to the tipping point where your character has to make the most important decision in the film.

So is it possible to build up the tension with one shot, let's find out?

Building-up-Tension-1.gif

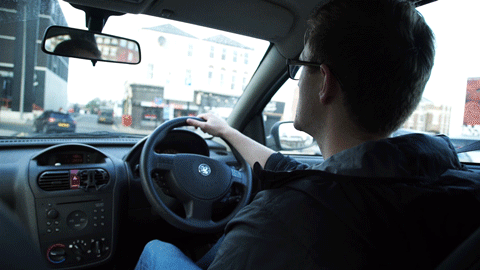
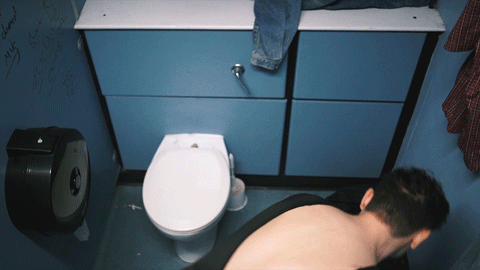
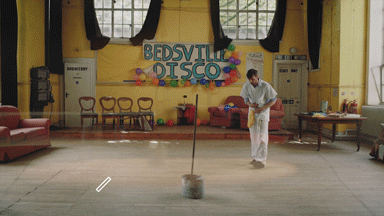
For this video, we have created this small scene. Let’s check it out:

Just like our coming to a halt video, this scene was inspired by a camera move from the book Master Shots by Christopher Kenworthy.

Building-up-Tension-2.gif

If you want to check out the book and watch the last video we made, you can find it here.

Let’s set the story for the shot:

Throughout the film, our character has been running from a creature, monster, or some form of an antagonist. They get to a point in the film where they either have to keep running or stand up and fight.

Building-up-Tension-3.gif

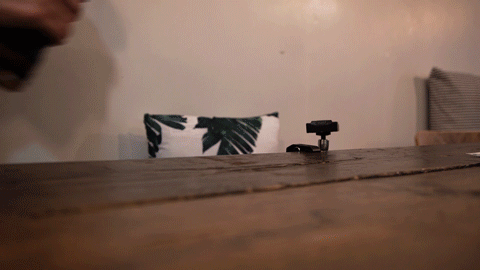
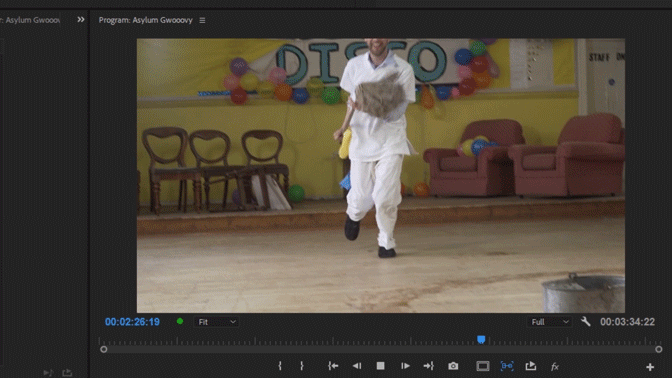
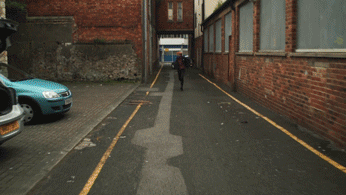
Staring down a long corridor, our character can hear the creature, which is tense enough. But to raise the tension even higher, at the beginning of the shot we frame the corridor out of the view of the audience. The camera slowly slides along and we finally reveal the corridor and see what our character can see.

At this point, you can do one of two things. Either reveal the creature or just leave the corridor empty. Your character deciding to step down a scary corridor and accepting the unknown could be a lot more impactful than if the monster is standing there. Plus you can add a lot of tension by adding sound effects of the creature.

Building-up-Tension-4.gif

If you do want to show the monster at the end of the shot looking at your main character, this could work as a standoff between the two characters. Your antagonist is telling the audience, if your hero wants to advance in the story, he is going to have to get past me first.

Building-up-Tension-5.gif

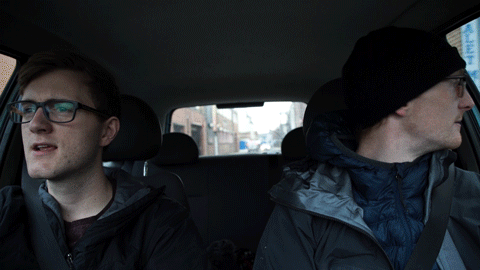
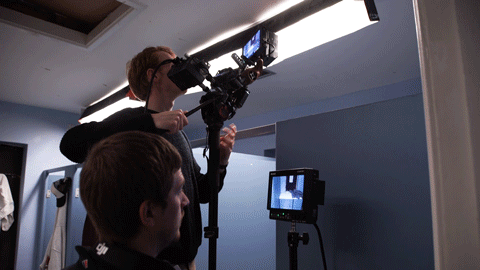
The move itself is simple, it’s just a track and pan, but to help build up the tension you want a slow and smooth shot and achieve this shot we used a handheld gimbal.

Building-up-Tension-Gimbal.gif

We did try and record this shot using a hand-held camera, but the movement didn’t look as good as it wasn’t as smooth. Also, we filmed the same shot only using a tripod, but the lack of movement didn’t allow us to build up the tension as much.

Knowing when and how to build up the tension in your film is an important trick, and this shot is just one of the ways you can do it and can be applied to other types of scenes.

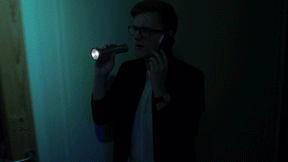
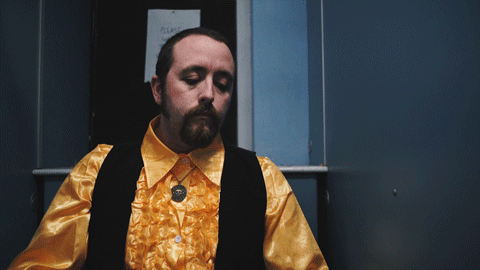
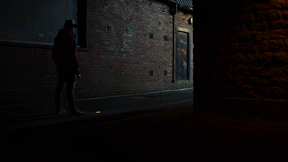
In this shot, our character has arrived at his bosses party and is anxious to enter. The creeping looking building doesn’t help either.

Building-up-Tension-7.gif

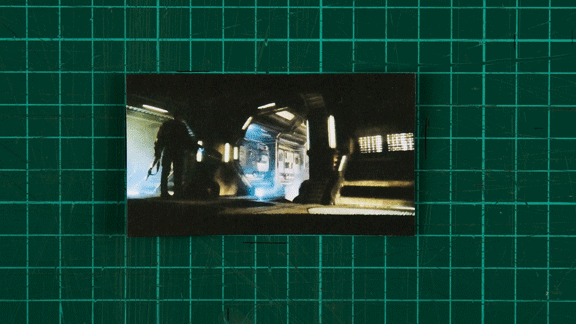
If you want to check out the master shots book we took this camera move from, you can find a link in the description below. This is the shot referenced in the book, the character in this film is geared up, ready to fight, and can hear the monster at the end of the corridor.

If you know what film this shot is from, let us know in the comments below.

Building-up-Tension-8.gif

Check out our other camera movement video which is called the coming to a halt, that can be found here. If you haven’t already, consider subscribing by hitting that orange lens cap and remember to achieve it one shot at a time.


This video was Sponsored By

🚀 http://bit.ly/pack-emulsion - Make your video look like it was tailor-made for the silver screen with RocketStock’s film grain overlay pack, Emulsion!

🎵 http://bit.ly/pbtfl-blissbay - Click here to download this episode's track. Check out Premiumbeat.com to discover a huge range of exclusive royalty free music!


DISCLAIMERS:

Some of these links are affiliate links, if you purchase gear via these links The Film Look will receive a small commission, but there will be no additional cost to you. Thank you!

Test Shooting: Why it's VITAL for YOUR Film | Behind The Scenes

This week we shot an episode, tested out some new microphones, talking about why dry running a scene is crucial to a successful film, and why you should test shoot any complex shots.

🎬 In case you missed it

When you can't pay your cast and crew: http://www.youtube.com/watch?v=KaT_Qaa_oks

We Failed to Make This Film 3 Times: http://www.youtube.com/watch?v=OEElrKSbYVM

1 EASY Tip for Writing BETTER Characters: https://youtu.be/kC_wW_toXuk

🎧 Listen to our Podcast!

iTunes: https://goo.gl/hikhGF

Android: https://goo.gl/fmsp4s

📞 The Socials

Website: http://thefilmlook.com

Twitter: https://twitter.com/TheFilmLook

Facebook: https://www.facebook.com/TheFilmLook

Instagram: https://www.instagram.com/thefilmlook


DISCLAIMERS:

Some of these links are affiliate links, if you purchase gear via these links The Film Look will receive a small commission, but there will be no additional cost to you. Thank you!

6 UNIQUE SHOTS using a Clamp Rig!

Lately, we’ve been experimenting with crab clamps.

Clamps1.gif

Our latest DIY invention is the lightweight clamp rig: it involves combining a clamp, a magic arm, and quick release plate so you can mount a light weight camera to strange and creative places.

Clamps2.gif

Today we are showing you 6 different ways you can get creative with the clamp rig to help you with your next film.

Let me preface this episode with a quick note: these clamps can be tightened very easily, so just make sure you attach them to something strong. You don’t want your camera to fall off, or even worse, damage the surface you are clamping it to! So just be cautious.

Clamps3.gif

Car Cam

The first place we tested out the clamp rig was inside a car to get some driving shots.

We found the headrest rods were a perfect diametre for the crab clamps, and because we had a magic arm attached, we were able to distance the camera from the clamp and get closer to the subject’s eyes.

Clamps4.gif

We drove around and the camera rig stayed in place. It did shake a bit when we hit some bumpy ground, but this could look like tasteful if you were shooting a scene with some fast paced action or drama.

Once we were driving on a flat, smooth road, the shot turned out silky.

Clamps5.gif

We also shot a set of french-overs. With this setup, you would actually be able to shoot 2 cameras at the same time because the headrests, and the clamps, aren’t in shot.

You can get the same type of shot with a camera op in the backseat, but if you have limited crew, this is a good option.

The last shot in the car was a 2 shot from the front. My car is old and cheap, so the dashboard is made of some sort of shiny plastic which made attaching the clamp difficult. So we stuffed in some extra rubber tape to keep it secure.

Clamps6.gif

Bookcase Cam

The next thing we tried was using the clamp rig on a bookcase.

We attached the clamp rig to the top shelf of the bookcase and positioned it looking into the room. With this shot, you can simulate a CCTV camera. This would be difficult to achieve with a tripod because of the lack of height and its spread out legs, so the clamp actually made this shot possible.

Clamps8.gif

Then we pointed the camera looking straight to the floor, achieving a very high, top down frame. This is a very strange type of angle, so using this type of shot in the film would work great if you wanted the audience to pay extra attention to something.

Clamps10.gif

Plate Cam

We wanted to go a bit weird with this next one.

Clamps11.gif

Similar to a snorri-cam setup, we attached the clamp rig to a moving dinner plate. When coupled with the journey from the microwave to the table, this shot becomes quite interesting.

Clamps12.gif

There is a lot of tell about a character by the type of meal they eat. So if you are using food to give a character or scene thematic emphasis, you can give the shot extra presence by turning it into a plate-cam!

Guitar Cam

The next thing we tried was attaching it to an instrument.

Clamps13.gif

This is a perfect shot for an interesting live session or music video. As the musician moves around the stage, the guitar seems to stick to the frame, giving us a shot with, again, a lot of presence.

Clamps14.gif

Just a quick note, before you attach the rig clamp to a guitar, ask the guitarist if it's okay, and try to pad out the clamp to relieve the pressure on the guitar to prevent any damage. We clamped the rig to my guitar, and unfortunately, it did leave a little groove in the wood. The crab clamp clearly isn’t the right tool for the job in this instance!

Clamps16.gif

So here’s a question for you guys: to achieve this shot without damaging an instrument, how would you attach the camera to it?

Toilet Cubicle Cam

Clamps17.gif

In one of our previous films, Backstage, some shots were inside a toilet cubicle. To pull of the shot we had to swap the tripod for a monopod in order to get closer to the door, and stand on an apple box in order to get the correct height.

Clamps18.gif

This is where the rig clamp comes in!

Clamps19.gif

We copied the shot from Backstage but this time we attached the rig clamp to the cubicle door frame and locked off the shot. It does mean you can no longer pan and tilt when the clamp is in place (unless you figure out how to attach a tripod head to it!), but now it’s safely up a height, pointing down, and best of all you can now open and close the door, so you won’t have to lock your talent in the loo anymore.

Discrete Shots & Timelapses

The last few things we tried were based on shooting vlogs. When a gorillapod won’t secure and a tripod is too bulky, you can use the rig clamp to attach it to things like railings if you wanted to get a shot of walking through the frame or even if you wanted to talk to the camera for a moment.

Clamps20.gif
Clamps21.gif

Lastly, we tried attaching the rig clamp to a table while we wrote the script for this very episode!

The camera is secure and out of the way: it can’t be knocked off the table during a timelapse, and there’s no chance of someone walking along and kicking one of the tripod legs.

And if someone tries to steal it, they will have a lot of trouble getting it disconnected!

Clamps22.gif

This WAS a bit of an experiment. The rig clamp isn’t perfect, we know that. But it certainly opened up some possibilities for shooting. The parts we used can be found in the description.

If you want to see more videos just like this one, hit the orange lens cap to subscribe, and remember to achieve it one shot at a time.


This video was Sponsored By

🚀 http://bit.ly/pack-emulsion - Make your video look like it was tailor-made for the silver screen with RocketStock’s film grain overlay pack, Emulsion!

🎵 http://bit.ly/pbtfl-citycruising - Click here to download this episode's track. Check out Premiumbeat.com to discover a huge range of exclusive royalty free music!


DISCLAIMERS:

Some of these links are affiliate links, if you purchase gear via these links The Film Look will receive a small commission, but there will be no additional cost to you. Thank you!

Unboxing the MyRodeReel Prizes | Behind The Scenes

In this week’s BTS we unbox all of the prizes we won from the MyRodeReel 2018 film competition!

🎵 Check out Premiumbeat.com to discover a huge range of exclusive royalty free music! Music used in episode:

http://bit.ly/pbtfl-spinningcircles

http://bit.ly/pbtfl-citycruising

http://bit.ly/pbtfl-blissbay

🎥 This episode's kit/gear/equipment:

Check out the prize list here: https://www.rode.com/myrodereel/prizes

🎬 In case you missed it

Winning BTS Video: https://youtu.be/MFZk2wmRrgU

The Asylum Groove: https://youtu.be/aysGfZyQEiM

🎧 Listen to our Podcast!

iTunes: https://goo.gl/hikhGF

Android: https://goo.gl/fmsp4s

📞 The Socials

Website: http://thefilmlook.com

Twitter: https://twitter.com/TheFilmLook

Facebook: https://www.facebook.com/TheFilmLook

Instagram: https://www.instagram.com/thefilmlook


DISCLAIMERS:

Some of these links are affiliate links, if you purchase gear via these links The Film Look will receive a small commission, but there will be no additional cost to you. Thank you!

Feelworld Master MA7 Monitor Review

The Feelworld Master MA7, now that’s how to name a monitor, and is what we are going to be reviewing in this video.

This is the 4th Monitor we have reviewed on this channel, so let's see if this one is better than rest.

Build Quality

Feelworld-Master-MA7-Review.jpg

Let's start off with the build quality of the MA7. It is the best out of all of the monitors we own, as this one has an all-metal body and the others are plastic.

I still wouldn’t recommend dropping it but if you do, the MA7 should be able to take a harder hit than the others we own.

There are 8 buttons on the top of the monitor. Power, menu, 4 to navigate through the menus and 2 custom function buttons.

When you’re not using the menu it would be great if the left and right buttons were also function buttons. Currently, they are being used to change the volume as this monitor has a headphone jack.

Feelworld-Master-MA7-Review-1.gif

Having the volume controls set as 2 of the main buttons is a bit of a waste when they could be set to more useful functions you would use when shooting.

This could all change and be updated as the monitor has a USB firmware upgrade port.

I/O

Feelworld-Master-MA7-Review-3.gif

The MA7 has both HDMI in and out, which allows you to daisy-chain the video signal to another monitor. This comes in handy if you have a focus puller who is operating away from the camera or if you have a directors monitor setup.

Power

Just like all of the other monitors we own, this one can be powered via NPF Batteries or via a DC power cable.

Screen

The screen is 7 inches and has a resolution of 1920 x 1200 pixels. So it is super sharper and much is sharper than the Sony a7s camera monitor.

The screen has a 160-degree viewing angle, which means you can literally view the image from any angle.

Feelworld-Master-MA7-Review-5.gif

You will have to calibrate this monitor to make it match your camera. This takes a little trial and error, by changing the colour tones of the monitor and the backlight brightness. I would say I got the colour, contrast, and brightness to about 95% there.

We’ve had to calibrate the 4 different monitors we own, so it’s not just the Feelworld Master MA7 that requires this.

This monitor will work with 4k cameras as well, with the resolution sticking at 1920 x 1200.

Latency

The MA7 does have a latency of around 4 frames, but the other 3 monitors we own all have the same latency. We’ve used these monitors on all types of projects and you really don't notice the latency when shooting. You only notice it when you go frame by frame which you are never going to do.

Software Features

We are seeing a trend with the monitors in this price range. They all have the same software feature and most have the same interface, so let's talk about the ones we use the most.

The first function button is set to false colour, the second is set to zebras and you can even set the IRE exposure level to match up with your camera.

I personally like to always have centre markers on, and sometimes we will use the ratio markers to help frame up if we plan to add film bars in a post.

This monitor also has an audiometer which you can have a screen at all times which is a nice feature to have.

What’s in the Box

The monitor comes with 2 HDMI cables, a mini and micro so you can start using it straight away depending on which HDMI socket your camera has.

Ours also came with a battery, but you will definitely need more.

The monitor comes with a sunscreen hood. First, you have to clip on the frame and velcro the hood onto that. A problem we have found is that when you clip the frame on to the monitor it hides the graphics which indicates which HDMI socket is which, as you have HDMI in and out.

Feelworld-Master-MA7-Review-7.gif

We’ve added a little bit of gaff tape onto the frame so we know which one is which as we like to keep the frame on the monitor.

This is just a design fault and does not affect the operation of the monitor in any way, but it’s worth knowing.

You also get a standard ball head mount, which isn’t the best one we ever had, so if you are looking for a monitor mount check out our video on the AndyCine hot shoe mount.

We think it’s the best one out there. You can find a link to that video at the end of this one.

Depending on where you buy this monitor will depend on what accessories you get in the box.

If you do want to buy it you can find a link in the description, it really helps the channel out if you use it.

Price

So is this monitor better than the 3 other monitors we have? The long answer is if you are looking for a new 7-inch monitor you’ll not be disappointed with the Master MA7, especially for the price.

The monitor has a little bit of setup, but this is no different from the other monitors we have, the viewing angle is great, and it has all of the software features you need.

The most important thing is that the monitor does not slow you down and get in the way when shooting. It just works.


This video was Sponsored By

🚀 http://bit.ly/tflrs-creator - Become a social media powerhouse with RocketStock's video element pack, Creator. This collection comes packed with logo reveals, end screens, subscribe animations, and much more.

🎵 http://bit.ly/pbtfl-glamourparty - Click here to download this episode's track. Check out Premiumbeat.com to discover a huge range of exclusive royalty free music!


DISCLAIMERS:

Some of these links are affiliate links, if you purchase gear via these links The Film Look will receive a small commission, but there will be no additional cost to you. Thank you!

How to RE-PAY Your ACTORS (when you can't pay them) | Behind The Scenes

On this week's BTS we talk about a way to pay back your volunteer actors, an update on our latest short film Nowhere To Go, we get a visit from someone across the globe, and a hint towards our next kit review!

🎬 In case you missed it

When you can't pay your cast and crew: http://www.youtube.com/watch?v=KaT_Qaa_oks

We Failed to Make This Film 3 Times: http://www.youtube.com/watch?v=OEElrKSbYVM

1 EASY Tip for Writing BETTER Characters: https://youtu.be/kC_wW_toXuk

🎧 Listen to our Podcast!

iTunes: https://goo.gl/hikhGF

Android: https://goo.gl/fmsp4s

📞 The Socials

Website: http://thefilmlook.com

Twitter: https://twitter.com/TheFilmLook

Facebook: https://www.facebook.com/TheFilmLook

Instagram: https://www.instagram.com/thefilmlook


DISCLAIMERS:

Some of these links are affiliate links, if you purchase gear via these links The Film Look will receive a small commission, but there will be no additional cost to you. Thank you!

5 Basic Filmmaking Tools for a Faster Shoot

What do you take with you on set when shooting a film? Cameras, Lenses, lights, microphones, these are the obvious tools you would take, but what about the peculiar ones.

In this video we are going to talk about the 5 things we think YOU should be carrying when on set and why this crocodile clip is the most important one. These are the 5 things that make up my daily carry when i’m on set shooting a film. Let's start with the crocodile clip.

Crocodile Clip Filmmaking

Crocodile Clip

Before we shoot a film, we create a shot list. This will be printed off and placed in a production folder along with our storyboards and a script.

We will have a few versions of this production folder hanging around on set, with the main one being with our 1st assistant director and producer who is the person running the shoot.

At any point during the shoot, you can go to your 1st AD and check the script, storyboard or the shot list with them.

As the DP I want to spend as much time next to the camera as possible, so I always create a smaller version of the shot list and clip it to my right front pocket. This means all I need to do is look down, see what shot is next and move on to that shot.

crocodile clip - Shot list

I’ve found this to be a great way to be more efficient on set, and it allows our 1st AD to concentrate on directing other areas of the production, but I always know they are there when I need them.

This also comes in super handy if you have a very small crew or you are your own 1st AD, DP, and director. Having this shot list clipped to you means you spend less time away from the camera finding and looking for the shot list.

Even if you are just a runner or production assistant, ask the producer or 1st AD if they have a spare shot list for you to have. This way you can keep up and be prepared with what is happening on the shoot, and they will be impressed you took the initiative to ask for one.

Torch

Filmmaking Torch

You can use a small torch like this to shine on your clapperboard when shooting in a dark situation. This means you do not need to change the exposure of the camera to be able to capture and read it.

Also during a shoot, when changing rig parts, it has come it handy to shine a light on HDMI sockets when trying to plug a cable in and to shine in a bag when looking for another piece of equipment.

It’s much easier than getting your phone out, unlocking it, finding the torch app and turning it on.

Gloves

dirty rigger gloves

I use these dirty rigger gloves when carrying and rigging up equipment, but also when operating the camera handheld as they give you that extra level of grip.

These ones have a hole already in them so you can put a carabiner through and clip it to your belt holder. I clip mine to one of the back clips so they do not get in the way when I’m not wearing them.

Multi-tool

The two tools I use on this multi-tool are the pliers to help to tighten up camera rig screws and also the flathead screwdriver for camera plate screws. I use the flat head screwdriver the most so I added a little gaff tape tab to it so I can quickly see and access it.

This multi-tool is very cheap but the quality of it is super high and only costs around £11 or $20.

The reason I went with such a cheap one is that I did not know how much I would use it, which turned out to be only when we are shooting films.

A piece of advice we always give to people is before you buy equipment, is to work out how many times you are going to use it, which will tell you if you really need it.

If I went out and bought something like a Leatherman which is anywhere from £70 to £100. That’s a lot of money just sitting there waiting to be used when the cheaper version was the better option, for me anyway.  

Pen - Notebook

Filmmaking Notebook

The last thing I carry is a pen and a small notebook that fits in my pocket. I use this to refer back to notes or make them. The pen also allows me to cross off a shot when it is completed on the shot list.

Links to everything I have mentioned can be found in the description below.

🎥 This episode's kit/gear/equipment:

🇺🇸 US links:

Crocodile Clip - https://amzn.to/2PYxGwB
Multi-Tool - https://amzn.to/2Q90jHS
Torch - https://amzn.to/2JntJzc
Gloves - https://amzn.to/2ENTD0o
Pen - https://amzn.to/2PYwBVz
Note Book - https://amzn.to/2Q3Q8Ea

🇬🇧 UK links:

Crocodile Clip - https://amzn.to/2zaVrul
Multi-Tool - https://amzn.to/2OX4wln
Gloves - https://amzn.to/2OdWnDI
Torch - https://amzn.to/2EKK3eG
Pen - https://amzn.to/2CMnJyS
Note Book - https://amzn.to/2OYstbI

Things I don't carry when shooting on set are my keys and generally my phone which I store in my bag. The reason for this is because I don’t want to have any distractions when shooting and phone notifications can do this.

If you are using a phone on set make sure it is for production or emergencies uses. Otherwise, it can look very unprofessional.

This is just a personal preference and the only thing I would use my phone for is the time, but I have a watch for that so I guess I carry 6 things.  

This is just my daily on set carry, but there are a bunch of other pieces of filmmaking equipment you might need. We actually made a video that shows what our 2nd assistant camera person carries when shooting. His utility pouch puts Batman to shame and it always has everything we need when shooting and is probably the reason I carry so little.

You can find a link to that video via a card in the corner of the screen or in the description below.


This video was Sponsored By

🚀 http://bit.ly/rs-aspect - Give your video a clean look with Aspect by RocketStock. It features over 200 logo reveals, intros, lower thirds, overlays, icons, and transitions.

🎵 http://bit.ly/track-hot-fusion - Click here to download this episode's track. Check out Premiumbeat.com to discover a huge range of exclusive royalty free music!


DISCLAIMERS:

Some of these links are affiliate links, if you purchase gear via these links The Film Look will receive a small commission, but there will be no additional cost to you. Thank you!

1 EASY Tip for Writing BETTER Characters

The best scripts are packed with action, drama, and compelling characters. You’ve got a bunch of characters battling their way through obstacles, both internally and externally, to achieve a goal. The very best scripts also have characters conflicting with each other, regardless of whether they want to achieve the same goal.

So how do you check your script has enough drama, action, and conflict between characters to be entertaining? We have one technique which will help solve that problem.

Proofreading the first draft of your script will only get you so far in working out the kinks.

Characters-Conflicting.gif

Because YOU wrote the script, you might not notice you’ve forgotten to include some things. Because you know the full backstory of the characters, and have a detailed outline of the locations in your mind, you will be reading your script with more knowledge than a newcomer.

The easiest way to identify issues with your script is by performing it, out loud, with a few friends.

Characters-Conflicting2.gif

Getting the script in the hands of someone else is a massive benefit as they can only read what’s been presented to them on paper.

Me and Rob tried this technique using the first draft of a script he wrote, and we were able to identify a lack of drama between characters from the get-go. The script is called 60 seconds, and we will be using it as a reference for this episode.

Characters-Conflicting3.gif

With having your friends perform the scene with you, you should be able to identify if the scene is just a bunch of characters doing and saying things, furthering the plot together, without colliding with each other.

We have so many things to think about when writing a script that we sometimes forget to push the characters into EACH OTHER.

This is easier to identify if you can see and hear it being performed in your living.

In an earlier version of the script, 60 seconds, both Jack and Stu are driving on parallel lines: they are BOTH simply trying to defuse the bomb together.

Characters-Conflicting4.gif

So we added a little more detail to their characters. For example, Jack would rather defuse the bomb on his own only to realise he needs Stu’s help, and Stu can’t help himself messing things up only to realise he needs to knuckle down and get serious if they want to defuse the bomb.

This example isn’t super complicated, but now both characters enter the scene with different motives, characteristics, and reach an agreement at the end.

If you think of the changes as converting parallel lines into intersecting lines will help you map out how the action and drama unravels.

In this example, you have 2 lines, Stu and Jack, and they are on opposite sides of the spectrum.

Characters-Conflicting5.gif

Once they cross between each other, they are at a standstill and are actually stopping each other from achieving their goal (whether they know it or not)...

Once they break through the cross section, they are now starting to understand each other’s opinions, and they have both swapped sides. Stu understands Jack is serious about the bomb, and Jack understands Stu is only trying to help.

Characters-Conflicting6.gif

If you want to read the first and final version of the 60 seconds script, to see how we changed it using the “read out-loud” method, you can find that in the description below. We are planning to make this film and put it on the channel, so if you don’t want spoilers, don’t read it!


This video was Sponsored By

🚀 http://bit.ly/tflrs-creator - Become a social media powerhouse with RocketStock's video element pack, Creator. This collection comes packed with logo reveals, end screens, subscribe animations, and much more.

🎵 http://bit.ly/pbtfl-newfrontier - Click here to download this episode's track. Check out Premiumbeat.com to discover a huge range of exclusive royalty free music!


DISCLAIMERS:

Some of these links are affiliate links, if you purchase gear via these links The Film Look will receive a small commission, but there will be no additional cost to you. Thank you!

Cheap Filmmaking Clamp

Cameras, lenses, lights, and microphones. These are the pieces of filmmaking equipment that get us the most excited when talking about equipment, but what about clamps?

In this video, we are going to be talking about these crab clamps, and how having a bunch of them can help you set up equipment in difficult and creative places.

Welcome to The Film Look.

We’ve had one of these Small Rig crab clamps for a while now.

The amount of uses we’ve had from just one is quite amazing, so we asked SmallRig if they could send us a few more for us to put them into some filmmaking tests!

The crab clamp is an all metal product with rubber grips and has 1/4"-20 and 3/8" thread. The clamp has a maximum opening of 44mm and a minimum of 15mm which is perfect if you are going to attach it to 15mm rods. More on that later!

Crab-Clamp.gif

You CAN buy the crab clamp on its own, but we decided to get the small ball head magic arm which fits into the 1/4"-20 thread on the clamp. It also has a 1/4"-20 thread on the other end of the arm which allows you to attach many different types of filmmaking equipment.

Crab-Clamp-1.gif

Magic arms come in all shapes and sizes and it’s always handy to have a bunch of different ones.

Just like all the SmallRig products we own (and we have quite a few), this clamp is at a high standard of construction.

Crab-Clamp-2.gif

The clamp gets a stronghold with little effect and the adjustable handle makes it easy to get it tight or slack.

One of the main uses we have found for the crab clamp is attaching a small LED panel to it.

We use these LED panels as an edge or hair light, which is what we using right now. We have the clamp attached to the bookcase behind us.

This combination allows us to stick the light in a load of places without the need for a light stand.

Instead of using the house lights in your location, you can clamp your own lights which will give you a great level of control over the brightness, shape and colour.

This type of setup works great if you’re shooting a long take with your character walking through a location.

You could add colour to those lights to help change the tone of your film.

Crab-Clamp-3.gif

The clamps can also be used to attach a light or monitor to the 15mm rods on a shoulder rig. By doing this, you have more mounting options to suit how you would like your rig to be set up.

Also, by adding this AndyCine monitor mount to the magic arm, you can quickly adjust the angle with one hand.

We made a video all about this mini hot shoe mount, which you can find here.

The max load of the clamp and ball head is around 1 Kilogram. We tested the strength of the clamp and magic arm by attaching our larger LED panel, an Aputure HR672c, with two Sony NPF batteries and it held the weight.

The same went for the camera. We took it out of the cage and stuck a 35mm lens on the front. Now we can clamp the camera in places we could not before.

Crab-Clamp4.gif

Just make sure what you are clamping to is safe and secure. Safety is always key.

This clamp is perfect if you have a GoPro or if you are a phone shooter as you could purchase a phone mount like this one which has a 1/4"-20 thread screw mount.

If your light does not have a 1/4"-20 or 3/8" thread BUT you have 2 crab clamps, you can connect two together and create something we are calling The Double Crab Clamp.

Clamp one end to a surface and the other to the non-threaded mount and away you go.

Considering how many uses we have found for the crab clamp and how much it costs, which is around £9 or $11 not including delivery, we think it's a great piece of kit to always have in your grip bag.


🎥 This episode's kit/gear/equipment:

Small Rig Crab Clamp -

US links:

AndyCine Monitor Mount - https://amzn.to/2A18lMZ

Smartphone Tripod Mount - https://amzn.to/2PN9cGP

UK links:

AndyCine Monitor Mount - https://amzn.to/2Ogao8T

Smartphone Tripod Mount - https://amzn.to/2PKD1aQ


This video was Sponsored By

🎵http://bit.ly/track-under-the-spotlight - Click here to download this episode's track. Check out Premiumbeat.com to discover a huge range of exclusive royalty free music!


DISCLAIMERS:

Some of these links are affiliate links, if you purchase gear via these links The Film Look will receive a small commission, but there will be no additional cost to you. Thank you!

Our Thoughts on the Black Magic Pocket 4K | Behind The Scenes

Black Magic Design invited us to see their newest bit of kit, the Pocket 4K. We also show a rundown of our sound setup for presenting BTS!

🎥 This episode's kit/gear/equipment:

🇺🇸 US links:

Sony a7s: http://amzn.to/2DrEdLb

Saramonic Smartrig: http://amzn.to/2DpJMK3

Rode NTG2: https://amzn.to/2CMTA3a

🇬🇧 UK links:

Sony a7s: http://amzn.to/2DrEdLb

Saramonic Smartrig: http://amzn.to/2D4BCtx

Rode NTG2: https://amzn.to/2IYJH2u

🎬 In case you missed it

Black Magic Pocket 4K films: https://www.blackmagicdesign.com/uk/products/blackmagicpocketcinemacamera/gallery

🎧 Listen to our Podcast!

Anchor: https://anchor.fm/the-film-look

iTunes: https://goo.gl/hikhGF

Android: https://goo.gl/fmsp4s

Spotify: https://open.spotify.com/show/2HCa9sUe2rBRZ7xXeWTIZ8

📞 The Socials

Website: http://thefilmlook.com

Twitter: https://twitter.com/TheFilmLook

Facebook: https://www.facebook.com/TheFilmLook

Instagram: https://www.instagram.com/thefilmlook


DISCLAIMERS:

Some of these links are affiliate links, if you purchase gear via these links The Film Look will receive a small commission, but there will be no additional cost to you. Thank you!

The Best Camera Monitor Mount

The guys over at AndyCine sent us a low profile hot shoe mount which we think is worth shouting about!

Today we are going to talk about its features, the many different ways you can use it, and why we like it so much!

Welcome to The Film Look.

It doesn’t look like much, but it packs a punch. We were sceptical about making a review for a product so small and basic, but MAN we were surprised when we started using it!

AndyCine Mini Hot Shoe Mount.jpg

It has 360 degree rotation and 176 degrees of tilt. This is great if you need to flip the monitor for self-shooting, as well as positioning a monitor when shooting at some extreme angles.

AndyCine-Mini-Hot-Shoe-Mount.gif

It’s made entirely out of aluminium (or aluminum), which makes a great change compared to other budget hot shoe mounting systems.

We’ve had a bunch of mounts in the past, and the ones that feature some plastic parts usually break before you can get them tight enough.

It has a ¼ 20 screw on the top to attach monitors, lights, and other bits, and features a cold shoe attachment at the bottom for attaching to cameras as well as a ¼ 20 thread so you can attach it to things like light stands.

AndyCine Mini Hot Shoe Mount 2.jpg
AndyCine Mini Hot Shoe Mount 3.jpg

One thing that this hot shoe mount DOESN’T have is the ability to hand tighten.

Instead, it comes with a small allen key to adjust the tension on the rotation and tilt, so you can get it rock solid or loosen it off if you want some play to it.

AndyCine-Mini-Hot-Shoe-Mount2.gif

What makes this better than other methods, in my opinion, is you can find that sweet spot where it will hold in place, but you can also adjust it without having to loosen it off completely. It makes setting up the shot fast and efficient, perfect for run and gun shooting.

You will need to carry an allen key around with you if you need to tighten it up on location, but I don’t consider it a big issue considering the advantages of this feature.

The hot shoe mount comes with a bunch of extras.

AndyCine-Mini-Hot-Shoe-Mount4.gif

You get a handy padded tool case as well as a bunch of screw bits and a flat-profile wrench ...which even opens beer bottles.

I also love the size and weight of this mount. It weighs only 45g and its dimensions are 4.5cm by 3.5cm by 3cm. So basically, it’s tiny and really light!

We have used things like magic arms in the past to mount camera monitors to rigs before, and although they provide a lot of flexibility, they can be difficult to re-position and keep tight (at least the budget ones we’ve used).

The best mounting option we’ve seen for run and gun filmmaking has been the articulating arm you see on monitors like the SmallHD Focus and AndyCine A6, with its swivel-tilt feature/

But this hot shoe mount seems like the better option considering you can rotate and tilt.

So this mount is light, small, strong, and flexible, but the best thing about it is when you start to connect to it other products.

First thing we tried was connecting it between our shoulder rig and a magic arm. Like I’ve mentioned earlier, repositioning a magic arm can be annoying as you have to slacken it off, adjust it, try to hold it in place, then tighten it up again.

AndyCine-Mini-Hot-Shoe-Mount5.gif

This is even more difficult if you are trying to adjust it while it's on your shoulder as you really need two hands to get it positioned properly.

By adding the hot shoe mount onto the magic arm, it means you can easily re-position the monitor with one hand without assistance from someone else.

AndyCine-Mini-Hot-Shoe-Mount6.gif

The next thing we tried was attaching it to a crab clamp. The clamp we have already includes a ballhead arm which gives you a lot of flexibility, but it's another mount which is either locked or unlocked. By adding the hot shoe mount, it means you can make slight adjustments without having to reset the lock.

AndyCine-Mini-Hot-Shoe-Mount7.gif

We will be reviewing this crab clamp by SmallRig in the next coming weeks. If you want to see all the ways you can use this thing to help you make films, get subscribed!

You might use this one - you might not - but, if you have a video mic on top of the camera, the hot shoe mount will give you the ability to offset the direction of the microphone. This could be handy if you are framing someone out of centre but you want to keep the microphone directed towards them.

In all honesty, if you are recording sound during an interview, placing the microphone on the camera is usually a bad idea. We have a video talking about that. There is a card in the corner and a link in the description. But, in a pinch, you may find this technique useful.


This video was Sponsored By

🚀 http://bit.ly/pack-emulsion - Make your video look like it was tailor-made for the silver screen with RocketStock’s film grain overlay pack, Emulsion!

🎵 http://bit.ly/pbtfl-1970sbrazil - Click here to download this episode's track. Check out Premiumbeat.com to discover a huge range of exclusive royalty free music!


DISCLAIMERS:

Some of these links are affiliate links, if you purchase gear via these links The Film Look will receive a small commission, but there will be no additional cost to you. Thank you!

We're making a new VIDEO SERIES! | Behind The Scenes

We're making a new video series, reviewing a new product, writing a new script, and we've just finished a new podcast!

🎥 This episode's kit/gear/equipment:

🇺🇸 US links:

AndyCine Mini Hot Shoe Mount: https://amzn.to/2PnIHav

🇬🇧 UK links:

AndyCine Mini Hot Shoe Mount: https://amzn.to/2pI2Rkl

🎬 In case you missed it

Handheld Gimbals Review: https://youtu.be/8O-d8hNOja4

AndyCine A6 Monitor Review: https://youtu.be/Hcx_QIdlGFM

🎧 Listen to our Podcast!

Anchor: https://anchor.fm/the-film-look

iTunes: https://goo.gl/hikhGF

Android: https://goo.gl/fmsp4s

Spotify: https://open.spotify.com/show/2HCa9sUe2rBRZ7xXeWTIZ8

📞 The Socials

Website: http://thefilmlook.com

Twitter: https://twitter.com/TheFilmLook

Facebook: https://www.facebook.com/TheFilmLook

Instagram: https://www.instagram.com/thefilmlook


DISCLAIMERS:

Some of these links are affiliate links, if you purchase gear via these links The Film Look will receive a small commission, but there will be no additional cost to you. Thank you!

Turn ANY song into Horror Music

Today we are showing YOU how to transform a song into a nightmare using some basic plugins you can find in your editor or digital audio workstation, perfect for your upcoming horror film.

In our short film The Asylum Groove we wanted to emphasise a disturbing scene by slowly manipulating the music from a lovable and heartfelt song into something twisted and disturbing to give the impression our character is slowly realising he is trapped in a nightmare.

We did this with some default plugins found in Adobe Audition. The plugins we used can also be found in Premiere and other editors, or even free DAWs like Audacity. So if you don’t have access to purchased products, you can still achieve this effect.

The trick to making this technique work is juxtaposition, which is essentially a fancy word for something with heavy contrast. The heavy contrast for this technique is picking a song which you’d not recognise as being scary, spooky, or horror-like, which means when we manipulate it, it will amplify the juxtaposition and we will be left with something very disturbing to add to the freaky images on screen.

Juxtaposition is the reason why Tiptoe Through The Tulips sounded so scary in the horror film Insidious.

The nightmare scene in The Asylum Groove also includes some sound design elements to help emphasise the disturbing scenario even further. We have a video all about sound design elements and how to use them.

Okay, that’s enough card dumping, let’s get started. I downloaded a song from premiumbeat called Devoted To You. It’s cheerful and positive.

EQ

The first thing we want to do is play with the EQ and reduce the full-of-life sound into something small and tinny. We can do that by selecting an EQ plugin. I’m in Audition, but this will work in pretty much any editor or DAW. I’m going to usce a 10 band Graphic Equalizer; this is one of the easier EQ plugins to wrap your head around but also gives some flexibility.

Episode.00_02_20_11.Still003.jpg

Right now the EQ is in a straight line. This means the frequency bands are all even. To make this song sound tinny and reduce its fidelity down to something more sinister, we want to create a ramp going up hill to the right.

Reducing the bands on the left will cut the bass from the song, and increasing the bands on the right will amplify the treble, giving us a very low fidelity song which sounds like its coming from a old, cheap speaker.

Episode.00_02_36_16.Still004.jpg

Sometimes when you do this, you might notice it will clip the audio. If this happens you will find a master gain fader somewhere in the plugin which you can adjust to stop it from peaking.

Obviously, this is all to taste, so adjust what you think works for your film.

Reverb

The next thing we want to do is add some reverb into the mix. There are a ton of different reverb plugins and settings, so I would suggest picking something straight forward like convolution reverb and trying out the different presets until you find something you like.

Episode.00_04_07_01.Still005.jpg

The purpose of this plugin is to give the impression that the room is bigger. More reverb basically means more space for sound to bounce around an enclosed space, so by adding reverb onto the song we are trying to make the character seem smaller in the scene by increasing the size of the room. This is psychological emphasis.

Pitch Shifter

Next up we have pitch shifting, which is the first plugin which REALLY gives the song a eerie and uncomfortable feeling, contributing to the nightmare effect.

With this plugin, you want it to be subtle. If you go too far in either direction, you get chipmunks or a bad darth vader impression, so be sensitive with this one.

Episode.00_04_49_18.Still006.jpg

With the pitch shifter, we will decrease it two semitones. This will make the song change in key and will start to sound a little weird. Coupled with a slow fade-in with this plugin, it should provide us with a really strange final effect.

Echo

Next up we have echo. This is very similar to reverb, but instead of simulating a change in the size of the room, we are creating feedback which echoes more clearly.

The idea behind this plugin is to generating a disturbing, paranoid voice in the back of the character’s head, as the vocals repeat over and over from the echo.

Episode.00_05_23_03.Still007.jpg

Play around with the echo presets until you find something which has tight echo with a quick decay. You don’t want to pick something which lingers too long or has an extended delay.

A delay plugin will give similar results.

Chorus/Flanger

Last but not least, we have chorus and flanger. This effect is basically to create the most weird sounding, alien abduction simulating, vocally destroying sound effect.

Episode.00_06_38_07.Still008.jpg

This effect will add some paranoid static to the mix and will throw the sound from right to left and back again. We can go aggressive with this one. We want to hear it slowly destroy the song.

Crossfading

Once you have your song completely messed up and sounding really sinister, we can fade in the effects. To keep it simple, I’m just going to duplicate the track and crossfade between the clean song and the crazy-weird one.

Episode.00_06_56_11.Still009.jpg

You will want to choose the best time to cross between the realms. And you might want to consider fading in each effect separately.

Extras

To sell the effect even further, I added a few sound design elements along with some foley art and the dialogue in the scene. And wouldn’t you know, we have a video about foley art!


This video was Sponsored By

🎵 http://bit.ly/tflpb-devotedtoyou - Click here to download this episode's track. Check out Premiumbeat.com to discover a huge range of exclusive royalty free music!


DISCLAIMERS:

Some of these links are affiliate links, if you purchase gear via these links The Film Look will receive a small commission, but there will be no additional cost to you. Thank you!

Handheld Camera Gimbals: Does a Filmmaker Need One?

Do filmmakers need to use a handheld gimbal to make their films? This is a question and a video we’ve been wanting to make for a while and it has been made possible by Per Gear.

They have sent us over the Zhiyun Crane Plus to help answer that question.

Just to start off, we are not going to go into detail about how to set up the Zhiyun Crane Plus. There are lots of other great videos on YouTube that do that. We’ve linked to a video we like in the description below.

There are 3 key tips we have learned about using a handheld gimbal. The first is, spend time balancing and unbalancing the gimbal.

This will help you learn how it works, and the process of setting it up will become quicker which is key on set. The more balanced the gimbal is, the steadier the shot will be.

The second tip is, practice operating it before you use it on a film. A handheld gimbal like the Zhiyun Crane Plus will do 90% of the work, but the other 10% is up to you.  

Walk around with it, follow a subject, and review the footage. We did this when we first got the gimbal by recording a whole Film Look video.

Which you can find here.

The 3rd tip is for when you are preparing to use a gimbal on a film. Block out the scene and walk through the camera movement with your actor or a stand-in. Also, add t-marks so you know where you need to hit.

Right! Let's test the gimbal to see when it can help improve a shot.

Gimbal-Review_V2.gif

We have set up 3 different shots you might find in a film and will be versing the gimbal up against shooting the same shot handheld and on a tripod to see which one works best.

First, let's start off with a simple walk and talk. Our character is on the phone to his local pizza shop ordering a pizza.

Gimbal-Review_V1.gif

This is not really a dramatic scene so by using the gimbal we can walk in front of the actor and capture the whole scene in one take.

Capturing this shot on a shoulder rig gives you a very similar shot, but you do have more camera shake, which would be perfect if our character is angry because his pizza is late, as it would link the feelings of the character to the style of shooting.

Shooting this shot on a tripod limits your movement. You can have your character walk towards the camera from a distance like we did.

You could also use this to your advantage and deliver the key lines of dialogue to your audience when your character is at their closest point to the camera.

You can achieve these walk and talk shots using these 3 different methods, but the gimbal gives you the ability to achieve all 3. Next, let's shoot a chase scene with the gimbal.

Jimmy 9 Fingers is being chased by the police as he has just robbed a shop.

Gimbal-Review_V3.gif

The start of the gimbal shot is steady but as soon as we wanted to pan quickly to keep up with the movement of our character, the gimbal could not keep up with the speed of the motion.

By using the shoulder rig, the camera operator could quickly whip pan and follow the actor.

The footage does have camera shake, but we think this works well as it, again, links the style of shooting to the motivation of the character; fast, on edge, and scrambling down the stairs.

We did record a shot with the gimbal which worked, but we had to simplify it, and instead, used the gimbal like a crane, which is another advantage of the handheld gimbal.

Finally, we shot the scene on a tripod and covered it from a few different angles. This allowed us to bring up the pace of the scene and capture reaction shots of our character.

We do think it is possible to capture this shot on a gimbal, but it may require more crew to help keep focus and equipment like handles which attach to the gimbal.

The biggest limitation of using a handheld gimbal with this type of shot, is that we don’t have the ability to pan the camera quick enough, but someone who is operating the camera on a shoulder rig or tripod can easily keep up, as there is no fighting with the technology.

The final shot is simple; our character has just finished making a cup of tea. They walk over to the table, sit down, and are shocked by something they read on their phone.

It was difficult to keep this shot level when filming it on the shoulder rig, which is one of the main advantages of using the gimbal.

Filming this shot on a tripod, again, limits our movement, but the same story is being told.

If we had planned to shoot this shot on a tripod from the start, it would have saved us time as operating the gimbal took time to get the movement right.

These are just a few examples of how you can use a gimbal to capture shots for your film. We previously made a video about using the gimbal to capture a motivated camera move called “coming to a halt”, where our character and camera meet each other during a dramatic moment.

If you want to check out that video you can find it here or in the description below.

When we started to use the Zhiyun Crane Plus we were surprised how many new creative ways it allows you to move the camera and how accessible it is.

There is a learning curve, but it does not take much time before you can capture smooth looking footage.

So should you buy a gimbal to use on your productions? You will have a lot of fun using one and it is another tool which will open up new cinematic possibilities which you may not have thought about before using one.

Gimbal-Review_V4.gif

If you’ve had a gimbal in your shopping basket for a while we would definitely recommend getting one.

It can't be used to shoot everything and the camera movement should always be dictated by the drama that is unravelling in your scene.

Sometimes a tripod or a handheld camera will be better, so it’s about using the right tool for the job.

Thanks, again to Pergear for sending over the gimbal, it made it possible to make this video.


This video was Sponsored By

🎵 http://bit.ly/track-the-funk - Click here to download this episode's track. Check out Premiumbeat.com to discover a huge range of exclusive royalty free music!


DISCLAIMERS:

Some of these links are affiliate links, if you purchase gear via these links The Film Look will receive a small commission, but there will be no additional cost to you. Thank you!

24 Filmmaking Tips

With every film, we’ve always learned something new and when we made our short film The Asylum Groove this was definitely true.

In this video, we are going to share 24 filmmaking tips, tricks, or hacks which can help you, make your short film.

Let’s get straight into it.

1 - Use your character's costume to help tell the audience about their backstory. For example, clothes that don’t fit shows they can't afford new clothes and may have been handed down to them.

2 - The same goes for clothes that are unironed, this shows the character does not take much pride in what they are wearing.

2.gif

3 - Or it helps to show a turning point when your character has stopped caring about what they look like for whatever reason.

4 - Create a mood board from past films to help with how you would like your film to look. This will give you a direction to work towards when it comes to creating your film.

5 - It will also help others to see what you are trying to achieve.

6 - Don’t just use reference images from films, look at other pieces of art. Google Images can be your best friend.

7 - A good prop can introduce who a character is without any words of dialogue being spoken. If someone flashes a police badge we know straight away they are police.

7.gif

8 - The version of a prop you use is also important. A plastic mop and bucket are a lot more modern than a wooden mop and metal bucket. A vinyl record can also help to set the film in a particular era or shows your character is a little old school.

9 - Build your story around a pre-existing location you already have access to. This will give your set a bespoke feel with a lot less work.

9.gif

10 - The right crew is more important than the camera, chose that first.

11 - When casting an actor, let them read the whole script. Don’t be too precious about other people reading it; it might convince a great actor to accept the role.

12 - If your script doesn’t include many lines of dialogue, ask your auditionees to read a monologue which they think suits the role instead.

13 - Then once they have performed it, direct them to act the same monologue but with a new character motivation. If they can take the redirection now, it is a good indication that they can mold to your vision on set.

14 - If you have many different actors coming in to read for the same role, ask them to read from one particular scene. This will allow you to see many different versions of the same character.

15 - Record auditions so you can review them side by side later on.

16 - Use these DIY T-Brackets as t-marks so your actor knows where they need to hit their mark.

16.gif

17 - Gaff tape the DIY T-Brackets so they can easily be seen.

18 - Don’t underestimate rehearsals. The more time you spend with your actors, the more they will understand what you require from them before the shoot day.

19 - In fact, spend time talking to your crew before the shoot so everyone is working from the same plan.

20 - Create key phrases for each character’s emotional beats throughout the script and add them to the storyboards. This will help you give quick directions when on set.

21- When you need an authentic shock from your actor, pop a balloon next to them.

21.gif

22 - Use a door wedge to help level out your camera when it’s on uneven ground.

23 - Add tape your lens so you can set the focus marks you need to hit.

24 - When working with other filmmakers, find out which areas they are most passionate about, and take advantage of their skills.

If you want more filmmaking tip and tricks, check out our 100 filmmaking tips in 10 minutes video here.


This video was Sponsored By

🚀 http://bit.ly/rs-aspect - Give your video a clean look with Aspect by RocketStock. It features over 200 logo reveals, intros, lower thirds, overlays, icons, and transitions.

🎵 http://bit.ly/track-hot-fusion - Click here to download this episode's track. Check out Premiumbeat.com to discover a huge range of exclusive royalty free music!


DISCLAIMERS:

Some of these links are affiliate links, if you purchase gear via these links The Film Look will receive a small commission, but there will be no additional cost to you. Thank you!

Short Film Post-Production Workflow | Part 2

A well-planned post-production workflow, even as a zero budget filmmaker, will save you a lot of time and prevent any hiccups during editing, sound design, VFX, and colour grading.

Once you have a picture lock, it’s time to share the edit and work on sound, music, VFX, and colour grading; and for some, this can be done all at the same time by a team of collaborators.

Editing-Workflow-Part-16.gif

Last time, we spoke about organise and sync, first picture assembly, initial feedback, re-edits & picture lock.

So now you’ve made the decision to lock the edit. You are happy with the cut, and any other edits will be strictly for emergency changes. You’ve already gauged feedback from other filmmakers, you’ve made those changes, and now it’s time to move on.

This is where we can branch out. If you, alone, are the sound, VFX, music, and colour grading department, then you can follow these steps in a linear fashion. But if you are a team, it’s time to divide and conquer these tasks.

First, let’s talk a bit about VFX.

Editing-Workflow-Part-2.gif

This is the only department which may need access to footage BEFORE the picture lock. The visual effects in the film will influence the sound design, music, and colour grading. So if it is at all possible, visual effects should be the first to get their hands on the edit.

If you already know which VFX need to be added to certain shots, the visual effects department can begin working during the editing process, but please be aware that some shots might be cut. So this is a balance between getting in there early and not wasting time on shots that won’t make the final cut.

Next we got sound design.

Editing-Workflow-Part-21.gif

With an export of the edit, the sound department can start to work on Foley Art. Foley can be a long process as it includes re-recording all the run of the mill sounds in sync with the edit, and experimenting with sound effects libraries.

We’ve covered foley in a bunch of episodes in the past. There’s a card in the corner and a playlist in the description if you want to learn more.

In the meantime, a colourist can be working on the colour grade.

Editing-Workflow-Part-22.gif

Just as sound design only needs the edit for sync points, colour grading doesn’t affect the sound in any way as it’s all visual, so these two can be easily worked on at the same time and brought together in the end.

Then you’ve got music.

Editing-Workflow-Part-24.gif

A locked-picture will give the composer the exact timing to create and tweak the music throughout the film. Having the edit in front of them while they compose will also give them inspiration in the images.

There might be something in a scene which they want to harness and use as a musical device, so giving a composer the edit will let them work their magic to its full potential.

Visual Effects make this process of divide and conquer a little more complicated.

VFX is the only department that will cause the other departments further changes. If you are working on your own, I would suggest working on the visual effects before sound, colour grading, or music.

Editing-Workflow-Part-27.gif

Once the VFX have been produced, extra sound effects will be added to the sound design, gunshots and explosions and spaceships for example. The colour grade might need tweaking once the VFX have been applied also.

Basically, every department will produce a another draft of their work with the final VFX in mind.

Once all the departments are finished, it’s time to put everything back together. This brings us to quality control.

Editing-Workflow-Part-28.gif

Device testing and volume referencing are key contributors to a great looking and great sounding film. We’ve covered these topics in another video if you want to check it out. There’s a card in the corner and a link in the description.

Once you feel you’ve done everything you can with the film, it’s time for one last feedback stage: the 99% feedback stage.

Don’t say you are finished just yet! You might jynx it. Show the film to as many of your filmmaker friends as possible, or least the ones who give great critical feedback. You’ve already asked them but there might be something which they point out which nobody has before, so it’s worth doing one last check.

Make any last minute tweaks if the feedback requires it, then hit EXPORT. After this comes the hard part: convincing people to watch your movie!


This video was Sponsored By

🎵 http://bit.ly/tflpb-paranormalsynths - Click here to download this episode's track. Check out Premiumbeat.com to discover a huge range of exclusive royalty free music!


DISCLAIMERS:

Some of these links are affiliate links, if you purchase gear via these links The Film Look will receive a small commission, but there will be no additional cost to you. Thank you!

Short Film Post-Production Workflow | Part 1

Editing is a particularly interesting process. After long days of shooting, you are finally placing down the building blocks for your film, and you can begin to see how it all flows.

But with a lot of things to complete including the picture lock, sound edit, music, and colour grading, it can sometimes feel like a mammoth task, especially when working with a lot of footage and sometimes with multiple post-production collaborators.

Editing-Workflow-Part-1.gif

So today we are going to share with YOU some tricks WE’VE learned along the way which will help give you a smooth workflow and divide and conquer your post-production elements.

Everyone’s post-production workflow is a little bit different. Today we are going to share ours, but we’d also love to know your post-production workflows. If you have any useful advice, drop them in the comments below!

First things first, let's map out the whole post-production process:

Editing-Workflow-Part-12.gif

We’ll be covering organise and sync, first picture assembly, initial feedback, re-edits & picture lock, sound, music, VFX, colour, quality control, device testing, a 99% feedback stage, last minute changes, and EXPORT.

Editing-Workflow-Part-13.gif

You can see that this isn’t a linear process - as it is stackable in places. This is to accommodate multiple artists working at the same time. But we will get into that once we reach these stages.

Let's get the boring one out of the way: organise and sync

Have you ever been working on a film, then suddenly you are greeted with a message telling you it can’t find a bunch of footage?

Or, did you think that because it's only a short film you don’t need to put anything in folders, to then discover you regret the complex mess you’ve now made?

Getting organised before you edit will prevent any of these headaches from happening.

We’ve covered organise and sync in a previous episode.

One more thing we’d like to add to organise and sync is labelling usable takes.

On our recent short film The Asylum Groove, the 2nd AC Mr. Adam Opie, took note of every take from the shoot and noted down bad takes, good takes, and great takes, including if there were any particular things to look out for.

During organise and sync, we followed Adam’s notes and labelled each take using different colours. Red being unusable, orange as emergency spares, blue as good takes, and green as the best takes.

Next up we have the first picture assembly.

If post-production was compared to building a house, this would be laying the bricks. The first assembly is there to build a foundation on the timeline.

Take your footage, cut yourself an edit, and get it to a watchable standard, but don't start working on colour grading or VFX yet, as you may end up working on shots which will be cut short or cut all together during the next editing stage.

You CAN spend as long as you need on the first assembly, but just remember that the next stage is FEEDBACK, so don’t worry about working on frame to frame details just yet, and be open to your peers’ interpretations and opinions on the cut.

If you are looking for creative advice on editing check out the channel THIS GUY EDITS. He’s got plenty of educational and entertaining videos all about how powerful editing choices can be for your films.

If there was one mistake made by some of us zero budget filmmakers, it’s not letting people see the edit before upload!

This is the next crucial stage in post-production, initial feedback.

During the editing process for a short film, there may be some things which you don’t notice, and when you are looking at the footage for a long time, you start to become “edit-blind”. You start to anticipate the cuts and the edit no longer feeds you new information which means you are no longer watching the film from an audience perspective.

Find your filmmaker friends, buy them a coffee, sit them down, and ask them to review your edit.

Find a mix between people who know the story, such as the crew who helped work on the film, but also find some filmmakers who know very little about the project so they can give you a accurate first impression of the film.

And if you need to, ask your family to watch it. But just make sure they understand that this ISN’T the finished product, and ask them specific questions to gauge their feedback as they might not know what to say until you ask them.

Next up we have re-edits.

The first thing you should do once you have a list of feedback is step away from the edit. Step away for a few days and come back with fresh eyes and a fresh perspective.

When you come back, watch the current draft of the film and make notes. Then compare these notes to the feedback you were given and start to work on the next draft of the edit.

A lot of the time, you’ll be given technical feedback: “This could be cut shorter”, “This shot was jarring” “The montage was a little too quick.”. This is feedback you can use to help give the audience a better viewing experience.

You might also get feedback from a storytelling perspective. “I didn’t understand why this character did this”, “the character's motivations are unclear”, “why was he mopping?”. This is feedback which is harder to fix in the edit, but if you have enough coverage, you might be able to solve it by extending the length of a shot or placing that insert back in.

If you can’t solve it in the edit, and it’s a MASSIVE detriment to the film, please consider shooting some pickups and retakes.

We actually had this issue with our short The Asylum Groove. There’s a moment when the character trips over a bucket and hits the floor. We had coverage of the fall but no takes where we see our Actor Chris actually make contact with the ground, which made the edit very jarring.

Editing-Workflow-Part-15.gif

So we scheduled a day to return to the location and shoot it. Without it, it just looked weird, so shooting those pickups were worth the extra time and effort.

The feedback you get will be VERY subjective: sometimes it's invaluable, sometimes it is just a matter of different taste. But this is your film, and it’s your decision. If you wholeheartedly believe the cut works the way it is, then keep it. But, if multiple people point out the same thing, consider changing it up.

This leads us to the picture lock.

Editing-Workflow-Part-16.gif

At some point, you have to make the decision that you can’t do any more to the edit! A picture lock is a promise NOT to change the edit. This is so departments such as sound design, music, VFX, and colour grading can begin to work.

I say “departments”. I imagine most of you, and us included, are just a bunch of people trying to make cool films. But officially, these are “departments”, so let’s stick with that.

All of these departments will need a finished picture to work with. And by “locking” the picture, it means each department is working from the same source, which means when they are finished, they can simply plonk their work into the edit.


This video was Sponsored By

🎵 http://bit.ly/tflpb-paranormalsynths - Click here to download this episode's track. Check out Premiumbeat.com to discover a huge range of exclusive royalty free music!


DISCLAIMERS:

Some of these links are affiliate links, if you purchase gear via these links The Film Look will receive a small commission, but there will be no additional cost to you. Thank you!

Add Impact to your Edit with Sound Design

“Sound effect” is a broad term. You’ve got hard sounds like gunshots, foley sounds like footsteps and clothing, and background sounds like wind and city streets.

And finally we have sound design elements. These are sounds that tend to be used to aid the edit and give plot points added drama.

Sound-Design-to-Aid-the-Edit-2.gif

Today we are showing you how using sound design elements can give your film extra impact and a smooth but pacey edit. 

We’ll be using our film The Asylum Groove as a reference, so if you haven’t seen it yet, there will be a card in the corner and a link in the description.

In this scene, our character Sam is about to pour water over his head which causes him to wake up from his daydream and suddenly slip into a nightmare.

Sound-Design-to-Aid-the-Edit-21.gif

In its current state, the scene feels lacklustre. This moment is supposed to aggressively transport our character from his happy place to a dark place and invoke a strange mix of false realities, so we can start to layer up some sounds which will get us there.

Firstly, let's grab a punchy sound, and add it onto the cut mark.

Sound-Design-to-Aid-the-Edit-22.gif

If we place this on the cut mark, it should give us that instant BANG which we need. 

Sound-Design-to-Aid-the-Edit-24.gif

Okay, this is getting us somewhere! But there are a few missing elements.

At the moment, the sound is sudden, and it almost feels like it's trying to be this cheap jump scare. So we need to include some suspense. We can add a sound element which will hint to the audience that something dark and mysterious is about the happen.

We need to add a crescendo, which is a sound which rises in volume or intensity.

Sound-Design-to-Aid-the-Edit-25.gif

We can create a crescendo from our existing impact sound. If we duplicate the that sound, then reverse it, it transforms from an impact into a slow rising crescendo with a strong punchy tail. 

This is a lot closer to our final desired product. Now all we need to do is find a few more sounds which we can use for layering and add them in. 

To help give the moment even more impact, I have added a few more sounds. Firstly, I layered in a low rumbling impact. This is similar to the first one but has more low end for a crunchy bass tone.

And to compliment the first crescendo, I used a hissing impact sound which I reversed.

And I also added a very short-attacking high frequency sound; a mouth click, recorded in a large room with lots of reverb.

This sound is supposed to represent the exact moment of change for the character. To me, it feels like when a magician snaps their fingers and puts someone under a spell, for our character, he is snapping out of it.

The only thing left is adding the music and manipulating it, and we have the finished scene.

You can find some great sound design elements online: checking out websites like freesound, sonniss, and 99sounds. Look for free samples, get them downloaded, and experiment.

🎹 Sound Design Resources:

https://freesound.org/
http://99sounds.org/
https://sonniss.com/


This video was Sponsored By

🎵 http://bit.ly/tflpb-paranormalsynths - Click here to download this episode's track. Check out Premiumbeat.com to discover a huge range of exclusive royalty free music!


DISCLAIMERS:

Some of these links are affiliate links, if you purchase gear via these links The Film Look will receive a small commission, but there will be no additional cost to you. Thank you!

Enhance Your Dialogue with Sound Design

A film is 50% picture and 50% sound. But the sound of your film is not just there to simply compliment the picture. When harnessed correctly, it's a powerful tool to drive the plot and help deliver the story in a really creative way.

Dialogue-Manipulation.gif

Today we are talking about how YOU can use creative sound design with dialogue to make your film more immersive and unique.

Dialogue is self-explanatory. It’s a conversation between two or people, and its sound that delivers that conversation. In film, dialogue should be clear, loud, and audible so the audience can understand what the characters are saying throughout the film.

But this rule doesn’t always have to apply!

A really simple and creative sound design technique is the manipulation of dialogue.

Let’s use one of our films, Backstage, as an example. I’ve altered the scene to help the concept. The Medium is lecturing The Flyswatter but The Flyswatter is so preoccupied that he completely zones out of the scene.

The first thing we can do is muffle the sound of The Medium’s dialogue. We can achieve this with a plugin called a LOW PASS FILTER.

Dialogue-Manipulation1.gif

This plugin cuts the high frequency and leaves only the bass, and can be adjusted for taste. It generates a sound which seems like someone is speaking on the other side of a wall. We can fade in the effect just as The Flyswatter loses eye contact, that is our cue.

A classic sound effect we can add to this shot is a “shell-shocked” buzzing tone. We can add that in and slowly raise the volume to emphasise the moment even further.

Dialogue-Manipulation3.gif

Now we are starting to get in the realm of preoccupation. He isn’t just tuning out of The Medium, but his mind is generating a numb tone.

Lets go one step further and compliment the high-frequency tone with a rumbling cinematic bass.

Dialogue-Manipulation4.gif

And the last thing we can do to help smooth out the cut to the next scene is grabbing a cinematic impact sound effect, reversing it, and placing it at the end of the scene as a crescendo.

Dialogue-Manipulation5.gif

Something as simple as some dialogue manipulation and a little bit of layering is a powerful storytelling tool. We went from the character simply staring off into the distance to BEING inside his mind.

We want the audience to feel what he is experiencing, so by numbing the sound of The Medium and adding some uncomfortably noise, it feels like we are really jumping into his head.

If you are new to sound design, it’s definitely worth checking out our Indie Film Sound Guide to get caught up with all the basics of sound for indie short films.


This video was Sponsored By

🎵 http://bit.ly/tflpb-electrodjango - Click here to download this episode's track. Check out Premiumbeat.com to discover a huge range of exclusive royalty free music!


DISCLAIMERS:

Some of these links are affiliate links, if you purchase gear via these links The Film Look will receive a small commission, but there will be no additional cost to you. Thank you!