Get Cinematic Sound with LAYERING

Foley Art is the process of recording everyday and run of the mill sounds and adding them BACK into the film.

You may think Foley is just recording everything you see in the film and trying to sync it all up. Well...it is, but it CAN be a very creative storytelling tool with a technique called LAYERING.

Foley-Art-&-Layering.gif

Without Foley, a film will feel unnaturally quiet. If there was one element of sound design you NEED in your film, it’s foley. It’s definitely worth the time and effort and will get you closer to achieving the film look.

Foley-Art-&-Layering1.gif

Layering is quite easy if you categorize sounds into different groups:

First of all, you have sounds which are low frequency: bassy, rumbly, dark sounds. Then you have mid-frequency sounds; clear, audible, and comfortable for the most part. And finally you have high-frequency; squeaky, buzzy, and sharp.

The idea of layering is to fill out the soundspace by choosing some high, mid, and low frequency sound effects and place them on top of each other. This will give the sound effect a richer tone and extra punch.

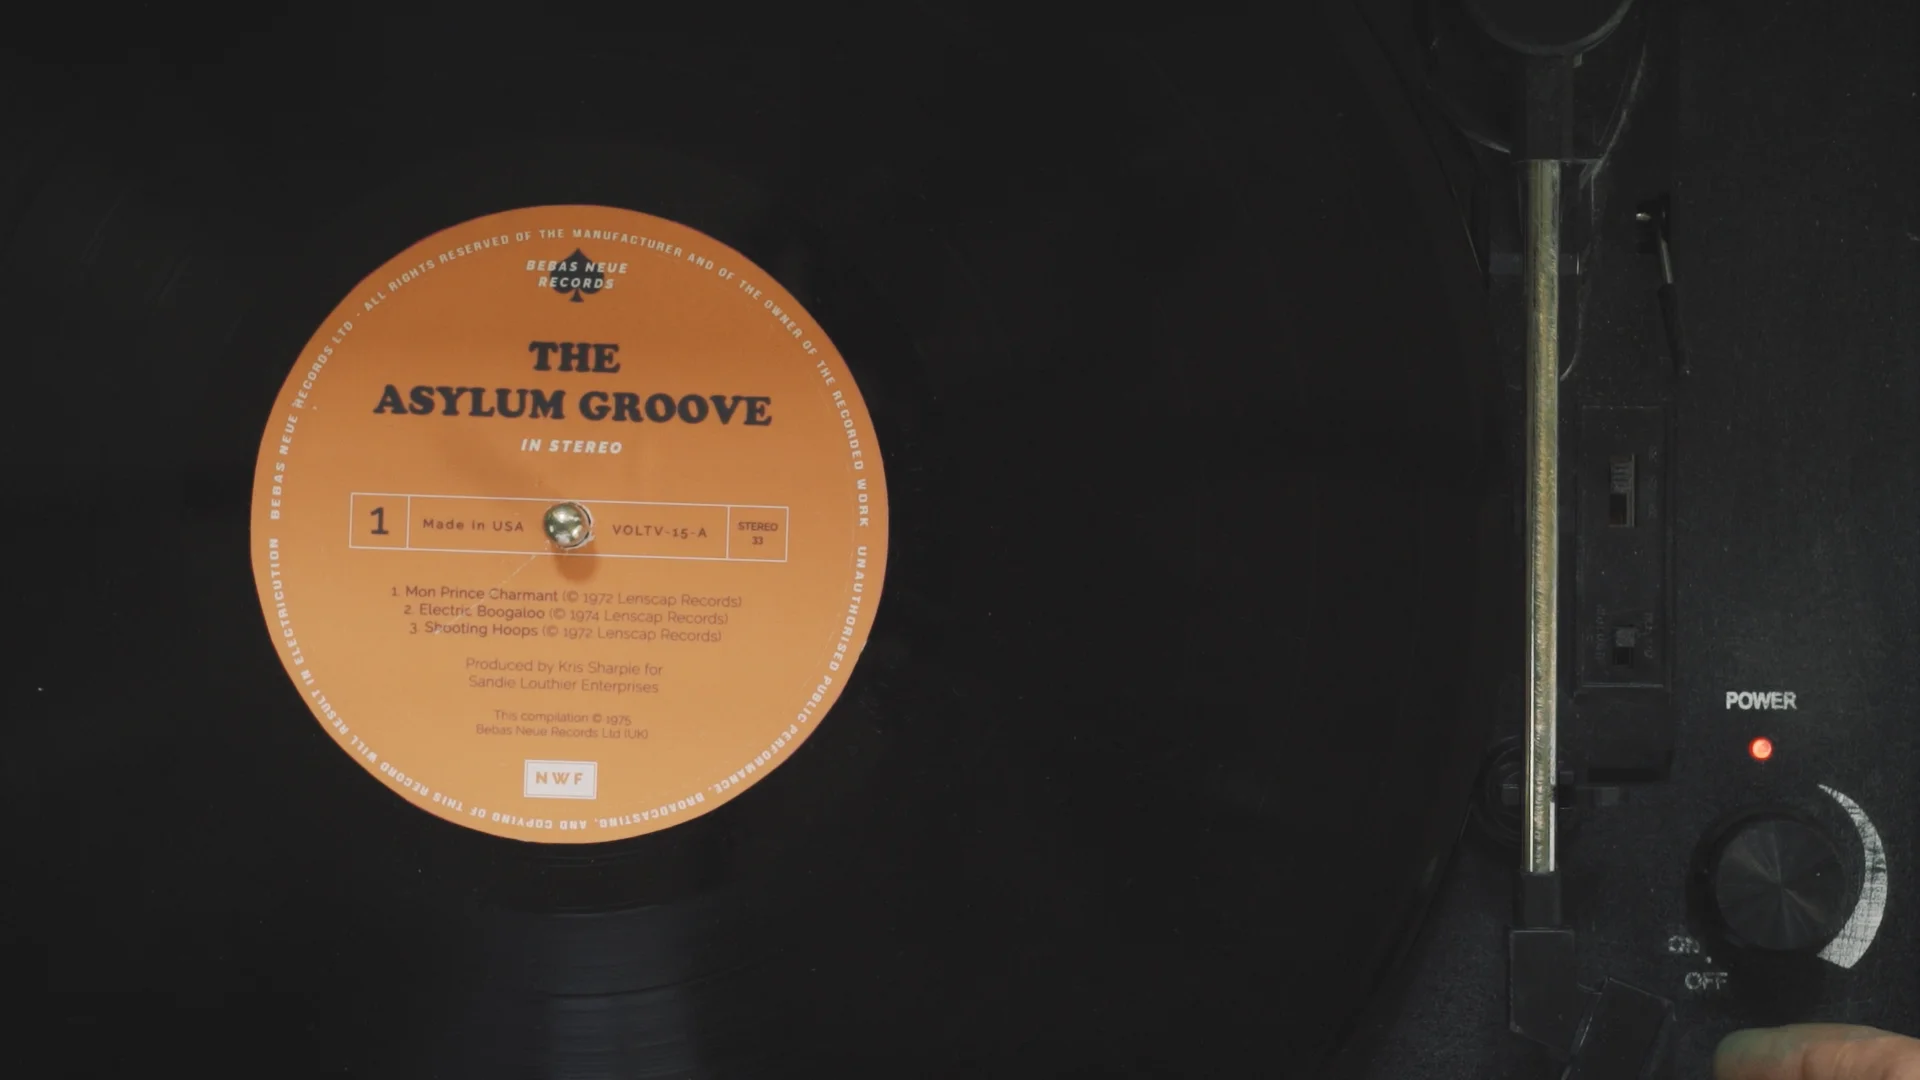
Lets use our film The Asylum Groove as an example:

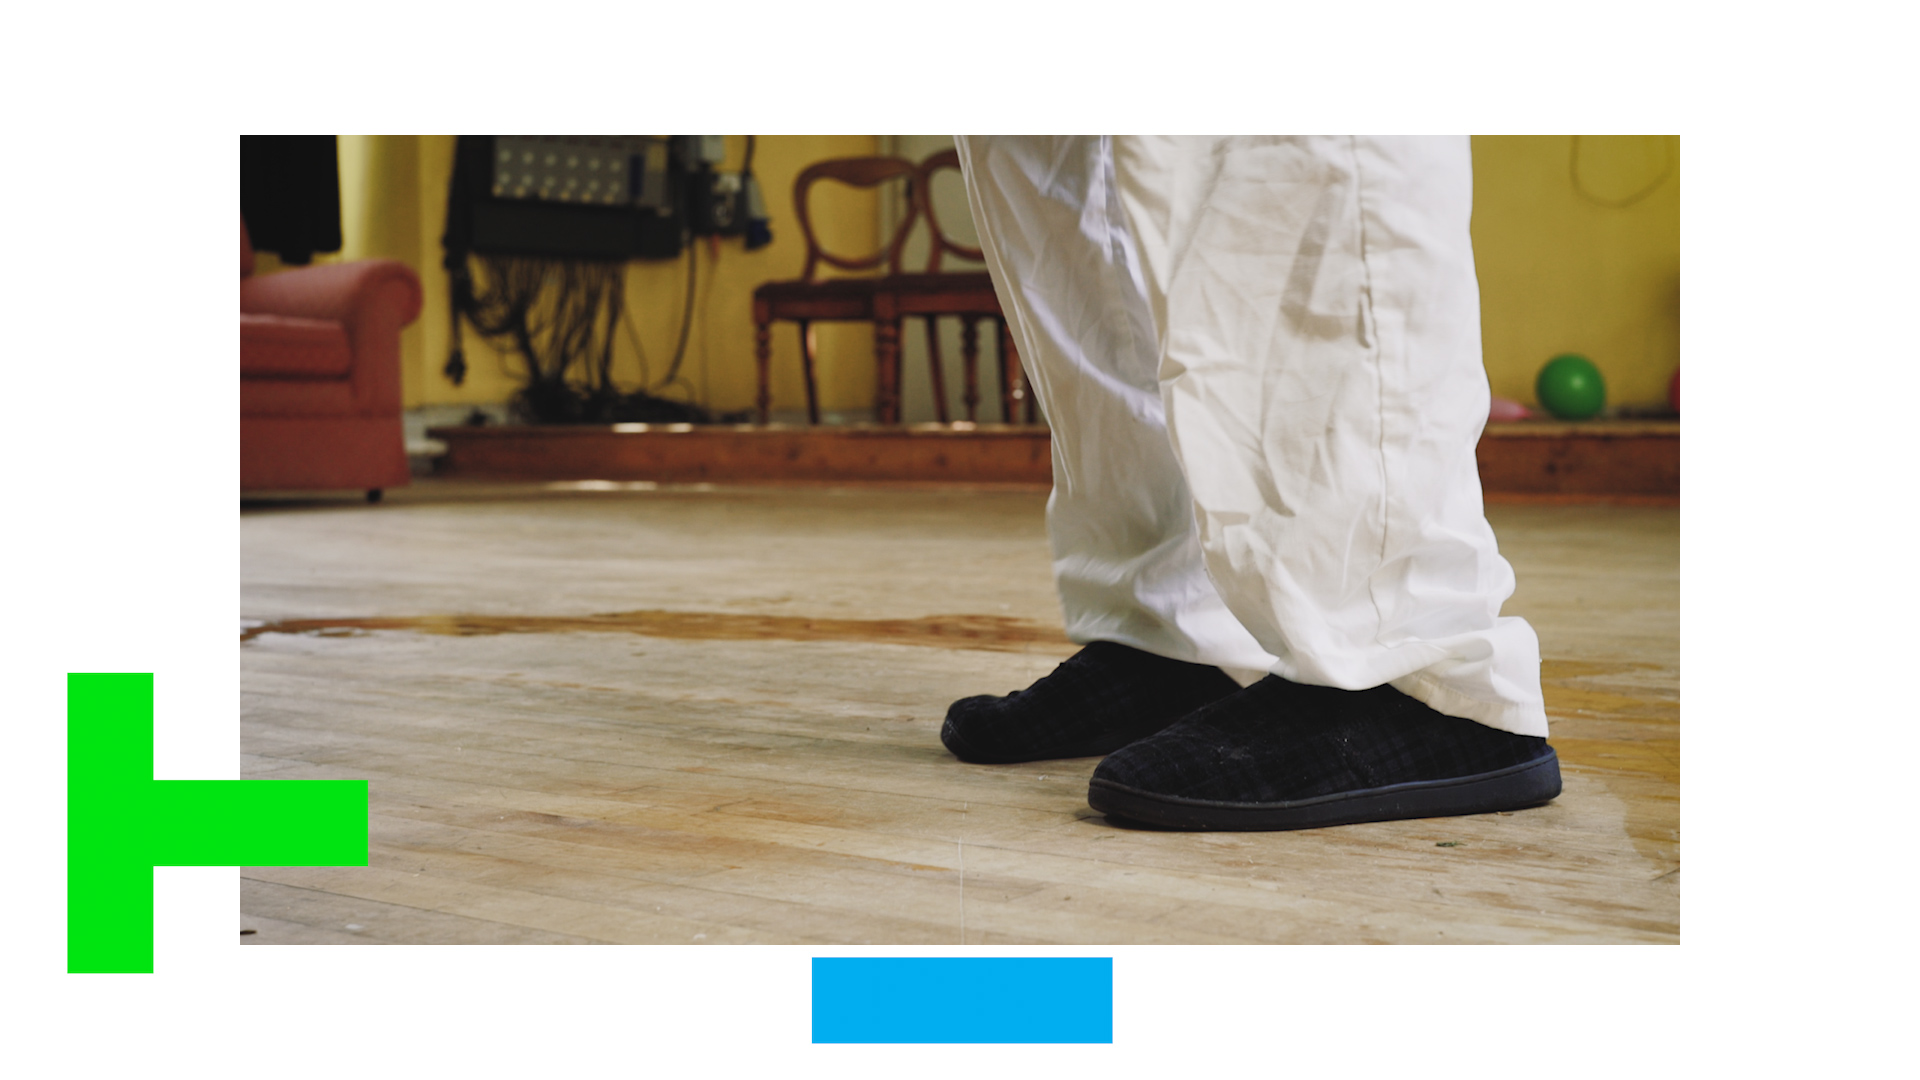
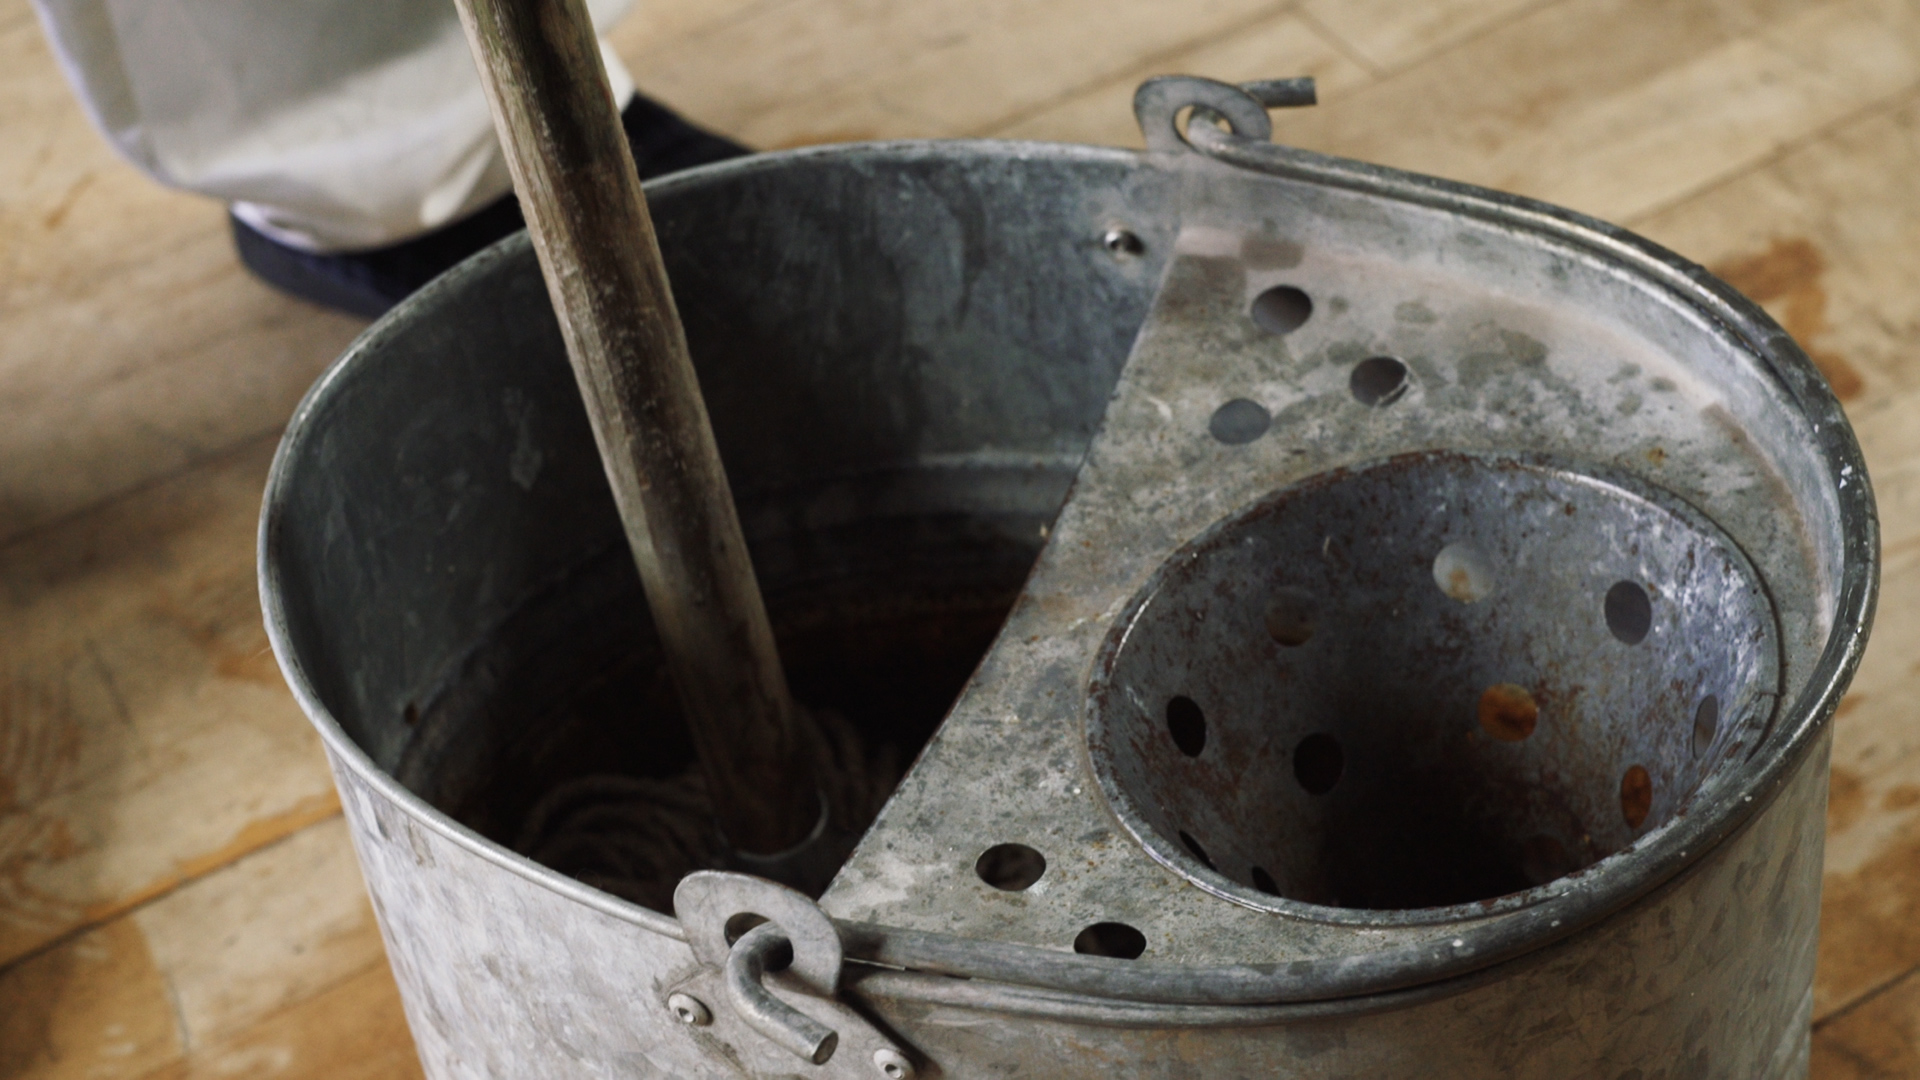
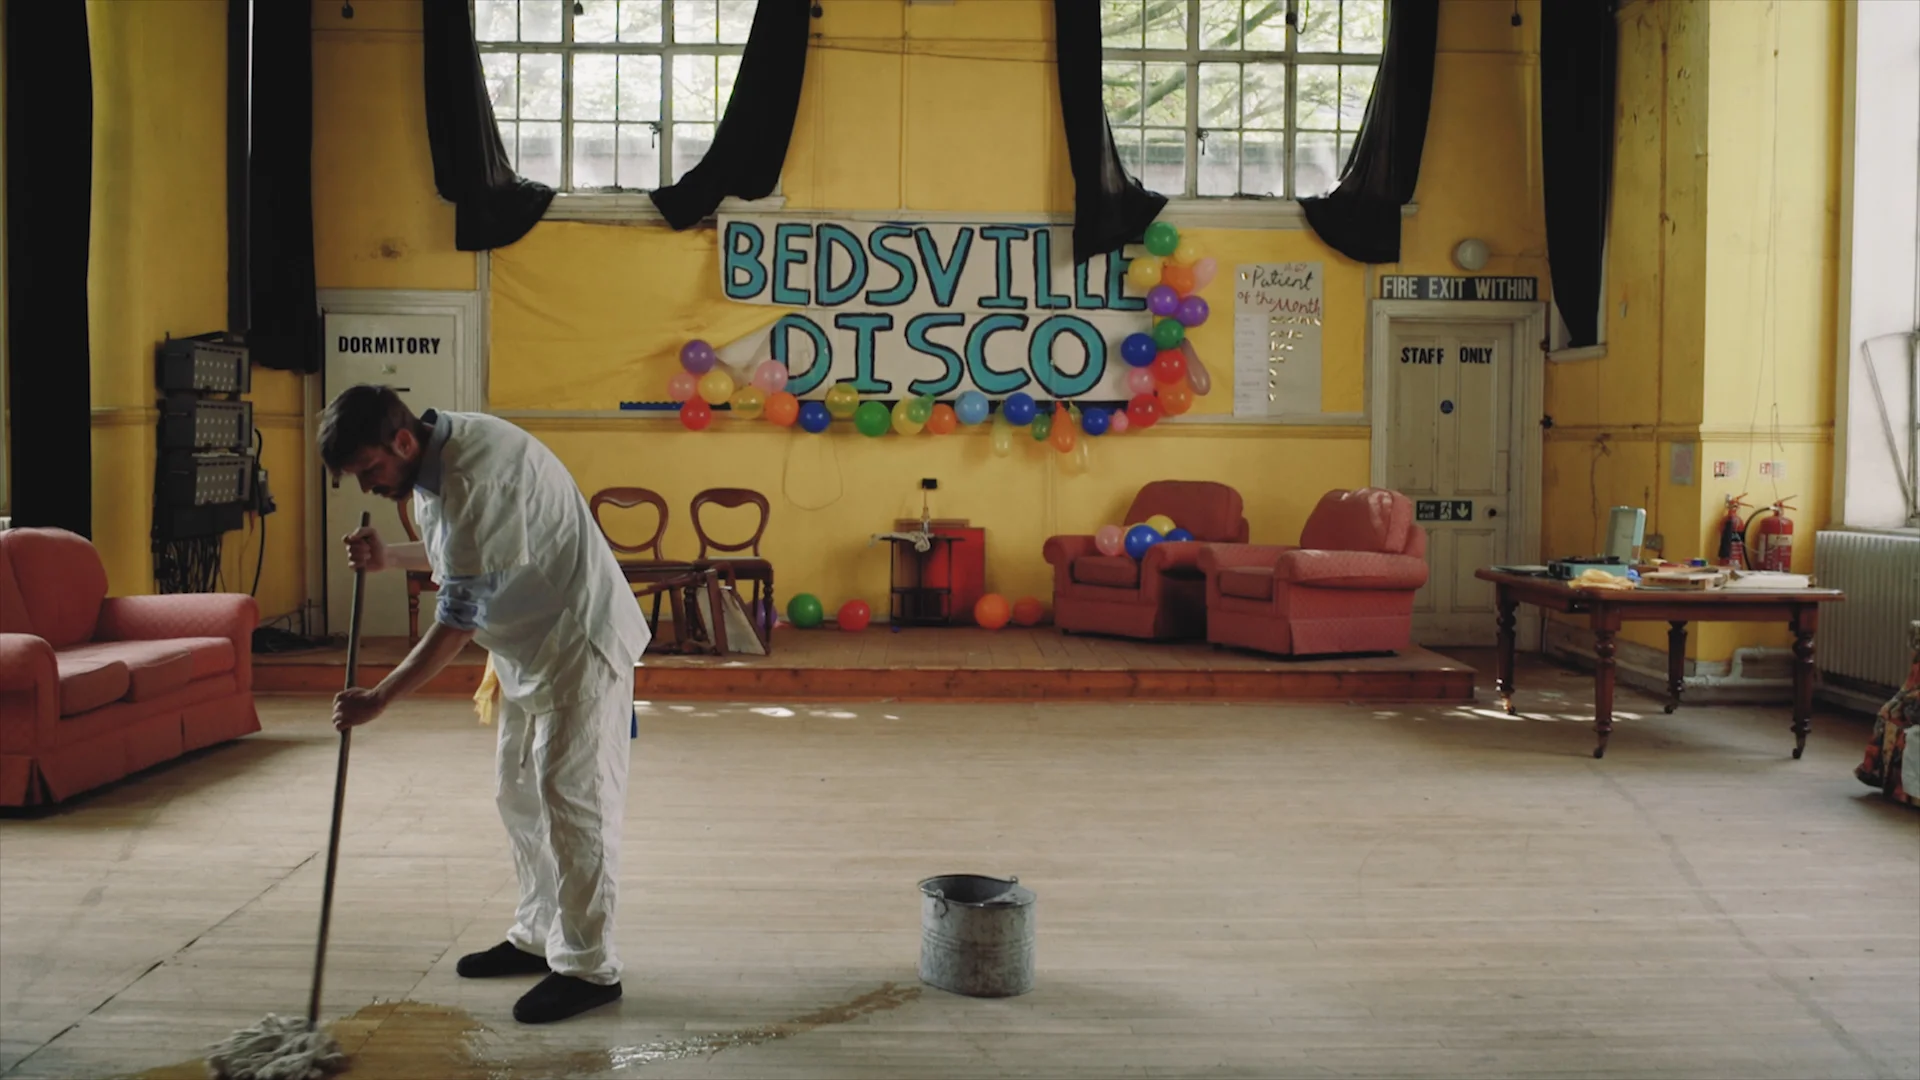
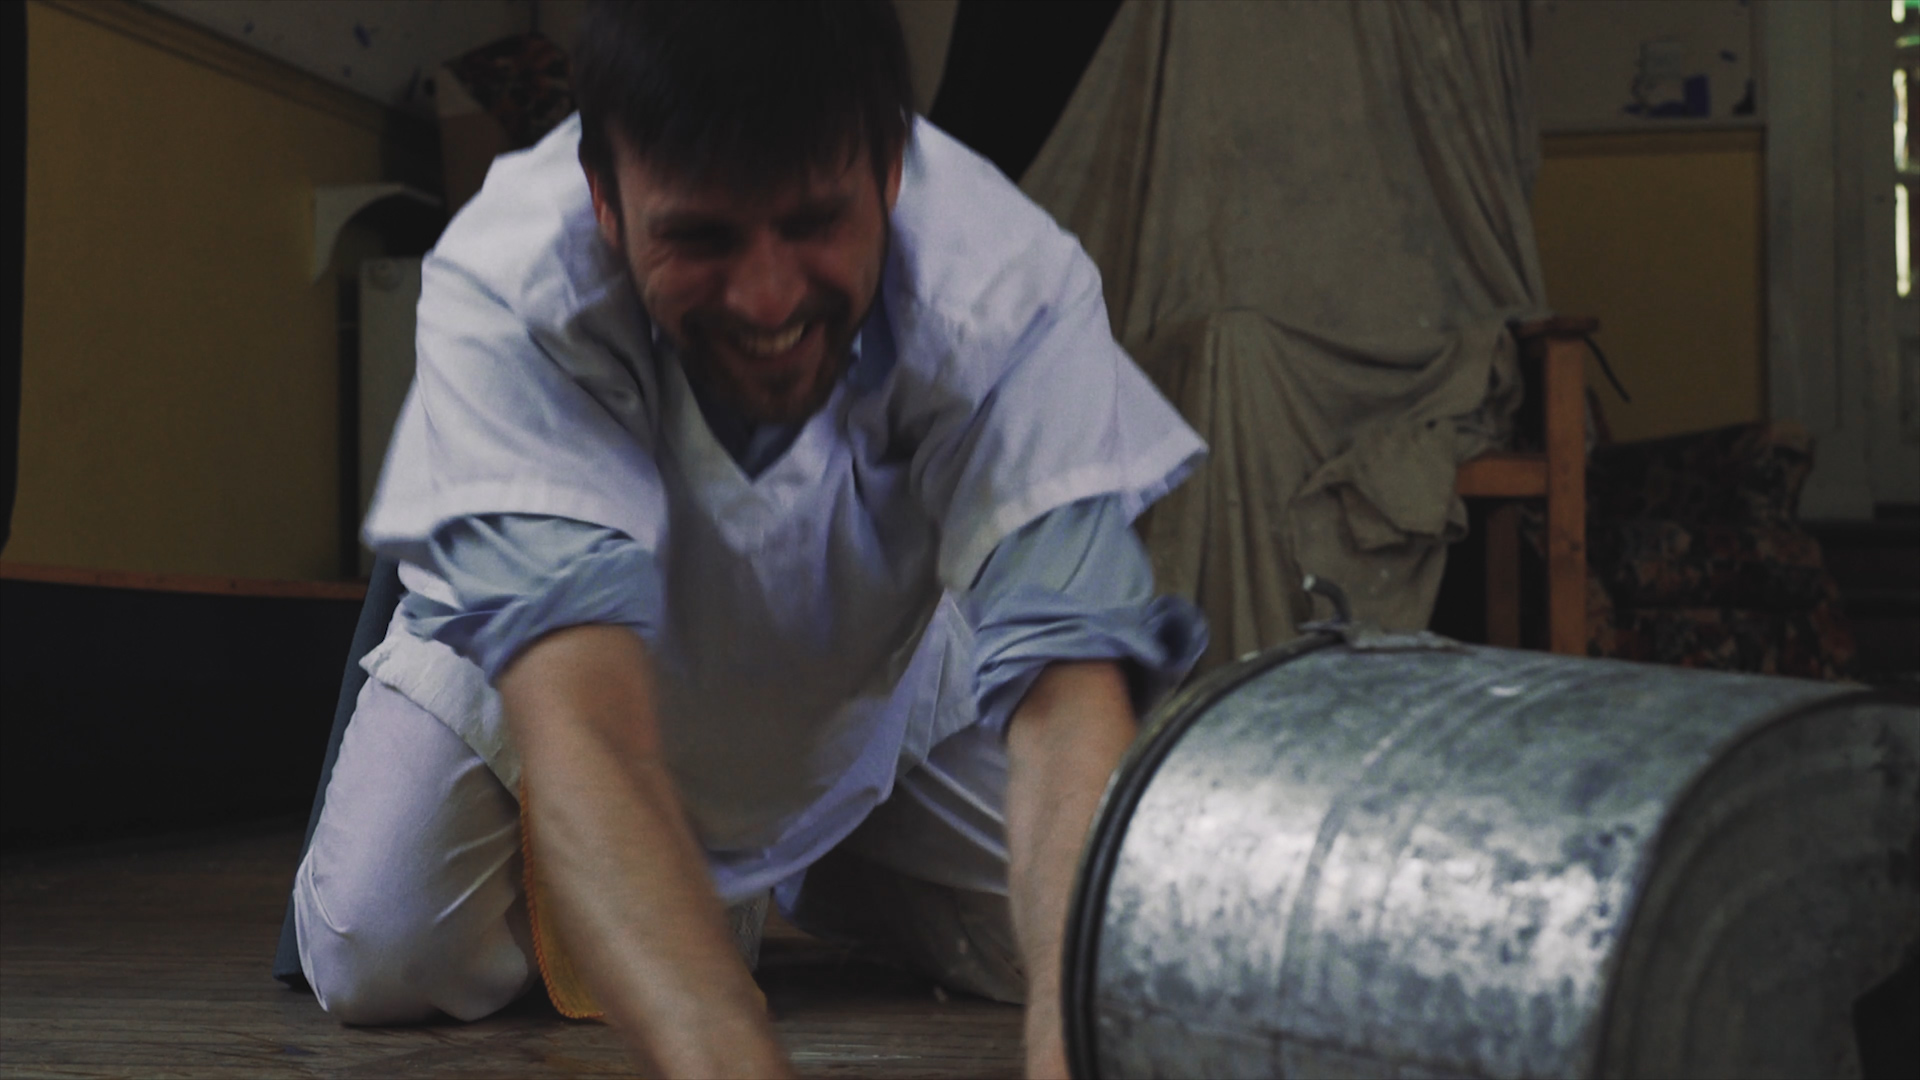
We have a moment in the film where our character Sam, played by Chris, runs, kicks a bucket, trips over, and hits the ground with a thud.

When we filmed this scene, Chris jumped and landed on a pile of cushions, so we are actually starting from scratch.

Foley-Art-&-Layering2.gif

We are going to scrap all the production audio, other than the grunt from Chris, and build it up from scratch, starting with the impact with the bucket, then the impact with the floor.

The first thing we want to do is add a bassy impact sound.

Foley-Art-&-Layering3.gif

We recorded hitting a cushion with a broom handle in the location. This sound will give the impact some weight and intensity because of the low-frequency thud and the long echoey decay.

Next we need a mid-frequency sound.

Foley-Art-&-Layering4.gif

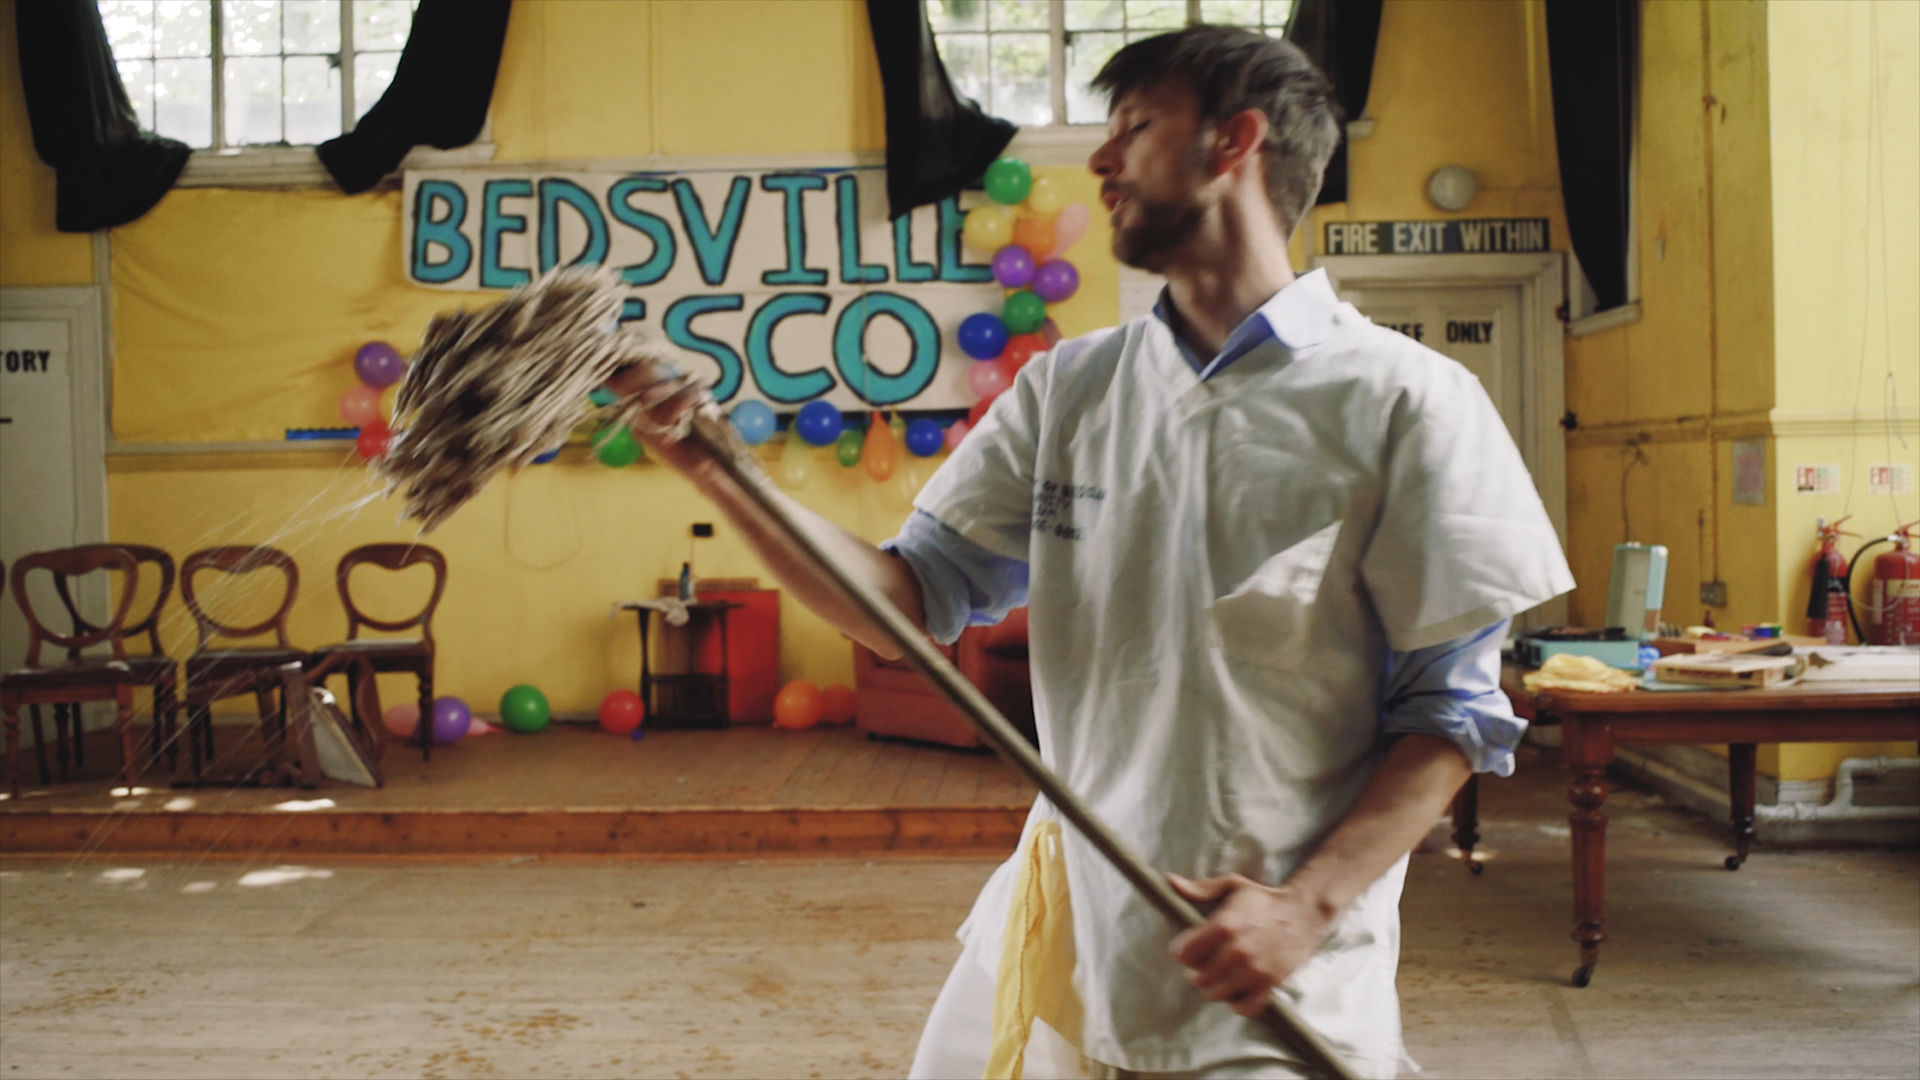
We recorded myself jumping onto a cushion. Originally I thought this would provide a bassy sound from hitting the cushion but the noise is actually coming from my boots hitting the floorboards.

In sound design there are no mistakes, only new discoveries! And the last thing we need to complement the low and mid frequency sounds is a high-frequency sound!

Foley-Art-&-Layering5.gif

As the bucket is a metal, hollow container, it will provide us with a tinny, high pitched sound effect. So we recorded picking up and handling the bucket.

One sound effect which will really bring the shot home is adding some sound for the post-impact. This will change depending on the shot you are working on, but for this shot, we used a sound of the bucket being kicked and rolling along the floor.  

Foley-Art-&-Layering6.gif

This is very likely the first sound effect you’ll record if you want a “bucket kicking” sound effect. But layering them together definitely gives the impact more cinematic punch! And this is good proof that using the obvious first choice isn’t always the best!

Once we fill in the scene with more sound effects, it really starts to give this shot life. 

With some simple layering, we have given this scene emphasise. It’s an important part of the plot and character development, so giving it some extra OOMPH helps tell a better story.

When layering, try not to add too many sound effects of a similar frequency because you will start to muddy the audio and won’t be able to recognise each sound.

And remember, you don’t ALWAYS have to fill the sound space. Sometimes two or even one sound element will do the trick.

Sound design is all about experimenting, so try things out and see what works.


This video was Sponsored By

🎵 http://bit.ly/tflpb-mrboogeyman - Click here to download this episode's track. Check out Premiumbeat.com to discover a huge range of exclusive royalty free music!


DISCLAIMERS:

Some of these links are affiliate links, if you purchase gear via these links The Film Look will receive a small commission, but there will be no additional cost to you. Thank you!

Sony to V-Lock/D-Tap Adaptor

In our review for the PD Wireless Follow System we used this to power the follow focus which is a cheaper option to buying a V-Lock battery.

The PD Wireless follow focus needs to be powered by a battery that has a D-Tap connection.

A D-Tap connection is widely used to power cameras, lights, and other filmmaking equipment and is found on a V-Lock battery.

D-tap.gif

The problem we had with buying a V-Lock battery is they are very expensive. We don’t have a cameras or lights that need to be powered by V-Lock batteries, and since we are only going to use the follow focus on a few projects a year,

And having a battery sitting there for most of the year which is worth over £150 is not really a option.

After some research we found this alternative battery source to solve our problem. It is still a V-Lock battery and it has a D-Tap output, but it uses Sony NP batteries to power whatever is plugged in. Since we own loads of NP batteries this saved us a lot of money, and it works great.

D-tap1.gif

The next problem is mounting the power source to the camera ring. There are 15mm rod rail mount system you can buy for a V-Lock Battery, but again they are very expensive. In Fact they are more expensive than the batteries, and you still have to buy a battery.

So we attached this 15mm rod mount we have laying round which is from a company called SmallRig.

Links to everything will be in the description below.

At first we attached it to the bottom of the power supply and mounted it like this to the rods. We soon realised to save space it would be best to mount it like this. It also meant you can still attach it to a V-Lock mount and power a piece of equipment with Sony NP batteries, not just via the D-Tap power connection.

Having it mounted to the back of the shoulder rig like this also helps to balance out the rig as there is more weight on the back of the rig.

There is another solution to our problem and that is to buy a cable which converts the PC barrel cable that connects to the motor of the follow focus to a DC cable instead of a D-Tap connection.

With this you will need a DC power supply which is similar to the one we use to power our camera, which you can find links to here.

This cable was not out when we purchased the first option, but works out about the same price once you purchased all of the parts.

V-Lock Batteries have there place, and are very much needed. They are super reliable and give you enough power to run your camera, monitors, and lights all day.


This video was Sponsored By

🚀 http://bit.ly/tflrs-creator - Become a social media powerhouse with RocketStock's video element pack, Creator. This collection comes packed with logo reveals, end screens, subscribe animations, and much more.

🎵 http://bit.ly/track-hot-fusion - Click here to download this episode's track. Check out Premiumbeat.com to discover a huge range of exclusive royalty free music!


DISCLAIMERS:

Some of these links are affiliate links, if you purchase gear via these links The Film Look will receive a small commission, but there will be no additional cost to you. Thank you!

Do you need a Follow Focus? | PD Movie Remote Air 3 Review

It doesn’t matter if you are shooting on the sharpest camera and lens, if your shot is not in focus, it’s not going to look very good.

Shooting retakes because of inconsistent focusing will cost you time which you should be putting to better use.

There are 3 tools, at different prices, which you can buy to help keep your shots in focus, and they all have different levels of accuracy when focusing.

90% of the time we focus by rotating the barrel of the lens with our fingers, and 90% of the time this works just fine.

Follow-Focus-with-Tape.gif

If you are shooting a film where your actor is moving from position 1, to 2, back to 1, then to position 3, keeping the movement and focus consistent will be very difficult to pull off.

To help add a little more accuracy when focusing, you can add tape to your lens which represent the different focus marks you need to hit. This will dramatically improve your accuracy and is a great budget option.

The only problem is you will have to stick tape to your lens, replace it after every shot, and because your fingers are touching the lens, you will be restricting the movement of the camera and may cause micro jitters from your fingers.

The next option is to buy a follow focus that mounts onto 15mm rods. You can set and easily wipe off the focus marks, it gets your hands away from the lens, and it makes it easier for someone else to operate.

Follow-Focus.gif

A follow focus will certainly improve your focus accuracy over the tape method.

When it comes to shots which have a lot of movement such as handheld shots, and shots using steadicams and gimbles, a wireless follow focus is preferred as the weight needs to be perfectly balanced, and someone holding onto the follow focus may throw off the balance.

PD Movie sent over their Remote Air 3 Wireless follow focus to review, but before we reviewed it, we used it to shoot our short film The Asylum Groove. We used it for shots which were static on a tripod, handheld and steadicam shots, and also shots on a slider.

There are two main advantages we found when using the wireless follow focus.

Firstly, it helps to improve the accuracy and consistency of your focus as there is someone whose sole job it is to set marks and pull focus.

This person will be the 1st AC, and if they nail focus on every take, it’s going to save a lot of time on set.

The technical side of shooting will be accurate and consistent, meaning fewer re-takes caused by technical issues, such as over-shooting focus in a shot.

This follow focus system comes in two parts. First, you have the focus motor which attaches to 19mm or 15mm rails. In our case, we attached it to our 15mm rail setup.

Depending on your lens, it may or may not come with gear rings. Our’s don’t, so we attach gear rings to the lens so we can line up the Remote Air 3 Motor with the lens.

The focus motor is then powered via a d-tap connection which you can find on a v-lock battery.

We have a video coming out on Sunday about the alternative d-tap power source we used, so if you haven't already, consider subscribing to find out about it.

Next you can attach the mini antenna to the motor which wirelessly connects to the second part of the follow focus, which is the controller that has an internal battery and can be charged via USB.

To connect the controller to the focus motor you must set them both to the same channel.

Then if you hold down the focus, zoom, and iris button for 3 seconds, it auto calibrates and finds the focus end points on your lens.

PD-Movie-Remote-Air-3.gif

This means when you turn the focus wheel, it will turn the lens no further than infinity, and to whatever the minimum focus distance is on your lens.

Having this function makes it quick and easy to set up different lenses.

Next you can set the strength you want the motor to turn the focus wheel on the lens as every lens will require a different amount of torque.

This 50mm lens we have rotates by using very little pressure so it would require less torque to turn.

These vintage lenses require more pressure to turn so you can set the motor   to a high torque.

You can put your focus marks on the focus rings on the controller which are rubber.

When you need to reset markers you can simply rub the dry wipe pen off, or replace it with the other focus ring that comes with it.

The motor and the controller are built really strong, and every cable and attachment is very high quality.

The controller is not too heavy but has a slight weight to it, and the modelling of the unit is slim and has lots of quarter threaded screw mounts so you can attach it to a light stand or to the lanyard that comes in the box.

The wheel rotation of the controller has a nice resistance to it when turning and again it feels very much like a premium product.

Like with everything, using a wireless follow focus will have a learning curve, and this is definitely something you have to get used to with the Remote Air 3.

The menus and UI can take a while to understand and you will definitely want to keep the manual close at first.

There are lots of indicator lights on the controller which mean different things depending on their colour.  

The control unit status indicator lights have 4 different colours. Red means the unit is powered on.

Green means it is powered on and synced via bluetooth, which will only happen if you use the app, Blue means the unit is changing, and Cyan means the unit is synced via bluetooth and is being charged.

If you need to change the settings for focus, you need to use a combination of button presses. If you want to change the speed of the motor, you have to press the button on the bottom of the motor 5 times.

There is a little graphic on the motor which tells you how many presses you need to do, which is great because it saves you time looking in the manual.

When you want to enable the auto calibration function you have to hold down the focus, zoom and iris button for 3 seconds, which is a little bit awkward to do.

This is not a big problem and once you get familiar with how it works it will just become normal.

One thing we did have a problem with was the follow focus no longer responding during different setups.

We were unsure how the problem occurred, maybe a button was pressed and a setting change. This held up the shoot but we managed to get it working in a couple of minutes.

Becoming more familiar with the unit and the menus would help to solve this problem.

We only really use the wireless follow focus on bigger projects like making short films.

When you have someone whose sole job it is to keep focus throughout a whole film, it will help you save time as this technical side of filmmaking will have a higher level of accuracy.

Not everyone can afford a wireless follow focus like the PD Movie Remote Air 3, but it is definitely worth considering when you can. The timed saved vs the price you pay is something think about.

If using a wireless follow focus saves you an hour a day for example, that is an extra hour you have to improve other aspect of your image or do more takes to make the performance the best it can be.

That hour could also save you money in other areas of the production too.

If you are renting a location which requires you to pack up at a certain time, or a member of your cast needs to leave early, that hour you’ve got back could save you from having to rent the location again or getting the actor back for another day.

If you need to keep doing retakes because you kept over and under shooting focus, your actor may have delivered a better performance in one of the out-of-focus takes.

The three options we’ve spoke about to help keep focus all work, but have a different level of accuracy, so chose the one you need for your production.

Before we got the PD Movie Remote Air 3 we did not expect how much it would improve the quality of the final image, and how much time would be saved by using it.

If you’ve never used one, go and check out the PD Movie website.

They have lots of different wireless follow focus systems, and lots of information about how they can improve your production.

In this video we did say you need a 1st Assistant Camera to operate it, so if you like to know more about the role of the 1st AC let us know in the comments below and we’ll make a video about it.

If you want to help this channel grow give us a thumbs up or down if you don't, hit that orange lens cap to subscribe, and remember achieve it one shot at a time.


This video was Sponsored By

🎵 http://bit.ly/pbtfl-wildestdreams - Click here to download this episode's track. Check out Premiumbeat.com to discover a huge range of exclusive royalty free music!


DISCLAIMERS:

Some of these links are affiliate links, if you purchase gear via these links The Film Look will receive a small commission, but there will be no additional cost to you. Thank you!

Don't be Afraid to use Reference Material | Behind The Scenes

Getting inspiration from other works of art, whether that's films, TV shows, or paintings, will help you focus the way you want your film to look, sound, and feel.

Even the biggest and most successful filmmakers use google images for reference material: so just remember - it's not cheating!


DISCLAIMERS:

Some of these links are affiliate links, if you purchase gear via these links The Film Look will receive a small commission, but there will be no additional cost to you. Thank you!

5 Tips for Directing Actors

Today we are talking about directing the performance and some tricks and techniques we used to direct our latest short film The Asylum Groove. If you want to watch the film, you can find it right here:

Rehearsals

It might sound silly to even include rehearsals in this video on directing tips but sometimes when you make a short film you have to make sacrifices, and rehearsals are one of the first things which are cut out of the schedule, but DON’T underestimate them!

Episode.00_00_25_03.Still002.jpg

Rehearsals with your cast, and even technical rehearsals with your crew, will save you a lot of time during the shoot and get you A LOT closer to achieving the film look.

First of all, it helps you practice the performance and mold it into something great. But it also helps you work out the kinks. A lot of times, the lines on the page and actions written down don’t perfectly translate when performed, so they need some re-working.

It’s worth rehearsing through everything and seeing what does and doesn’t work, blocking out the scene and cleaning up the movement between beats, trying lines, and experimenting. Your cast and crew are members of your band; it’s worth having a few jamming sessions before you go on stage for the gig.

Just remember not to rehearse the scene to concrete. Give it some breathing room and be ready for changes on the day. A good rule of thumb is working up to 90% in rehearsals and going 100% on the day.

Keywords

Adding keywords to your storyboards and will give you the chance to really think about the meaning of your shots, what those shots tell the audience, will help you connect the shots to the story.

For The Asylum Groove, we wrote down key phrases for every shot in the film. Whether this was just an insert or a cut away, every shot had a title which gave it its purpose. Job, work, impress, caress, showing off, fear, terror, hate.

Episode.00_01_23_22.Still003.jpg

On set, this meant Chris was prompted very easily. Instead of rambling on about this, that, and the other, try to boil the shot down to something simple and let the actor do the thinking. During the take, you can always give redirection and mold it into something perfect.

You don’t always need to explain the shot with an essay.

Emotional Beat Map

The Asylum Groove revolved around a single piece of music which was sourced online. One way you can emphasise emotion in a song and connect it to the emotion in the film is by creating an emotional beat map.

Listen to the song and try to image the film playing out. Fit the emotional beats of the film into the song and use the different parts of the song to pinpoint an emotion and tie them together.

Episode.00_02_22_09.Still004.jpg

Then you can label emotional beats to the music. You can play the music on set, and let the actor feel the music during the scene.

Obviously you can’t play the music if you are recording dialogue, but you can use the emotional beat map when editing to make your music choice sound like it was written for the film!

Character Music Playlist

Once you and your actor have talked about the character; their traits, characteristics, and their journey through the film, ask your actor to create a playlist of music which the character would listen to.

Episode.00_02_49_10.Still005.jpg

You can select music which resembles the purpose of the scene in the film. This can give the actor some time to themselves, to get into the zone, and may heighten their emotions for an amazing performance on screen.

Using music can also give the actor a cue back into their character if they have taken a break, for instance.

Sometimes You Just Can’t Fake It

You really can’t fault a great actor and their ability to pretend to be someone else on screen. But there are a few things which are very difficult to get looking genuine, and those usually revolve around involuntary reactions.

First of all, you can’t fake out of breath. At least, you don’t need to. If you actor is out of breath in a scene, have them jog around the block for a few minutes to get their heart rate up, their face red, and their brow sweating. It’s looks and sounds a lot better than pretending.

Episode.00_03_20_23.Still006.jpg

Another thing which is difficult to fake is being startled, and involuntary facial twitches. To create a genuine reaction of sudden shock from our actor Chris, we popped a balloon beside him. We didn’t count down or give him a warning: that way he didn’t know when it was coming, so when it was popped, he was genuinely startled.

This is the same technique Ridley Scott used to frighten the cast in Alien during the chestburster scene. The cast had no idea it was about to pop out of his chest, creating a genuine reaction.


This video was Sponsored By

🎵 http://bit.ly/pbtfl-newfrontier - Click here to download this episode's track. Check out Premiumbeat.com to discover a huge range of exclusive royalty free music!


DISCLAIMERS:

Some of these links are affiliate links, if you purchase gear via these links The Film Look will receive a small commission, but there will be no additional cost to you. Thank you!

How to Give Your Film Visual Rhythm

Sometimes as a filmmaker you just have to experiment with an idea and hope it will work.

One thing we wanted to test out with our latest film The Asylum Groove was using shot patterns and symmetry within the sequence to see if it would help drive the story forward.

Today we are going to talk about giving your film visual rhythm.

We’re breaking down our latest short The Asylum Groove. So if you haven’t seen it yet, you can find it right here:

First and Final Frames

A lot of our previous films have been open ended, have involved cliff hangers, or have just finished abruptly. With the asylum groove we wanted to improve on that - we wanted to make something which had a clear start and a clear end.

A piece of symmetry which a lot of films incorporate is the connection between the first and final frame in the movie. These can be mirror images, clones, or a perfect opposite, and they help give the film clear bookends with distinct contrast from the start and end of a character’s journey.

We connected the first and final frame of The Asylum Groove with the use of curtains.

The film begins with Sam cleaning the assembly hall for the bedsville disco, so by having him literally open the film by drawing the curtains, we hoped it would give the impression that he is inviting the audience into the world, kind of like the curtains opening at the start film or a play.

Episode.00_01_12_04.Still001.jpg

The final shot in the film is when he is about to be electrocuted. The curtains close and we are left with his mother’s hand pressed against the window before it slowly fades to black.

At the end of the film, we see a different side to Sam: his rage. At this point we wanted the audience to distance themselves from the character and flip their perception of him from a protagonist to an antagonist. This is why we placed the camera on the other side of the glass.

Episode.00_01_13_03.Still002.jpg

We hoped using symmetrical first and final frames would give the audience a clear indication that the film has started and ended. No cliffhanger, post-credits sequence, or teaser to the sequel.

The Rule of Three

Another principle we wanted to incorporate to help drive the story, retain the pace, and create visual rhythm was the use of the rule of three.

The rule of three is a writing principle which suggests a sequence of exactly three is the smallest amount of information needed to create a pattern. This is a way to keep the information short and snappy but to also help emphasise the point being given.

The rule of three is used all over:

  • The slogan “Stop, Drop, and Roll” or “Blood, sweat, and tears”

  • The Three Little Pigs

  • The Three Musketeers

  • A feature film usually uses a three-act structure

  • And photography composition often uses the rule of thirds

We wanted to experiment with the rule of three by incorporating it into the film.

Each shot during the opening montage, after the curtain shot, is grouped into sets of three.

First of all you have the TASKS. We wanted the audience to know he was cleaning straight away. Instead of a single shot of him cleaning we used THREE to solidify the information while keeping the shot count to a minimum.

Episode.00_02_52_21.Still005.jpg

Anymore than 3 shots would be boring. Any less might not emphasise his TASK enough.

Next you have the BLUE shots. Blue balloon, blue paint brush, brush dipped in water.

These THREE shots show that the work he is doing is not JUST moving furniture around. He’s painting and hanging up balloons which gives the audience clues to the party and the disco.

Again, anymore than 3 shots would be a waste of time, any less might feel random.

Episode.00_03_07_14.Still006.jpg

We bridged the furniture shots with the painting shots by including blue paint on his fingers in the final furniture shot. This was to help bridge the gap between the sequences and help it flow.

The last set of THREE are the shots of the record player. Again, we included a bridging shot by using the jar of blue water in the first shot of the record player sequence to help with pace and continuity.

So with the record player sequence you have: pulling out the record from the sleeve, placing the record down, and the needle slowly falling into place.

Episode.00_03_38_06.Still007.jpg

The last shot in the montage, the slow fall of the needle, was chosen for a few particular reasons.

We wanted the fast pace of the montage to slow right down in order to match the pace of the character as he walks to the mop and bucket.

The needle falling onto the record player, and the long cross dissolve between the two shots, gave a smooth transition between the speeds and would hopefully give a clue to the audience that the rule of THREE has come to an end.

Episode.00_03_58_18.Still008.jpg

Using techniques like First and Final Frames & The Rule of Three aren’t something which will instantly give your movie The Film Look.

Things like casting, camera, costume, lighting, set, and story line are the most important parts of making a great film. But once you have those, its worth experimenting with alternative and subconscious tricks for your film and see what comes of it.


This video was Sponsored By

🚀 http://bit.ly/tflrs-creator - Become a social media powerhouse with RocketStock's video element pack, Creator. This collection comes packed with logo reveals, end screens, subscribe animations, and much more.

🎵 http://bit.ly/pbtfl-wildestdreams - Click here to download this episode's track. Check out Premiumbeat.com to discover a huge range of exclusive royalty free music!


DISCLAIMERS:

Some of these links are affiliate links, if you purchase gear via these links The Film Look will receive a small commission, but there will be no additional cost to you. Thank you!

Technical Blocking using T-Marks & Tape

Blocking a scene is an essential part of filmmaking, but to help keep your shots consistent and make sure your actors and camera are hitting the correct marks.

You can use some inexpensive tape and t-marks to allow you to work more efficiently on set.

Blocking is the process of working out where your actors need to stand and move throughout each scene of your film to help tell the story.

Some questions you need to ask yourself when blocking a scene is: Where are the actors in the scene? Do they move? Where do they move? Is the shot achievable?

We have a video that goes into more detail about the theory about blocking here if you want to check it out.

Blocking is done in three different stages. Firstly, you can pre-block the scene before the shooting day. This will allow you to work out if the location is suitable to shoot the scene, and if it is, work out the best way to use it.

If you can not get into the location before the shoot, don’t worry. Most blocking is setup on the day and is one of the first things you should do when you turn up to set. This is also the second stage of blocking.

Depending on the length of your scene, you can walk through the whole scene with your actor and DOP so they know how it is going to playout.

This will allow your actor to know how they need to move physically throughout the scene and where they need to be when delivering certain lines of dialogue.

It allows your camera team to know where the camera and lighting equipment needs to be, but also flag up any issues they have regarding where they can place the camera.

This also allows for others to have a creative input about the blocking.

The first two stages of blocking are there to work out the general movement of your actor and camera, but the third stage of blocking is where you set the specific marks for where you need you actor, camera, and focus to hit in order to capture the footage.

Our actor had their starting point and moved towards the camera, keeping the position of his feet on frame right.

2.gif

The camera tilts down whilst the 1st AC keeps the focus tracked on the feet. The actor lands on his end point and places the mop down.

This may not look like a complicated shot, but there are a lot of points for both the actor and camera team to hit.

To achieve this shot, we placed the camera low down on the floor and asked our actor to perform the action from point 1 to 2. Then we asked the actor to stay at this position as we adjusted the camera angle, and placed a number of different marks on the floor.

Firstly we placed a blue piece of gaff tape at the bottom of the frame to indicate if the shot has over-shot the tilt of the camera.

Blocking with T-Marks and Tape

Next we placed a t-mark just off screen to the left of frame. This shows the actor where his end mark is and where his feet need to line up with and where he need to place the mop down. This also allows the 1st AC to set their focus marks on the follow focus.

The reason T shapes are used is because it tells your actor how far left and right they need to be, but also how far forward or back they need to be.

You can place t-marks down by making them out of tape or by using these metal t-shaped brackets you find in DIY shops.

1.gif

Then you can use gaff tape to tape them up so they are nice and bright so people can see them. You can now reuse them, and place them on surfaces like concrete where tape would not stick.

The last mark we added was a focus mark which was just off camera right. This mark was set halfway between point one and two so the 1st AC could see the halfway point and determine the speed the focus.

We used t-marks and tape throughout the whole shoot, sometimes for the actor to know where they need to stand or mop to and others for focus marks.

Having T-marks and tape helps to improve accuracy when shooting as the actors, camera and focus puller know where they need to be to hit their marks. If you need to do many takes, the technical side of the filmmaking will be consistent and it will help save time when shooting.

Check out our video on blocking if you want to find out more information about it. If you want to help this channel grow give us a thumbs up or down if you don't, hit that orange lens cap to subscribe, and remember achieve it one shot at a time.


This video was Sponsored By

🚀 http://bit.ly/pack-emulsion - Make your video look like it was tailor-made for the silver screen with RocketStock’s film grain overlay pack, Emulsion!

🎵http://bit.ly/track-tell-me - Click here to download this episode's track. Check out Premiumbeat.com to discover a huge range of exclusive royalty free music!


DISCLAIMERS:

Some of these links are affiliate links, if you purchase gear via these links The Film Look will receive a small commission, but there will be no additional cost to you. Thank you!

Our Filmmaking Camera Rig

We’ve had loads of comments asking about the camera rig we used to shoot our short film The Asylum Groove.

In this video I am going to break down the rig. If you haven't seen the short film yet you can find it here.

The camera we used was a Sony A7s mark 1, which is the camera we use to shoot all of the film look videos.

We shot the film in 1080p using a cine 4 flat picture profile to give us a little more dynamic range.

Everything was contained in a Tilta cage, the one with the wooden handle which makes it easier to press the record button.

The camera is powered by our custom dummy battery setup, which gives us about a full day’s worth of power.

If you want to find out more about the battery we have a video about it here.

For the film we used a set of vintage lenses. We had a 35mm, 58mm, and 85mm.

The entire film was shot at F8 as we wanted people to see everything that was in the background as the location helps to tell the story. If we opened up all the way to F1.8 the background would have been a lot softer, losing the detail you get at shooting at F8.

Shooting at F8 was a decision we made after looking at the reference images from films like Thousands Cheer and one flew over the cuckoo's nest both which have a deep focus.

To help keep focus we used a PDMovie wireless follow focus system which was powered by a D-Tap battery.

We have a video review coming very soon all about the wireless follow focus and how we powered it. 

Everything was mounted via the Titla rail mounts to a pair of 15mm rods. The camera was mounted as far back as possible to help balance the weight, and the rig rested on this Small Rig shoulder mount.

Sticking with the shoulder rig, we had a set of handles mounted to the front, which were also from SmallRig.

Small Rig are not sponsoring this video we just really like their products, but we DO have a video all about SmallRig here.

This setup was very versatile. I used it on my shoulder, low down resting on the floor, also on a slider and a tripod. Everything worked so we did not have to take anything apart during different setups.

We had a PerGear 7 inch monitor mounted to the camera via a magic arm so we could quickly adjust it depending on the setup.

We also have a full review about this monitor here.

The main reason we used this monitor was because it had an HDMI out. This meant we could take the feed from the camera to the monitor, then backout to another monitor which was used by our 1st assistant camera, Rob. This stand was set up with an Atomos Shogun monitor and used to pull focus with the PD Movie follow focus controller.

I’m not going to take credit for setting up the camera on the shoot, this was done by our 1st and 2nd ACs, Rob and Adam. This was made possible by communicating with the camera team before the shoot so they knew exactly what I needed from the rig.

We also used a mixture of other people’s equipment like a Konova slider, a steadicam and various grip and AC equipment.

We haven't always had all of this equipment, we started off shooting on handy cameras, then moved on to shooting with a Canon 600d with one lens, and the same shoulder rig we used on this film.

We’ve built up what we used over the past 6 years of working on many different jobs, and a lot of the equipment we used on the film was borrowed from others who worked on the film.

Not all of this equipment allowed us to capture a better image, a lot of the equipment we used simply let us save time, like the wireless follow focus as there was someone dedicated to that job. Any equipment that can save you time during a day and a half shoot is super valuable but your most valuable asset is your crew, so chose them before your camera.


DISCLAIMERS:

Some of these links are affiliate links, if you purchase gear via these links The Film Look will receive a small commission, but there will be no additional cost to you. Thank you!

Using ONLY Aputure Lights to Make a Film

The final two shots in our short film The Asylum Groove were inspired by this piece of art which we randomly found online when looking for inspiration for this film.

In this video we are going to talk about the setup and how we lit those two shots.

Both shots were filmed in the same location as the first scene of the film. The location was 16.2 by 7.5 meters and had 6 windows which were 1.2 by 3.2 meters high.

To start, we positioned the electric chair in the spot we wanted and screwed it to the floor. Our actor would be strapped into the chair and wouldn’t be able to get out without assistance.

For his performance, we wanted him to to try and force his way out. Screwing it to the floor meant the chair would not tip over.

To make it as comfortable as possible for our actor, we made some soft straps for his wrists and ankles so he could pull as much as he liked and he would not be hurt.

Having so much natural light coming through the windows worked great for all of the other shots in the film, but for these two shots, we needed it to be completely dark.

Unfortunately, we could not shoot the scene at night as we could not get access to the location later in the day, so we shot it during the day. We made the location as dark as possible in two ways.

The location was a old school hall which had a lighting rig built in and had large blackout curtains. The curtains had been damaged over time and did not cover all of the windows, but it was a good start. We also used some of the curtains to block out the entire background for both shots.

Next we used the law of physics and something called inverse square law, let me explain.

The closer your light is to the subject, the brighter it will be, and the fall off will be harsher. The further away your light is from the subject, it decreases in brightness and the fall off is a lot more even.

The sunlight coming through the windows was further away our key light, which was about 1 meter away from our subject.

When we correctly exposed the camera for the closest and brightest light, this made all over light darker.

We have linked to an article from Petapixel and a video from a youtube channel called Wolfcrow which goes into a lot more detail about the inverse square law if you want to check it out.

For the shot we hung an Aputure 300d from the lighting rig that was all ready in the room. We did this by using a rail clamp which was attached to the bars of the rig. Attached to that was a C-Stand arm so we could bring the light further down, getting it about a meter away from our subject, and it also meant we could easily adjust the angle if needed.

We also attached a safety harness to the light just encase the clamp decided to fail. You can never be to careful.

One advantage of using the Aputure lights was the remote it came with which lets you wireless control the brightest and switch the light on and off.

As the light was up high, having the remote meant we didn't have to get the ladder back out to adjust it, which saved us a lot of time on set.

One of the main reasons we rented the Aputure 300d was because you can attach different mounts to the front of the light creating many different types of light sources.

For the first part of the film we used the space light attachment which we spoke about more in last week’s video.

For this shot, we attached a Fresnel lens which helps to focus and create a beam of light. The light was set at 75% brightness, angled just in front of our actor Chris, creating dark shadows on his face.

Before we filmed the shot we got someone to stand in for Chris, so our 1st AC Rob could get focus marks with the PD Movie Wireless Follow focus we were using.

It’s best to do these technical things with a stand-in. That way your actors aren’t standing around in front of lights all day as well as giving a performance.

We had to film this shot a couple of times because we had some technical issues with the straps not being tight about, causing it to fall of Chris’s head during the take.

One decision we made early one was avoid giving our actor an eye light for this shot. This was because we wanted his eyes to look dark and dead, unlike the previous scene where it was very light. In retrospect, this is actually something we would like to change because you can't read his reaction as well because you can’t see his eyes.

The last shot of the film was this one.

Taking inspiration from other films

We took the inspiration for this shot from this image we found online. We knew straight away this is how we wanted the film to end with the reflection of people watching him from the observation room.

So we built an observation room. We randomly had access to a window which was big enough and mounted onto a stand which was already in the room. Then we built a blanket fort around the window with the help of the blackout curtains, c-stands, more blackout material and lots of clips.

Now we had a room which was facing the chair and was completely blacked out all the way around, apart from the window. We did this to help emphasise the reflection of the people. By blocking out the background, this meant we would only get their reflection and nothing else.

To achieve the reflection of the people in the window we used an Aputure 300d with a space light and set it to 100% brightness which is around a 2k light. This was placed outside the fort, shining through the window, as we could not fit it in side.

Lighting-Video-3.gif

Then we boomed an LED panel into the fort as the main key light for Emily who was playing the woman’s hand in the film. For Ed, who was playing the executioner, we had an Aputure M9 light just to bring him up a little.

We are not sponsored by Aputure - we just really like their lights.

One thing we learned from this shot was just the sheer amount of light you need to add in order to achieve a bright enough reflection to see the subjects.

Another thing we decided early on which helped seeing them in the reflection was dressing them in white. And because I was in the fort operating the camera, I made sure to wear black to avoid being picked up by the camera.

With the camera being in the fort on a slider, the reflection was so strong we could see it in the window. So to combat this, any part of the camera that reflected light, was gaff taped up and it solved the problem.

The final part of the shot were the curtains falling which was achieved by clipping blackout material to the outside of the window and having two people let go on action.

These two shots did take around 4 hours to setup and the footage in total lasts for about 40 seconds, but we think it was totally worth it and without the crew, it wouldn’t be possible so big thanks to them.


Equipment Used

🎥 This episode's kit/gear/equipment:

🇺🇸 US links: 

Aputure 300D - https://amzn.to/2L7JZI2
Aputure Space Light - https://amzn.to/2NK8QA8
Aputure Fresnel Mount - https://amzn.to/2mfuOhD

🇬🇧 UK links:

Aputure 300D - https://amzn.to/2L8CnSe
Aputure Space Light - https://amzn.to/2Lctas0
Aputure Fresnel Mount - https://amzn.to/2LcLaCL

This video was Sponsored By

🎵 http://bit.ly/pbtfl-themaster - Click here to download this episode's track. Check out Premiumbeat.com to discover a huge range of exclusive royalty free music!


DISCLAIMERS:

Some of these links are affiliate links, if you purchase gear via these links The Film Look will receive a small commission, but there will be no additional cost to you. Thank you!

Making a £8000 film for £500

Short films cost money to make, but how much money do they cost?

In this video we are going to break down how much it cost to make our short film The Asylum Groove. If you haven't seen the short film yet you can find it here.

The film is just over 3 minutes long, we shot it over 2 days, and had a crew size of 9.

We are going to break down the cost of the film into a few different areas. First will be the things we spent money on like equipment rentals, props and costume. Second will be the cost of the equipment we already owned or borrowed from other people, and finally the cost of people's time.

Set - £35.09

The location we used for the film we were able to get for free, but we did spend money on dressing the set to help tell the story. We created the Bedsville Disco sign, pinned up balloons, bought and weathered the record player and added signs to the doors.

Costume - £52.98

The main cost for the costume was from the scrub set and also the elbow and knee pads which our actor wore during the tripping shots. We also bought the dust rags which hung out of the character pockets and we also bought a bow tie for the executioner to wear.

Props - £71.94

Props that we had to buy for the film were the mop heads, wood to build the chair, the head sponge and chair straps.

Music - £23.99

The music for this film was such an important part in the film, it helps to set the tone and mood. We started off with about 20 tracks we found on various different sites, but settled on this one from audio network.

Food - £27.61

Feeding your cast and crew is super important and if it is the only thing you spend money on do it.

Travel - £30.00

We didn’t want any of our cast and crew to be out of pocket travelling to and from the location.

Equipment Rented - £242.39

For this film we had to rent 3 Aputure 300d lights as we did not have any lights that would be suitable for the production.

Total cash spent was £484

The total cost to make this film was £484 which is actually £24 more than it cost to make our last short film Backstage.

The equipment we used to shoot the film was equipment we have been building up for the past 6 years, and it is the same equipment we use on a day to day basis to make these videos. If someone wanted to go out and shoot this film on the same equipment we used, we have worked out it would cost around £4,850. Now making the total cost of the film £5,334.

This total cost only includes the equipment we owned. Rob our first assistant camera and Opie the second assistant camera both brought their own kit which we used. This included C-Stands, tripods, a steadicam and many other pieces of equipment and lots of tape. We have worked with them a number of times and they bring what they think we need to make the production the best it can be.

To put a value on this equipment we have said it would cost about £500 to rent the equipment that we did not already own. Now making the total cost for the film £5,834.

But that’s not everything, what about people's time? For everyone who worked on the film they did it in kind. Hopefully one day we will have the budget to pay everyone, but we have estimated if we paid everyone a standard filmmaker’s rate in North East England, the total cost of the film would be £7,834.

This is a scary number to us and is something we simply can’t afford.

This film would have been impossible to make at that cost, but getting to know people over time who want to help, building up your equipment little by little, and making sure you cater for everyone who works on your film, then it makes it possible to make a film for £484.

You don’t need all of the equipment we used to make a film, not all of the time anyway. We shot our short film Corpse on a Canon 550D with a 24-105mm lens, and on the same shoulder rig we used to shoot this film and we still think that film looks good.

Go out there and make films on whatever equipment you have, and we hope this video has helped people understand how much it can cost to make a short. It is something we did not know until we started to make bigger films.

Let us know in the comments about your experiences of making short films and the things you’ve spent money on to make your films better, give us a thumbs up or a thumbs down if you liked or disliked this video, hit the orange lens cap to subscribe, and remember achieve it one shot at a time.


DISCLAIMERS:

Some of these links are affiliate links, if you purchase gear via these links The Film Look will receive a small commission, but there will be no additional cost to you. Thank you!

Using Inspiration to Light Your Film

In this video we are going to breakdown the process of using inspiration from other films to help you light your short film.

We did this same process to light our short film The Asylum Groove and If you haven't seen it yet you can find it here.

Use-Inspiration-to-Light-Your-Film.gif

First of all, you want to look for inspiration. Our short is set loosely in the 70s and in an Asylum, a film we took a lot of inspiration from was One flew over the cuckoo's nest. You can see this in the costume our main character is wearing. We have a video about that HERE.

You can create a moodboard of images which have a similar look to the film you want to make. We took inspiration from films and others were pieces of art we found online. This image of Gene Kelly in Thousands Cheer from 1943 inspired this shot, and this image inspired us to create the final shot in the film.

We are going to be talking about how we set up this shot in next week’s video. So if you haven't already consider subscribing.

Example images allow you to focus your attention and dial in the look of the film, so you can start to work out how to light it, the design of your costumes, and how you would like your location to look.

Now you have this inspiration you can start to make the creative choices which will make it your own.

The location we had for our film was an old assembly hall which had large windows that let in a lot of natural light.

This laid down the groundwork for how we were going to light the film and we wanted to embrace the natural light coming into the room.

It’s not always possible but if you can get into the location before the shoot and do some camera tests it will allow you to work out how you can light your film.

One of the main creative choices we made was to shoot at F8. The was because we wanted to show the detail of the location, as it was already old and grimy which suited the look of the film.

Using-different-f-stops.gif

This was another decision we made after looking at the reference images from films like Thousands Cheer and one flew over the cuckoo's nest both which have a deep focus.

Shooting at F8 also helped us prevent blowing out the window light, which again allows for the audience to see how old and grimy the location is.

One problem we had shooting at F8 was that our subject was underexposed, so we did a camera test. We placed our subject in the middle of the room with the window behind them on a bright sunny day, which would harshest lighting conditions we would encounter on the shooting day.

By using a light meter it told us if we wanted to expose the outside correctly we would have to shoot at a F-Stop of F16, and if we wanted to expose our subject correctly we would have to shoot at a F-Stop of F5.6. This was a 3 stop difference or a ratio of 8 to 1.

To get a little more dynamic range we decided to shoot in Cine 4 which would give us a little more information to work with in post.

With all of this information we worked out the lights we own would not be powerful and reliable enough to light the scene.

So we rented 3 Aputure 300d’s. These lights are rated to be the equivalent of a 2k light and are set at 5500K, this meant we did not have to gel the lights with CTB as they already matched the colour temperature of daylight.

One of the most versatile aspects of these lights is the bowens mount attachment which is on the front of the light. The light comes with a reflector cone, but you can also attach a Fresnel which we used for this shot.

The main attachment we used was a space light which essentially works the same way a china lantern.

Lighting-floor-Plan.gif

The original idea was to take advantage of the lighting rig we had in the room and hang the lights from there. We soon realised we would need to move the lights a lot more than we planned during the shoot.

Moving the lights helped to keep the exposure consistent and bring the lights closer to our actor, but still allow our actor to be able to move freely throughout the room.

So we put the lights on high up on stands and angled them downwards so the space light could hang down and spread the light evenly. We positioned the lights in front on the windows so the light would come from the same direction of the day light.

Now the light was evenly spread, it brought the exposure up in the room and created enough light so our subject was correctly exposed.

Everything at this point was very even, so to add a little contrast, the space light kit comes with flags which can be clipped onto the space light. We used them to block the light from hitting the background, therefore creating contrast between the subject and background which helps make him pop on screen.

Throughout the shoot we either moved the lights closer to the actor, or dimmed them down to get the correct exposure. The Aperture lights come with a remote which allows you to control each light from the one remote, meaning you can dim or turn off a light wirelessly.

The lighting setup we used on the film was super versatile, we could move the lights where ever we needed them, and they gave off a lot of soft light. Being so flexible allowed each setup to be setup quickly and save time on set, which was important as we shot this film in a day and a half.  

Taking inspiration from other films and art work really inspired us when lighting this film, and it can do the same for you. Find images that closely represent how you would like your film to look, and use them to drive your creativity to create new images.  


This video was Sponsored By

🚀 http://bit.ly/illuminate-pack - RocketStock’s light leak pack, "Illuminate", is sure to impress your viewers. Shot using digital cinema cameras in 4K, it’s an unbeatable way to lift your video to new, cinematic heights.

🎵 http://bit.ly/pbtfl-newfrontier - Click here to download this episode's track. Check out Premiumbeat.com to discover a huge range of exclusive royalty free music!


DISCLAIMERS:

Some of these links are affiliate links, if you purchase gear via these links The Film Look will receive a small commission, but there will be no additional cost to you. Thank you!

Tips for Casting your First Actor

As zero budget filmmakers we find ourselves taking on a lot of roles, one of them being the casting director.

Today we are going to talk about some things YOU can do to advertise your film to talent, and what to look for in an actor. 

Episode.00_00_05_08.Still001.jpg

Facebook is a good place to start. Ask your friends, ask your family, join filmmaking groups, and let everyone know you are casting your movie.

Episode.00_00_35_01.Still002.jpg

If you have any filmmaking friends, avoid tagging them all in a single post. Give them a text or a call and personally ask them if they know of any actors who would be suitable for your film. They will be a lot more likely to help you if you go to them directly.

Episode.00_00_45_09.Still003.jpg

You can use advertisement boards such as Craigslist, Gumtree, and casting websites like StarNow and Mandy. We’ve used these in the past and can work well.

One mistake you can make is not wanting to release the whole script; either because you are afraid someone will steal it, or you will give away spoilers, but try not to worry about this.

Release your script and let the actors read the whole thing. Don’t be precious about it, it’s only a short film, and you never know, that actor who wasn’t too sure about the project might finish the script and beg to be involved.

Episode.00_01_12_11.Still004.jpg

So now you have interest in your film. You’ve set up some auditions. What do you do now?

There are 2 methods we’ve used for auditions; reading for a character in a scene, and performing a monologue. Both work well and can be used for different types of projects.

Episode.00_01_25_18.Still005.jpg

If you have a lot of cast members and a lot of actors coming in for auditions, you might want to go with reading for a character. This way you can see a lot of actors doing the same thing and then make your mind up about the ideal person to play that role.

It’s worth filming each audition too. This way you can review them in more detail later.

Episode.00_01_39_18.Still006.jpg

But if you have very little dialogue in your film, this method might not be the best one to use.

This is where the monologue comes in, and this was our choice when we were casting for The Asylum Groove because the film had very little dialogue.

Some of you might be asking “well why don’t you get them to perform the actions in the script?”.

This is all fair and good, but dancing around with a mop wasn’t the skill we needed for the performance because we WANTED the dancing to be rusty, so this wasn’t all that important. We were looking for the ability to express fine detailed emotions and the ability to take redirection.

Episode.00_02_00_01.Still007.jpg

Adapting to redirection is one of the most vital skills you should be looking for in an actor and you can use monologues as a way to discover this in an actor during an audition.

Firstly, ask the actor to provide a monologue from a film which they think best mirrors the character in the script. This, initially, has them thinking about the script and how they perceive the story. If they show you that they understand the script, you are a step closer to casting the perfect actor.

During the audition, ask them to perform the monologue they’ve rehearsed. This is a great basis for someone’s acting ability. You can see their emotions, nuances, and range.

Then discuss the character in your film; their motivations, their traits, and their backstory.

With what you’ve discussed in mind, ask the actor to perform the same monologue from the perspective of the character in the script.

Holding the audition this way showed US several vital skills: the challenge of redirection and whether they would be able to change up their monologue, and their ability to think about the character, their traits, and how they would portray them.

If, after some redirection, the actors perform the monologue the same way, this is a sign that they might have rehearsed their monologue to concrete and aren’t able to change and mold to the direction given.

Episode.00_03_11_18.Still008.jpg

This is a big warning sign to NOT go with this person because if they can’t be redirected in the audition, they might not listen to your direction during the shoot and not give you what you need for the character.


This video was Sponsored By

🎵 http://bit.ly/pbtfl-1970sbrazil - Click here to download this episode's track. Check out Premiumbeat.com to discover a huge range of exclusive royalty free music


DISCLAIMERS:

Some of these links are affiliate links, if you purchase gear via these links The Film Look will receive a small commission, but there will be no additional cost to you. Thank you!

5 Different Camera Rigs in 1 for $500

As an indie filmmaker we are always looking for equipment that has a good level of price to quality ratio. We have gone out and bought cheap equipment that works at first, but the quality doesn’t last.

For a few years now, anytime we’ve needed shoulder rig parts like rails, handles, or little mounts so we can add more accessories on to our rig, we have been using a company called SmallRig.

Small Rig.jpg

They have found that sweet spot between quality and price.

SmallRig did send us over half of the equipment we will be talking about in this video, but the other half, we purchased ourselves over the last few years.

Small Rig.00_00_44_18.Still001.jpg

Let’s start off with a bare bones setup. For most small cameras you can now get cages and from SmallRig we have a Sony a7s Mark 1 cage. [No. 2010]

We have reviewed other cages for the Sony A7s which you can find here:

This cage is one unit and you don’t have to disassemble the cage to take the camera out of it. You simply just place the camera in and screw it in from the bottom.

Small Rig.00_00_47_07.Still002.jpg

Compared to the other cages we have used for the a7s, this one has a lot of room around the buttons and nothing is hidden behind any parts of the cage, so you can easily get access to them.

Small Rig.00_01_07_23.Still003.jpg

It has 3 cold shoe connections so you can mount loads of accessories, and an HDMI clamp which is adjustable to fit different sized HDMI cables depending on which size you have.

You can also get a top handle for the cage. The one we have has loads of screw mounts so you can attach more accessories, but SmallRig have other top handles to choose from which also work with this cage.

The cage also has a Rosette connection which is built into the side. You can get many Rosette accessories, but the one we like the most is the wooden handle [1941] and it’s not just because it looks cool.

When going handheld, the grip is really comfortable, and it gets your hands away from the lens which prevents micro jitters.

If you’re not a fan of the wooden handle, you can also get a rubber handle like this one. [1963]

By having a Rosette connection on the side instead of a standard screw, it allows you to put a lot more pressure and tension on the handle and it won’t slip because of the small grooves of the Rosette.

Small Rig.00_01_54_15.Still005.jpg

You can also get a bunch of other cages for other cameras from SmallRig, if you want to check them out for the camera you have.

This is the setup we would use most days, but when we are shooting a film we would set up the camera like this.

We will go into more detail about the other pieces of camera equipment we used to shoot our short film in a future video, so if you haven't already consider subscribing, but for now let's talk about how the SmallRig components have helped build this rig.

To be able to add more equipment to the camera, we added a rail mount system to the bottom. You can get a Manfrotto SmallRig baseplate to make this a little easier, but we already had this 15mm Rod Riser Clamp [1408]

This is the setup: we have a Manfrotto plate screwed into the Riser Clamp, which is screwed into the bottom of a Manfrotto release plate, then the camera slides on to this release plate.

Small Rig.00_02_45_15.Still006.jpg

Then you can add 15mm rods to the riser and add a follow focus, a battery, or even a monitor by using this little clamp [843].

By setting up the camera this way, you can take the camera off the tripod with the rail mount attached, or you can release it from the tripod plate and leave the rail system behind.

This comes in handy if you just need to quickly pick up the camera and grab a shot without all of the other pieces of equipment attached.

This setup works well on a tripod, but where the SmallRig components really come in handy is when you are building a shoulder rig.

If you are trying to work out which components you need for your rig, go on the SmallRig website, look at what they have, and draw a couple of diagrams which has all of the components you are thinking to buy.

Small Rig.00_03_08_19.Still007.jpg

By doing this, you can see which parts connect to other parts and work out what you need to build you rig.

The next setup we have is our shoulder rig setup. We swapped out the 15mm rods for longer ones so we could attach a shoulder pad [1483] and this cross front handle kit which has two rubber handles [998].

We have the camera as far back as possible so the weight is more on the shoulder and not front heavy. We can still see what we are shooting by using the same rod clamp as before to mount our monitor further forward with a Articulating Arm, [2066] so we can adjust the angle of the monitor with ease.

Small Rig.00_03_21_11.Still009.jpg

We add all of the other pieces of camera equipment and we have this.

The wooden handle is not really needed on the cage so instead of using the cross front handle kit, you could get this Rosette to rod clamp so you can attach the wooden handle to the 15mm rods.

By only using the few parts we have, we’ve managed to build many different setups which work in different situations.

Small Rig.00_04_00_17.Still010.jpg

You can get this Rosette extension arm so the rig handles are not straight in front but down by your side which is a lot more comfortable and it means you can tuck in your elbows creating steadier shots.

The cross front handle kit can be setup as a fig rig by turning the handles upside down and mounting them next to the camera.

All of the components from SmallRig are built out of metal; the nobs tighten well, and they are built with a ratchet system. So if you can not turn the nob any further, because something is in the way, you just need to pull it out, turn, and tighten.

Small Rig.00_04_16_11.Still011.jpg

Like I said at the start of the video, SmallRig have a great price to quality ratio and they have lots of products that solve problems you didn’t even know you had.


This video was Sponsored By

🚀 http://bit.ly/rs-aspect - Give your video a clean look with Aspect by RocketStock. It features over 200 logo reveals, intros, lower thirds, overlays, icons, and transitions.

🎵 http://bit.ly/pbtfl-newfrontier - Click here to download this episode's track. Check out Premiumbeat.com to discover a huge range of exclusive royalty free music!


DISCLAIMERS:

Some of these links are affiliate links, if you purchase gear via these links The Film Look will receive a small commission, but there will be no additional cost to you. Thank you!

How to Give Your Shots Reason

The shots YOU use in your film aren’t just there to look fancy. Your shots convey the story on screen, and by giving your shots REASON and MOTIVATION, you can get a step closer to achieving the film look.

We’re breaking down how we applied reason and motivation to the shots in our latest film The Asylum Groove, you can watch it right here:

One thing we wanted to do with The Asylum Groove was give the camera characteristics. This way we could apply reason and motivation to every shot and try to tell the story as if the camera was alive.

So we thought of the camera as a really curious child. They have stumbled into an intriguing situation and throughout the scene they will want to learn more.

Episode.00_01_13_08.Still004.jpg

This curious child will be trying to soak up all the important information in the scene and will be giving it back to the audience as entertainment.

Our character Sam has decided to lift his mop and dance to the music. But the camera stays in place. Our reasoning for this movement, or lack of movement, is because his dancing starts very suddenly.

The camera, AKA the curious child, is surprised by what is happening. They stay still and watch as they try to figure out this new piece of information. Sam dances backwards, distancing himself from the curious child. So what does the camera want to do? Get closer.

Episode.00_01_32_18.Still001.jpg

Then we cut to a close up of the character. This is needed to clearly see the new expression of love and compassion on his face, a key emotional beat in the sequence. It is motivated by the curious child wanting to find out more about our character.

As humans we tend to read people’s facial expressions, so when there isn’t a lot of BIG information in the scene, we read the MICRO information.

The next big camera move compliments the two previous shots.

This time the curious child knows the character is about to resume dancing. The camera is intrigued and is now invested in the situation. The next shot cuts t o a wide, but this time the curious child follows along with the movement of the character and physically moves forward in order to get another look on his face.

Episode.00_01_52_21.Still002.jpg

All of the shots in the Asylum Groove follow this process of the curious child. You can make your shots even more interesting by thinking of the child as someone who doesn’t always tell the truth and doesn’t always want to tell you everything straight away.

The entire beginning sequence of the film is shot with close up inserts, mostly of details, hinting story elements without outright displaying them. In this case, the curious child has joined the scene BEFORE the audience and is slowly giving clues, teasing the audience with small chunks of information.

Episode.00_02_13_07.Still003.jpg

At the end, when we find out Sam is being electrocuted, the camera is confused. The curious child has just been transported to this new scene all of a sudden, so they are initially looking around their environment to figure out what is going on.

Once the camera understands the situation, and is faced with our character Sam RAGING on screen, it distances itself from him and the disturbing scene, pulling back, and ending in a wide shot.

Episode.00_02_48_09.Still007.jpg

Your shots should have a place in the story. Instead of just shooting coverage, try to find the emotional or dramatic beats in the scene and bring the audience along for the journey - after all, the curious child is dictating what the audience can see. If the camera isn’t interested in the scene, why should the audience even pay attention?


This video was Sponsored By

🚀 http://bit.ly/pack-emulsion - Make your video look like it was tailor-made for the silver screen with RocketStock’s film grain overlay pack, Emulsion!

🎵 http://bit.ly/pbtfl-wildestdreams - Click here to download this episode's track. Check out Premiumbeat.com to discover a huge range of exclusive royalty free music!


DISCLAIMERS:

Some of these links are affiliate links, if you purchase gear via these links The Film Look will receive a small commission, but there will be no additional cost to you. Thank you!

Making of: The Asylum Groove Part 3 | Behind The Scenes

This is part one of the making of our short film The Asylum Groove. Let us know in the comments below if you see anything in the behind the scenes which you would like to more about. 

Part 1 - https://youtu.be/mSbNZNrZHdg
Part 2 - https://youtu.be/-zSvTmWIZP4


🎬 In case you missed it

The Asylum Groove - Short Film - https://youtu.be/aysGfZyQEiM


DISCLAIMERS:

Some of these links are affiliate links, if you purchase gear via these links The Film Look will receive a small commission, but there will be no additional cost to you. Thank you!

Stop Making Films by Yourself

Taking on multiple filmmaking roles is a great way to find out which areas you want to pursue. But there comes a time when you MUST give some of the key jobs to others if you want to make the best film possible.

We’ve made films were we’ve had a crew of 10 and we’ve made films where we had a crew of 2. On the barebones projects, this meant we were taking the role of: writer, director, camera operator, 1st AC, AD, sound recordist, and we were also the costume & props department.

Taking on all of these roles is great because you get to gain experience in different areas and it can help you work out which areas of filmmaking you want to pursue.

Stop-Making-Films-by-Yourself.gif

The downside to multi-role projects is that you can’t give 100% of your time and energy to one role. If you’re the camera operator and director, you’ll spend half your time setting up the shot while the actors stand around, then spend the other half directing the performance while the crew stands around.

All of these roles are actually super fun and sometimes at the beginning you NEED to take on these roles just to get your film finished.

But spreading yourself too thin can make the film suffer. For our short film Keep the Change, I was camera operator and 1st AC, Rich was the sound recordist and we both directed when we got the chance.

Stop-Making-Films-by-Yourself1.gif

Directing is one of the areas of filmmaking we are the most passionate about, but because we were doing many other roles, the project suffered.

To help combat this, we started collaborating with more filmmakers.

We built up this small crew of filmmakers over the past few of years by attending local filmmaking networking groups, working on other people’s short films to get to know them, and looking at filmmaking Facebook pages to see if there was anyone in our local area making films.

At first, there was 2 of us, then 3, 4, 5, and on our latest short, The Asylum Groove, we had a core crew of 10. This is still a very small crew but it allowed everyone take on roles we were all passionate about, and it gave everyone a specific department and responsibility on set, which meant NO waiting around and wasting time.

I operated the camera, The other Rob was 1st AC and focus puller, Adam was the 2nd AC and clapper loader, and both Rob and Adam provided their invaluable grip skills.

For us, this still feels like a luxury, but we could see the benefit of having a larger camera department straight away.

At no point did I have to step away to do a different job. I concentrated on the image; the lighting, framing, and camera movement. Having the other Rob pull focus meant it was nailed every time, and having Adam set up the marks and frame edges meant we did very little technical retakes.

With me being on camera, Richard could concentrate on just directing. He could spend more time with our actor Chris, dialing in the different emotions he needed to feel at different points of the shoot.

If you’ve wrote a script and plan on directing the film, maybe think about getting someone else to shoot it.

You know the story more than anyone else, you know when each character needs to hit different emotional beats, so why not give your full attention to the performance?

Getting someone else to shoot your film is a big role to give away. If you know someone who can shoot, you can work closely with them in pre-production and plan how you would like the film to look. Onset you will both be working from the same plan and share a stronger collaborative vision.

For The Asylum Groove, we still had to double up roles. Emily, the producer, was also the 1st assistant director, and she even had a cameo at the end of the film. During takes, Rich held the reflector when we needed more light, Jack shot BTS but also recorded sound for the last two shots.

The people who help you make your film don’t all need to be experienced filmmakers. An extra pair of hands on set is a massive bonus, and there are roles such as boom operating, grip assistance, and being the reflector-holder which contribute so much to a film and don’t take a lot of practice to become sufficient.

When collaborating with other filmmakers, find out which areas they are most interested in. Take advantage of their knowledge and passion. From our experience, they are usually more skilled in a certain area than we are.

Don’t let having a small crew stop you from making your film, do whatever you can to make it, you might have a wicked time making it anyway. If you struggle through the process and things don’t come out as planned, at least you still went out there, made something, made mistakes and learned new skills. You can take all of the lessons you learn and apply them on your next film.

In the comments below let us know about your experiences of making short films and how other people have made them better. Also, if you haven't already hit the orange lens cap to subscribe, check out our short film here and remember to achieve it one shot at a time.


This video was Sponsored By

🚀 http://bit.ly/tflrs-creator - Become a social media powerhouse with RocketStock's video element pack, Creator. This collection comes packed with logo reveals, end screens, subscribe animations, and much more.

🎵 http://bit.ly/pb-finestimports - Click here to download this episode's track. Check out Premiumbeat.com to discover a huge range of exclusive royalty free music!


DISCLAIMERS:

Some of these links are affiliate links, if you purchase gear via these links The Film Look will receive a small commission, but there will be no additional cost to you. Thank you!

Making of: The Asylum Groove Part 2 | Behind The Scenes

This is part one of the making of our short film The Asylum Groove. Let us know in the comments below if you see anything in the behind the scenes which you would like to more about. 

Part 1 - https://youtu.be/mSbNZNrZHdg


🎬 In case you missed it

The Asylum Groove - Short Film - https://youtu.be/aysGfZyQEiM


DISCLAIMERS:

Some of these links are affiliate links, if you purchase gear via these links The Film Look will receive a small commission, but there will be no additional cost to you. Thank you!

Get The Film Look with Art Direction

If there is one aspect of zero budget filmmaking that gets overlooked more than any other, I feel it’s art direction and production design.

I’m talking about costumes, set dressing, props, graphics; the things that give a movie life. These are things which contribute towards achieving the film look and will give your film a convincing visual identity and will embed it into your make-believe world. But art direction also serves a bigger purpose than just making your film look cinematic.

Today we are going to talk about how YOU can use art direction to help tell a better story by giving the audience visual clues on screen. 

Today we are taking lessons we learned from shooting our latest short The Asylum Groove.

We were challenged to make a film with only a single word of dialogue.

With this in mind, we knew we would want to take advantage of cinema’s visual medium and use art direction to help tell the story, expose the universe, and give the audience clues as to when and where the film is set.

There are three main groups of art direction for a zero budget movie: You’ve got costume design, set design, and props. They all contribute something in their own way but all come together to create a fully fledged world.

First, lets cover costume.

The costume of your character, and the way they wear that costume, is a visual representation of their characteristics and their situation in the film. You can tell a lot about a character by the way they dress.

For The Asylum Groove, we wanted to use the costume as a way to give the audience the character’s backstory and to help him pop on screen, so we designed it in a few different ways.

Firstly, ill-fitting white scrubs. Yes, this costume is also worn by a doctor, nurse, or a surgeon, but by making them worn, unironed, and stamped with a registration number, it would help give the impression that the scrubs are a mass produced, unkempt, mandatory uniform.

Episode.00_01_38_13.Still004.jpg

The creases and weathering also gives the costume some texture on screen, and as the scrubs are the brightest colour on screen, it also helps the character stand out from the background.

Costume design seems to work best when you give your costume a history or backstory. Most people don’t wear clothes that they’ve literally just bought that day, so think about your character, the types of clothes they would wear, and how long they have been wearing them before the moment the film begins.

The scrubs weren’t the only costume detail we added. His blue shirt underneath was to give the impression that he still retains some independence by wearing his own clothes underneath. This design also pays massive homage to One Flew Over the Cuckoo’s Nest, which this film is heavily inspired by.

We gave him cheap slippers which instantly negate any question that he might be a janitor or caretaker. The slippers also represent comfort and a relaxed attitude, so clearly he lives or stays in this location for a long period of time.

Episode.00_02_43_13.Still001.jpg

The last detail are the rags hanging from his waist and pocket. We included these for a few reasons. Firstly, it shows he’s cleaning. Secondly, having something long and hanging down helps compliment the energy of him dancing and spinning as it flows and lifts when he moves.

Episode.00_03_04_18.Still003.jpg

Next up we have props!

Props, and the design of those props, tell us about the character, the world, but most importantly, a prop is a totem of a character’s purpose in the story.

If you see someone flash a badge, you instantly think they are police or a detective, even without them wearing a uniform or saying a word.

Episode.00_03_16_22.Still010.jpg

We wanted the audience to know within a few moments that our character had a job to do. So we gave him a mop and bucket. In terms of specifics, we wanted an old tin bucket.

This is a classic-look, and helps gives the film a pre-modern aesthetic. The mop needed to be old, dirty, and with a wooden handle, also helping set the film in the past and maybe even tell the audience that he’s been given sub-standard cleaning supplies for his job.

Episode.00_03_32_08.Still011.jpg

The last major prop in the film was the vinyl record. From the get-go we knew this film would involve dancing to an old-school song. We wanted to help place the film around the 1970s, so we took an old record and designed, what we thought, was the most 70s label as possible: orange background, groovy disco font, and a simple design without anything super fancy in terms of graphics.

Episode.00_03_55_21.Still007.jpg

This prop was also designed to be used as the title of the film, so we knew we wanted it to look as genuine as we could. Last up, we have set design!

Set design is arguably the hardest part of art direction for an indie and zero budget filmmaker. Whereas things like props and costume are usually quite small and personal, creating a convincing set (depending on the film you are making) is a mammoth task, but if done right, can be a powerful provider of clues to the audience about the world, the period, the state of the location, and the character’s situation.

We cheated a little bit with the set on The Asylum Groove: we actually wrote the script around the pre-existing location. We knew of the school assembly hall before we were even given the one word challenge, and we knew we wanted to use it for a film about people in an insane asylum.

Episode.00_04_52_16.Still012.jpg

The location was already old, worn, dirty, and had the most horrible bright yellow walls. Instead of trying to convert it into something completely different, we used the location as the basis for the script and embraced the old, grimy look.

Building a world around an interesting looking location you already have access to will give you an easier job of creating a convincing set and also save you a lot of money.

Episode.00_05_01_21.Still013.jpg

If there was one thing we wanted to tell the audience without OUTRIGHT telling them, it was WHY the character was cleaning. His reason for mopping isn’t necessarily a major plot point, but giving the character a true purpose on screen helps the audience settle into the film and not question it from the very first frame.

If the audience had to ask “Why’s he mopping?” at the beginning of the film, it just means we didn’t give the audience enough clues to his situation.

So we added a banner and balloons onto the back wall with “Bedsville Disco” painted on. We deliberately made a poor job of  he back wall, the banner is falling off and the balloons are not even finished. This was to give the audience the impression that the disco wasn’t a glamorous affair, and would fit closer to the derelict hall we had access to.

Episode.00_06_00_20.Still015.jpg

We added small details such as signs on the door with “dormitory” and “staff only”. We actually took these from the set of the One Flew Over the Cuckoo’s Nest stage play.

Episode.00_06_17_12.Still016.jpg

Colour design was another thing we wanted to focus on with this film. Because of the bright yellow walls of the assembly hall, we knew we could use yellow’s complementary colour, BLUE, as an accent colour for the character and as a visual device to lead the audience's eyes.

Episode.00_06_26_07.Still017.jpg

This is why we picked a blue shirt, blue paint on his hand and the brush, a blue balloon placed on the wall, a bright blue record player, and blue nail varnish for the mother at the end. We wanted everything he interacted with to be blue.

The Asylum Groove FILM V1.247.Still005.jpg
Episode.00_06_32_03.Still018.jpg

One last we did was take advantage of the furniture left over in the room. The chairs and sofas were already there, so we placed them in a way which we left created a vacant audience for the character to dance to.

Episode.00_06_40_18.Still019.jpg

All of the furniture points in the direct of the character, and the angle of the chairs on stage actually point directly towards the framing of the execution, foreshadowing the audience viewing of the execution at the very end.

Not a hugely important detail, but we thought it could be a cool little bit to add in and maybe, subconsciously, it would add something to the storytelling. 

We even included the execution chair in the background after the moment the character snaps back into the reality when he trips over the bucket.

Episode.00_07_06_15.Still020.jpg

Obviously this is only our experience of art direction so far, and we have a lot to learn.

With this film, we suddenly realised how powerful of a storytelling device art direction can be. It can reduce your dialogue, give your audience visual hints towards the story and the world, and there’s no denying a great-looking set makes your film look a hell of a lot more cinematic.

A picture is worth a thousand words, and we as filmmakers should take advantage of that.


This video was Sponsored By

🎵 http://bit.ly/pbtrack-links - Click here to download this episode's track. Check out Premiumbeat.com to discover a huge range of exclusive royalty free music!


DISCLAIMERS:

Some of these links are affiliate links, if you purchase gear via these links The Film Look will receive a small commission, but there will be no additional cost to you. Thank you!

Making of: The Asylum Groove Part 1 | Behind The Scenes

This is part one of the making of our short film The Asylum Groove. Let us know in the comments below if you see anything in the behind the scenes which you would like to more about.


🎬 In case you missed it

The Asylum Groove - Short Film - https://youtu.be/aysGfZyQEiM


DISCLAIMERS:

Some of these links are affiliate links, if you purchase gear via these links The Film Look will receive a small commission, but there will be no additional cost to you. Thank you!