BTS Day Two of Backstage

A fly on the wall experience of the making of our latest film Backstage! We had a load of fun making it and wanted to share with you our process of shooting the film.

If you haven't seen our short film Backstage you can find the link below.


BTS: Day 2 - The Film Look Team
DJI Wireless setup

DISCLAIMERS:

Some of these links are affiliate links, if you purchase gear via these links The Film Look will receive a small commission, but there will be no additional cost to you. Thank you!


How to scout a location for filmmaking

The location you choose to shoot your film helps to create the world your film is set in, and it’s just as important as casting the right actor.

So how do you know if a location is the right one for your film?

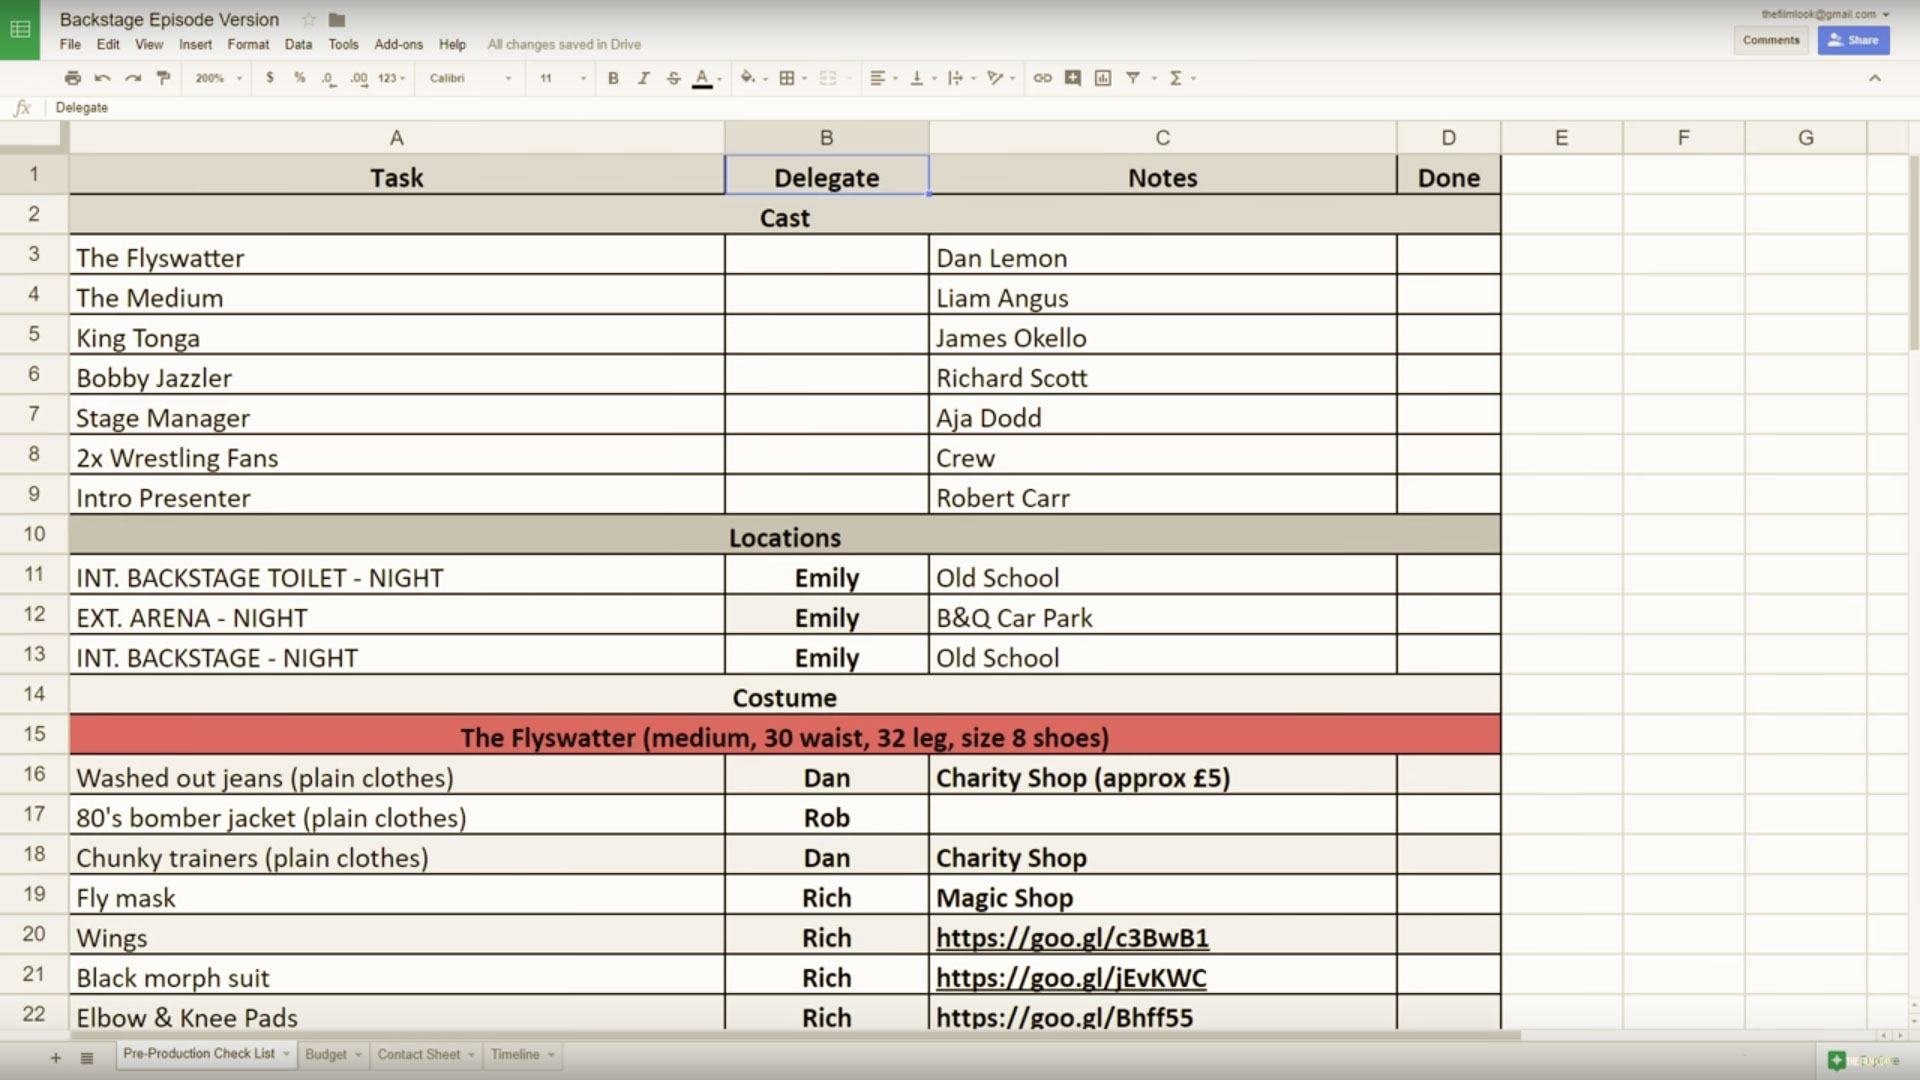
Once your script is complete go through and break it down. Make a list of all the locations that you need - in fact, make a list of everything you need to make your film.

We made a video about breaking down your script which goes into more detail if you want to check out that video after this one.

Now you have written down all of the locations you need, ask yourself how you want each location to look and how much access you need to shoot the scenes in that location.

How do you need it to look?

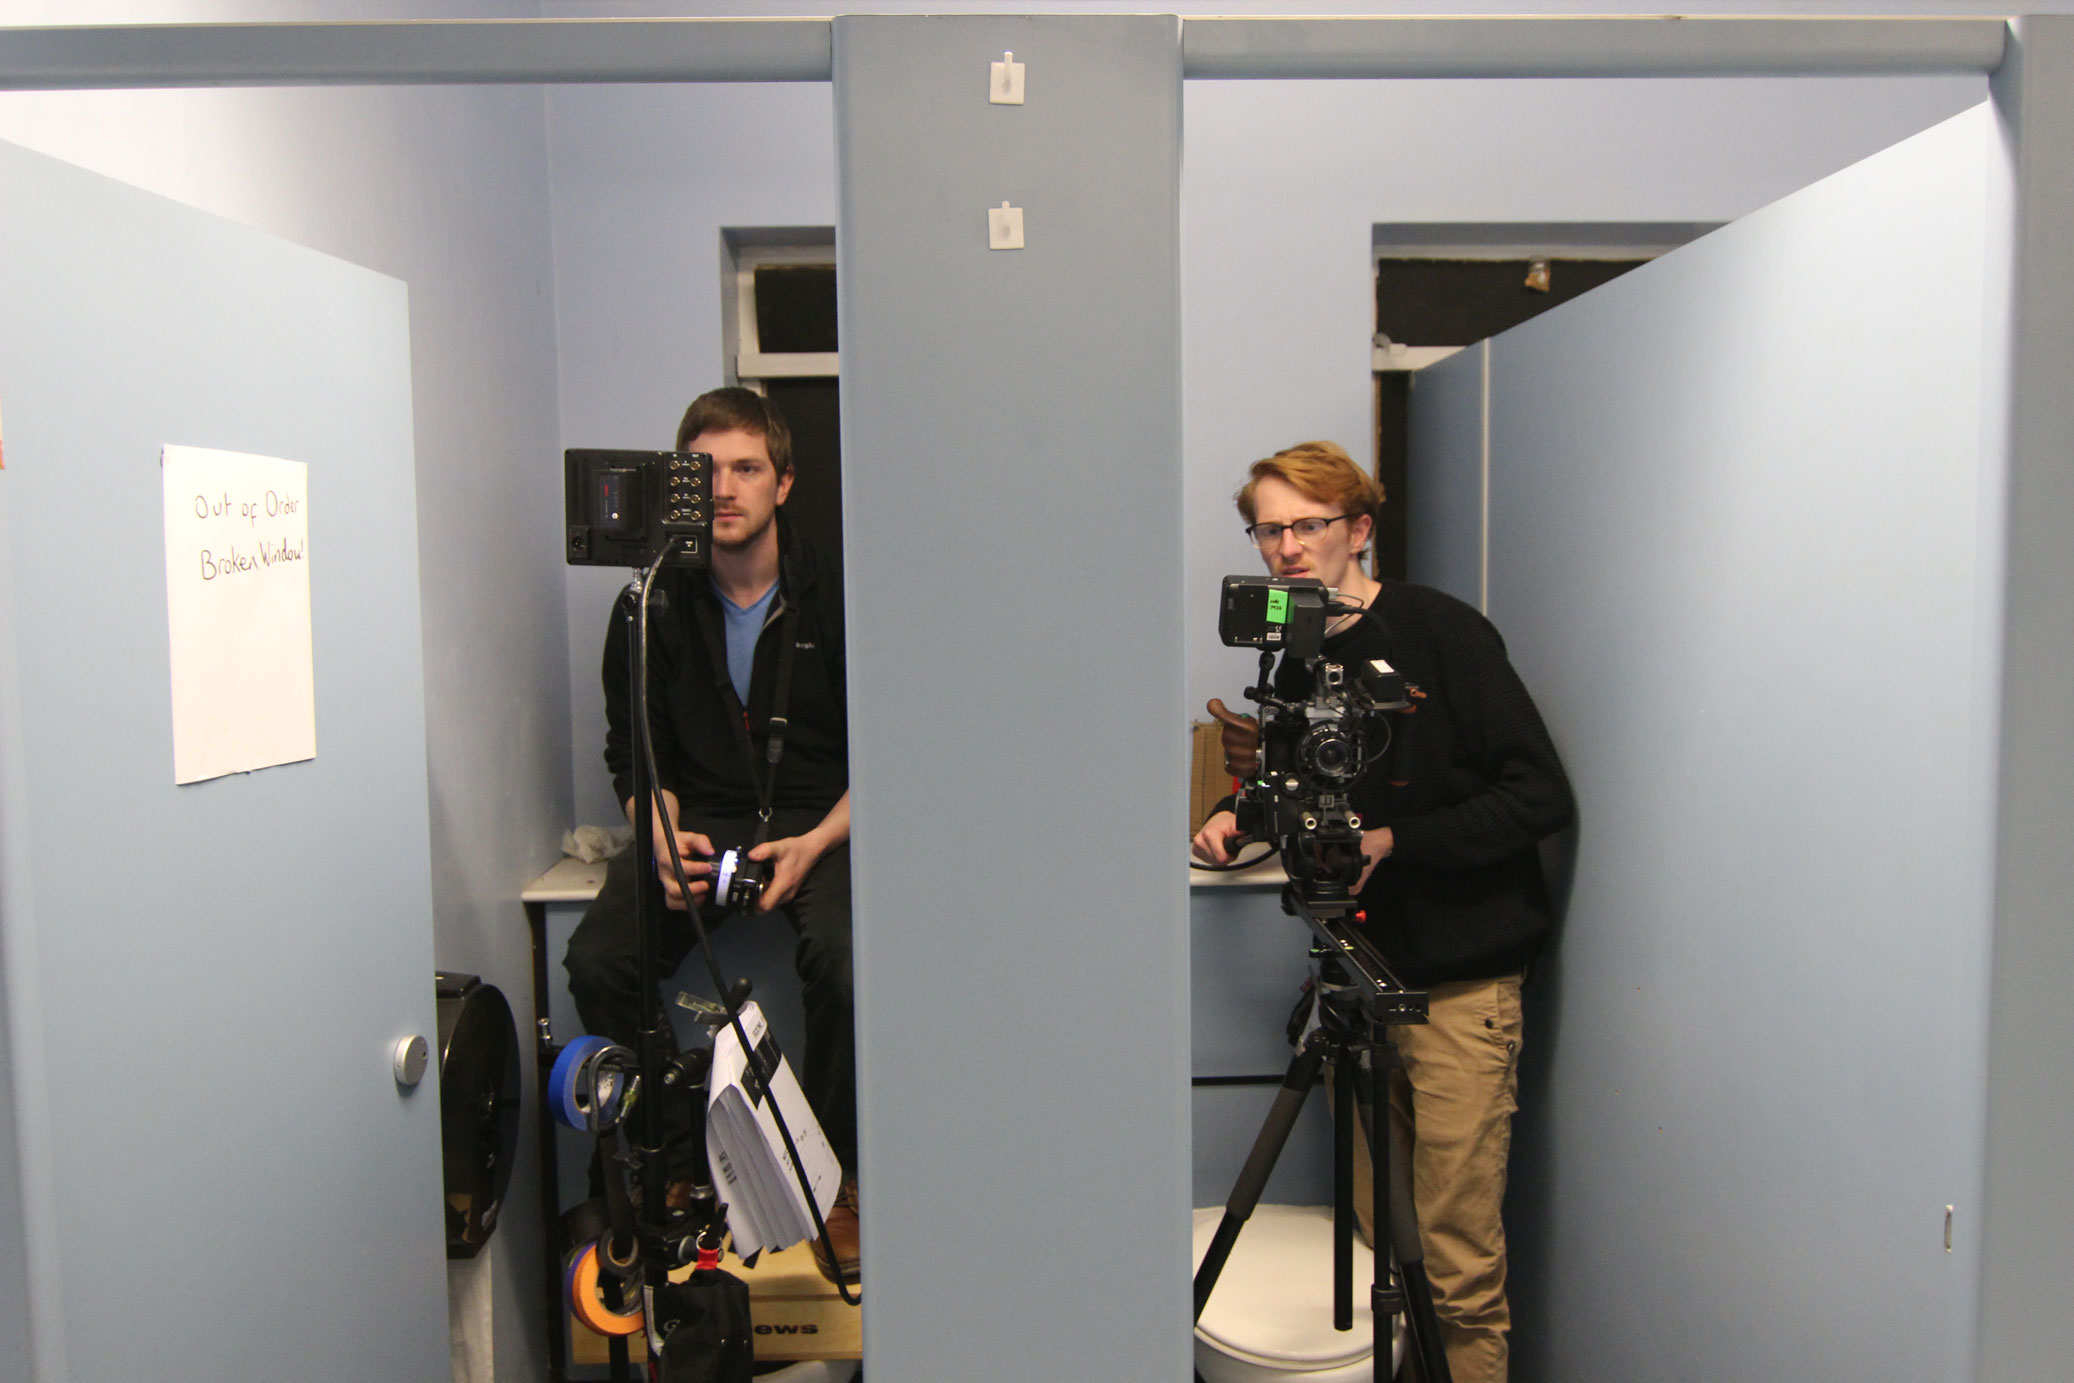
The main location in the script for our short film Backstage is set in the locker room at a local community centre or boxing gym.

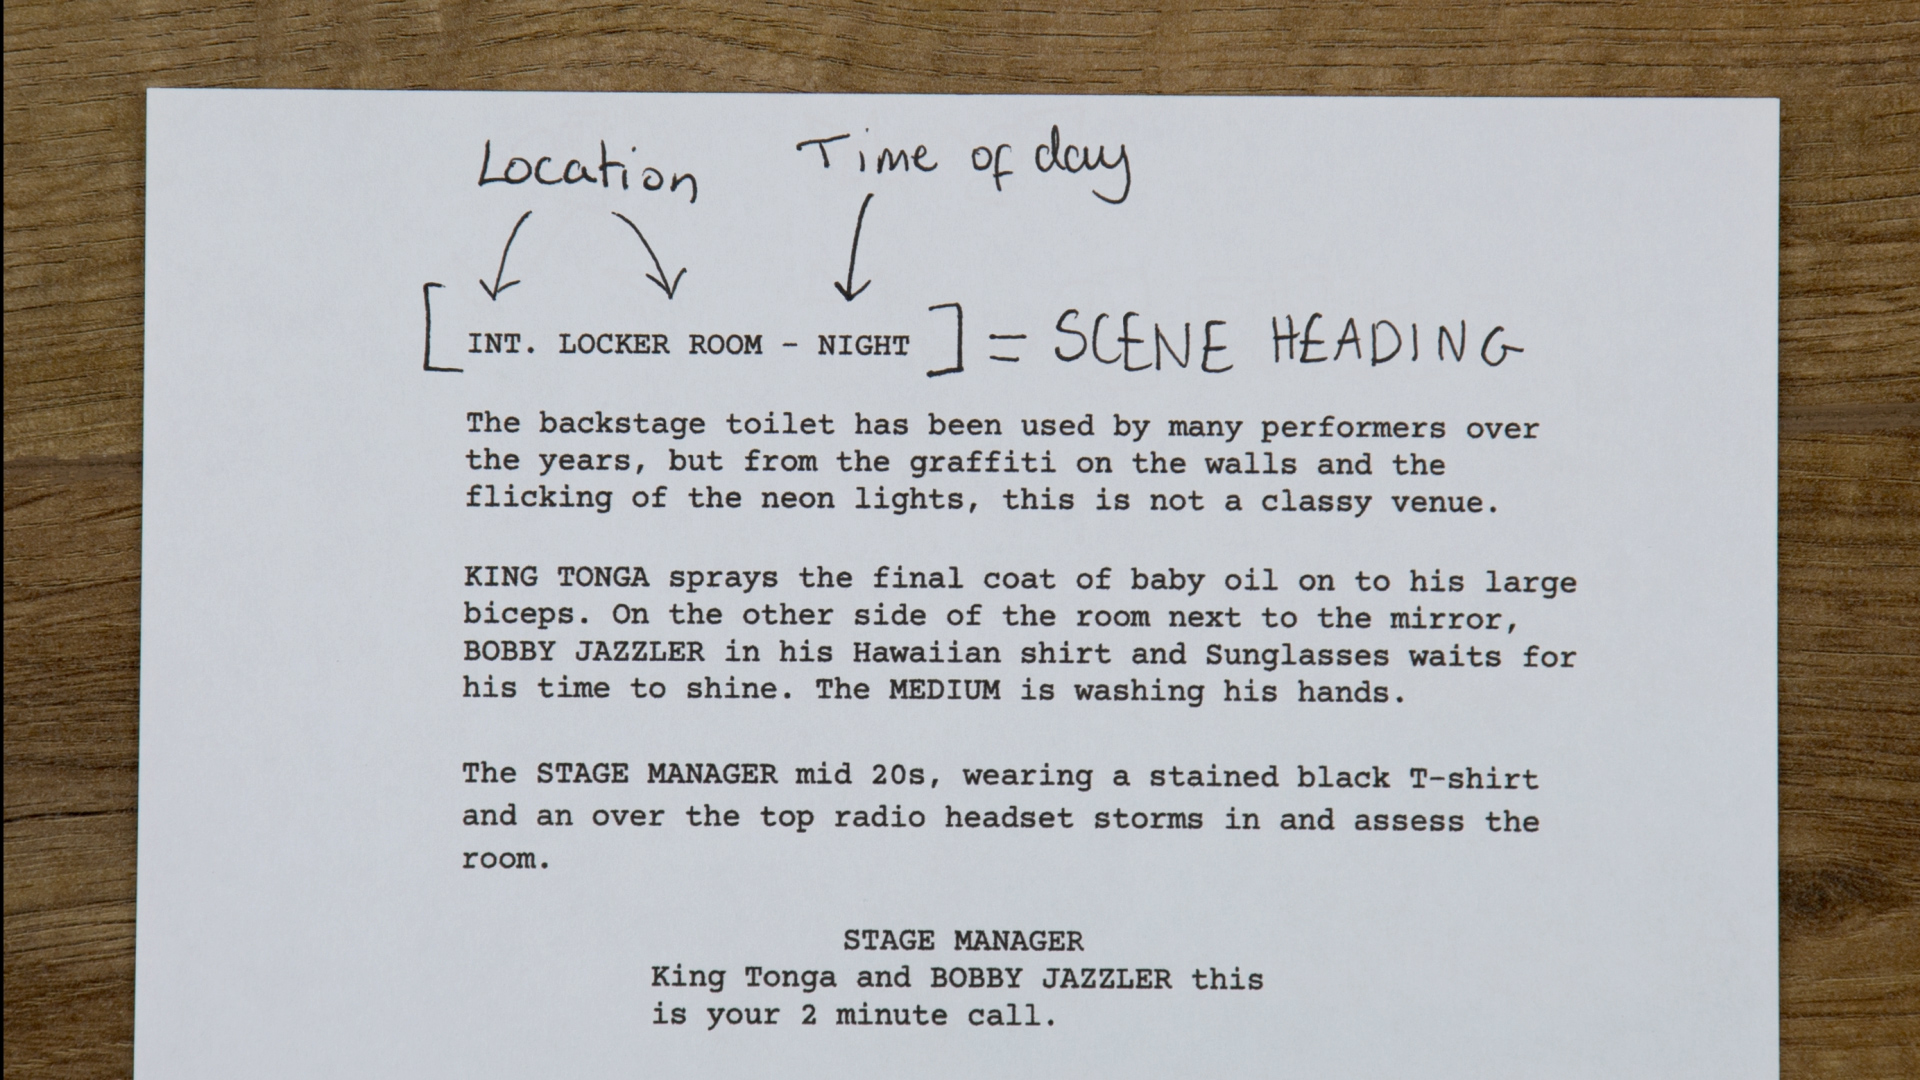
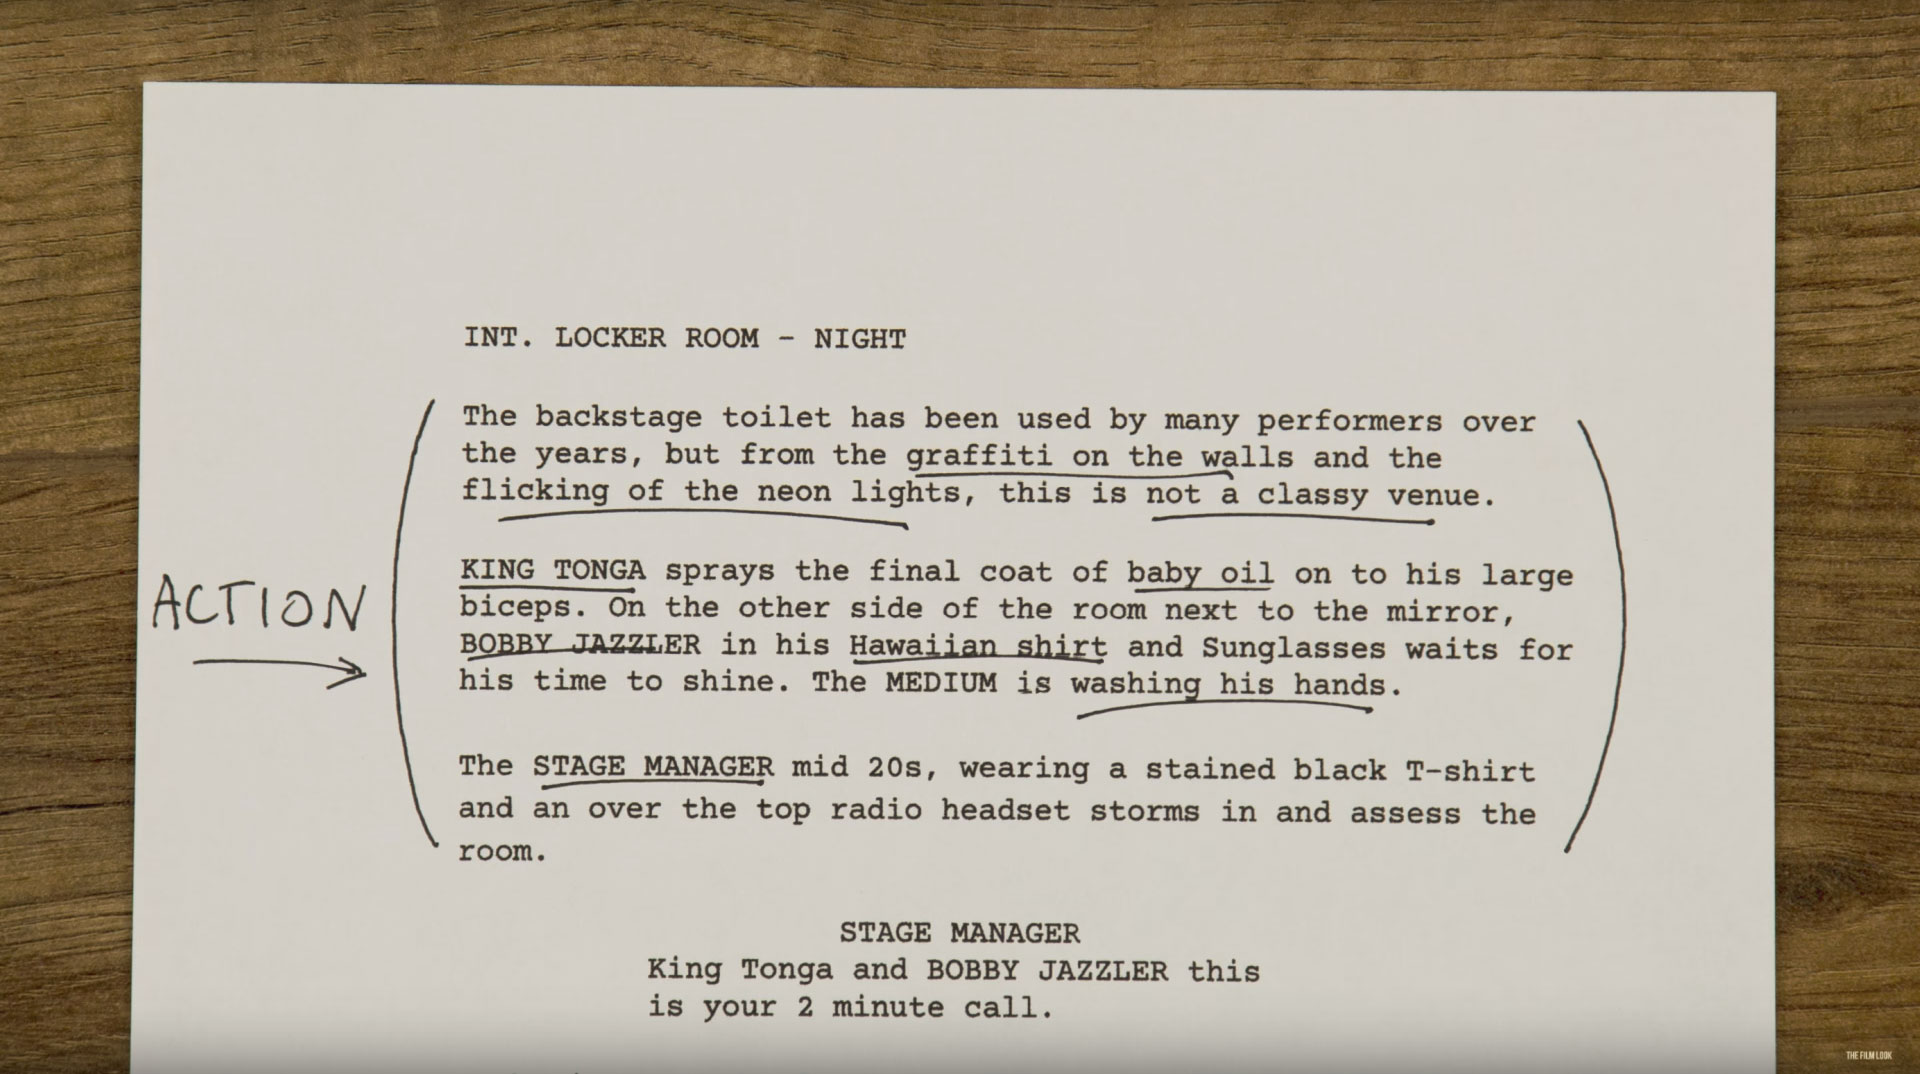
This is how we describe the location in the script -

INT. LOCKER ROOM - NIGHT

The backstage toilet has been used by many performers over the years, but from the graffiti on the walls and the flicking of the neon lights, this is not a classy venue.

When looking for this location we thought about contacting local gyms and sports centers as they would have locker rooms which are already set up.

The first problem we had with these types of locations is that they do not look run down, and it would be very difficult to make them fit the mood we needed for the film.

Access

The reason we could not change the look of these locations is the second problem we had which is access.

Access is very important when making low budget films as you are normally asking to use the location for free, and have to work around external time restrictions.

Local gyms and sport centres are normally used on a 24 hour basis, and if they are closed it’s during the night.

Our access would be very limited, before and during the shoot. If we needed to dress and undress the location after each shooting day, keeping the look of the set consistent would have been very difficult.

Don’t just use the first location that comes to mind, spend a little time searching for alternative locations.

If you need a living room, a friends or parents living room would be the quick and easy option, but if you need the location to look run down you need the time to make it look that way.

Can you set up the room, shoot everything you need, and return the location to its original state in the same day?

Backstage

The location we used for our short film Backstage was in a old school which now gets used by a church, they never use the area we wanted to use which was a boys bathroom, and we could get access to the location as many days as we needed before the shoot.

This was the 3rd location we looked at. The first was too small, the second was too new, and it might not look like it, but the 3rd was perfect.

Having these extra days before the shoot allowed us to clean, dress the set, test the lighting, and block the scene a few weeks before we shot the film.

This meant on the first day of principal photography we only needed to turn up with the camera and shooting schedule, giving us more time to work with the actors and start shooting on time.

We found the location by putting a call out on different local Facebook filmmaking groups.

Emily, the producer of the film, posted out to a bunch of pages and someone she knows, knew someone else, who knew of a place that might suit what we needed.This is why it is so important to collaborate with others as a filmmaker - you never know who knows someone that can help.

Location Scouting

The look of the location and available access are just two of the main things you need to think about when scouting locations for your film.

In the description below you will find a location checklist that has other things you should check when scouting your next filming location. Let’s film in the form.

Location Scounting Form 1.jpg

Script Location - For us it is Locker Room

It’s Scene - 1 of the film which is set at night and it is an interior. The actual Location was an old school and then we add the address which will come in handy later on.

Add the time of when you visited the location as at different times of the day the look and sound of the location may change.And finally add the contact details of the person that give you access to the location.

Next work out the dates you would like to use the location, this includes the number of preperation, shoot and how many days it will take you to reset the location. You can use this information to compare what access is available at the location.Make a note of how far away it is from our production office from the address you wrote down, for most people this is their home.

Location Scounting Form 2.jpg

When at the location draw a rough floor plan of the room and then make a note of what the room looks like.

Also, take photos of the room.

Does the room fit the tone of the film? This question maybe yes or no, but you should always be thinking about how much set dressing you need to do to make it match the tone of the film.

Location Scounting Form 3.jpg

Then work out do you have enough time to dress the set with the information you know from how much access you have.

Listen to the sounds that are in the location. Will you be able to record clean dialogue?

If not can you turn off anything that is making a noise like a clock or a fridge. If there are noises you can not get rid off can like cars going by, can you record your film at this location.

Finally make a note if there are places for people to park at the location. Is there enough room for you to store equipment, makeup artist, and are there bathrooms. This one is very important.

Location Scounting Form 4.jpg

So when you are scouting your next film location, use this checklist to evaluate whether the location is the right one for your film. Ask yourself what you need it to look like, how much access you’ll need, and be open to different places.

You never know, a disused boys bathroom might be the perfect setting for your film, it was for us.


This video was Sponsored By

🎵 http://bit.ly/interface-pack - "Interface", RocketStock's HUD element pack, offers you more than 400 futuristic elements compatible with Premiere Pro, FCPX, and AE. Discover it now!

http://bit.ly/track-rosegold - Click here to download this episode's track. Check out Premiumbeat.com to discover a huge range of exclusive royalty free music!


Location Scouting The Film Look

DISCLAIMERS:

Some of these links are affiliate links, if you purchase gear via these links The Film Look will receive a small commission, but there will be no additional cost to you. Thank you!


BTS: Day One of Backstage


A fly on the wall experience of the making of our latest film Backstage! We had a load of fun making it and wanted to share with you our process of shooting the film.

If you would like to watch our short film you can find it below:


Behind The Scenes The Film Look
BTS The Film Look

DISCLAIMERS:

Some of these links are affiliate links, if you purchase gear via these links The Film Look will receive a small commission, but there will be no additional cost to you. Thank you!


How to Break Down Your Script

Once you have your script complete, the next step is to figure out exactly what you need to make your film. It’s time to break it down!

A script breakdown is essentially extracting all of the necessary information from your script. To do this you need to read through your script and every time a location, prop, costume, or character is mentioned write it down.

This is the script for our short film Backstage. Let’s take a section from the script and break it down. Everything we highlight is something we need to make the film.

Breaking Down the script.jpg

Characters

For this scene we know we need to cast someone to play Jack who is The Flyswatter.

If you haven’t already, start to think about the characteristics your characters have, and then put a call out for to cast your actor. We cast an actor called Daniel Lemon to play Jack.

In this scene we also need a group of people to be wrestling fans that walk past the camera. This is a very small part for people to play, but we still need them to help tell the story. The wrestling fans in our film were just crew members.

Costume

To help identify them as wrestling fans, Ed the sound recordist is wearing the same bandana asThe Medium, a Wrestler in the film.

It shows he is going to the wrestling event to support him, and we threw in the the foam hand as this is a well known costume that people would wear when going to a sporting event.

Breaking down your script - Costumes.jpg

Since this film is set in the 80s all of the costumes need to fit that era, so we needed to dress Jack in washed out jeans and a multicolored jacket.

The final costume looked like this.

We did not go for a multicolored jacket because we managed to get this denim jacket which is actually from the 80s, and nothing says 80s like double denim. Having this list just made sure we had something for our actor to wear, which fit the tone of the film.

Props

The props we needed in this scene were wrestling leaflets, which are shown earlier in the film to help dress the backstage set, and help set the scene that this is a wrestling event. The black sports bag which he is carrying in this scene was also used earlier in the film.

Breaking down your script - Props.jpg

The 1982 Volkswagen Scirocco really helps to ground this film in the 80s. Having access to a vintage car like this upped the production value of the film and really helped put a time stamp on the film. We wrote it into the script because we knew we could get access to it for free, as it is owned by Richard’s Dad.

Breaking down your script - Props 1.jpg

Location

The location we needed was an exterior venue where a local wrestling match might take place. We chose a public car park with very few buildings and signs surrounding it.

We couldn’t point the camera towards anything that showed we were shooting in 2017, so this empty car park worked perfectly. We also chose this location because we were able to place the car under a flood light, reducing the time to set up complex lights.

Once we’ve gone through the entire script we create an excel document to store all of this information. In the document we have 4 columns with the first being the task. This is where you put the name of all of your characters, props and costumes.

Excel - Breaking down your script

The next column is Delegate, this is where you can add the name of the person who is responsible for completing that task.  The 3rd column is for notes with information where you might obtain costumes or props. Finally the 4th column is where you can tick off a complete task.

When all of this section is green you have obtained everything to make your film.

Throughout this breakdown document we break down everything we need into different sections. We start by making a list of all of the characters we need to make the film, and when we have cast them, their name goes in the notes section.

Next are the locations we need, and when we have them complete the address and contact details of that location also go in the notes section. For the costumes, each character gets their own section so we know which character is wearing what item of clothing.

Finally we split the different props and set dressing into the different locations of the film. We do this so we know exactly what we need to take to each different location.

Breaking down your script Form.jpg

Having a document like this let's you and your production team know what you need to make your film on different days and at different locations. We use Google Docs to do this as it is free and everyone can see what they are responsible for.

Breaking down the script gives you a list of all of the pieces you need to make your film, it’s just up to you to put them together.


This video was Sponsored By

🎵 http://bit.ly/illuminate-pack - RocketStock’s light leak pack, "Illuminate", is sure to impress your viewers. Shot using digital cinema cameras in 4K, it’s an unbeatable way to lift your video to new, cinematic heights.

http://bit.ly/track-boundforglory - Click here to download this episode's track. Check out Premiumbeat.com to discover a huge range of exclusive royalty free music!


DISCLAIMERS:

Some of these links are affiliate links, if you purchase gear via these links The Film Look will receive a small commission, but there will be no additional cost to you. Thank you!


The Film Look Plans for 2018 | Channel Update

Here are our plans for the channel for 2018. We want to make 2 short films, create a directing 101 series, create more kit and DIY video, along with making The Film Look Podcast.


DISCLAIMERS:

Some of these links are affiliate links, if you purchase gear via these links The Film Look will receive a small commission, but there will be no additional cost to you. Thank you!

The Basics of Writing a Screenplay

YOU just came up with an awesome story that you want to turn into a film. What do you do now? It’s time to get that story written on paper - let's write a script!

A script (or screenplay) is the backbone of your film. It is the blueprint you’ll follow when you plan, shoot, and edit your movie.

In the last episode we spoke about storytelling, structure, and using “character, conflict, goal” to craft a compelling plot. Now it’s time to put that into practice and draft a formatted screenplay.

Firstly let's breakdown the elements of a screenplay using a page from our latest film BACKSTAGE.

A scene always starts with a scene heading. The scene heading is there to tell you the location and time of day of the scene you’re about to read.

Screenplay - Scene Heading.jpg

It always begins with INT or EXT, signifying if the scene is inside or outside.

Then a brief description of the location, for example, LOCKER ROOM. This is followed by the time of day: DAY or NIGHT are standard descriptions, but if you plan on shooting in a certain light, you can be more specific like GOLDEN HOUR or DAWN.

Next you have action; this is where you place the narrative description of events in the scene. This is the meat of the script, so in here you can describe characters, the events, the location and character interaction.

Screenplay Action

When a character is introduced for the first time, their name should be in ALL CAPS. This is to clearly identify that this is a new character who we haven’t seen yet.

After that, you should use sentence case with a capital letter at the beginning of their name.

Next up we have dialogue. It always starts with the character’s name in ALL CAPS in the centre of the page. Underneath you have the written lines in sentence case.

Screenplay - Dialouge.jpg

We won’t be getting into the nitty gritty of margins, spacing, and indents. With screenwriting programs such as Celtx and Final Draft doing all of this for you, I won’t bore you with it.

Next up we have parentheticals. These are seen as small descriptions placed between a character’s name and their dialogue inside parentheses. They have multiple uses, and all link to the dialogue being performed.

Screenplay - Parentheticals.jpg

They can be used to indicate where a line is being outputted, such as FROM PHONE.

They can be used if a line of dialogue needs to be performed a specific way, such as SARCASTICALLY.

They can also be used when a character is addressing a specific character in the scene, such as TO BOBBY JAZZLER.

You can SOMETIMES use parentheticals in replace of action, such as TAKES OFF GLOVES. This should only be used if the action can be written with very few words and is delivered during the line. Otherwise, break from the dialogue and write it out as an action line.  

Parentheticals should be used sparingly, and it’s common to see parentheticals unused in a script altogether. If you don’t know whether to use them, just leave them out.

There are a few more intricate details you can add to your script, but this is a good starting point to formatting. So now you know the basics, what's next?

It’s time to start filling out the action. If you have some brief notes from your beat sheet such as “a bunch of wrestlers are getting ready for the fight” you can now turn it into something more descriptive.

Just remember to avoid writing anything which is unfilmable; by this I mean anything which you can’t capture on screen.

Instead of writing “the locker room smells like a boys bedroom” describe the pile of dirty laundry in the corner. Try to limit describing anything you can’t point a camera or microphone towards.

And don’t write anything which jumps into the role of another filmmaker. If you describe a character’s eye and hair colour, the casting director will be limited. If you start describing all of the camera angles, you’re doing the job of the cinematographer.

Once you have a finished draft, it doesn’t have to stop there! A first draft is a good starting point, but there will always be room for improvement. We have a bunch of videos on our channel on ways to improve your script writing. I’ve put a link to our Writing Playlist if you want to check them out.

And once you’ve written your first draft, print it off, and give it to someone to read. They might notice something you don’t.

Free screenwriting software I use: https://www.celtx.com/


This video was Sponsored By

🎵 http://bit.ly/track-rollthedice - Thanks to PremiumBeat.com for sponsoring the episode! Click here to download this episode's track. Check out Premiumbeat.com to discover a huge range of exclusive royalty free music!


Screenplay-Location-INT-EXT

DISCLAIMERS:

Some of these links are affiliate links, if you purchase gear via these links The Film Look will receive a small commission, but there will be no additional cost to you. Thank you!

Storytelling 101

YOU just thought of a really interesting idea for a film. What do you do now? It’s time to turn that idea into a story.

A story starts with some sort of scenario, character, or moment you can see inside your head, and then expanding on it.

Don’t get bogged down by formatting and complex story structure just yet.

Right now all you need to do is outline the things that can happen to your characters throughout the film by making a big list of stuff that can happen. These are sometimes referred to as story beats, and listing them creates a beat sheet.

Our latest short film BACKSTAGE was a product of a writing exercise we call “Story in a Can”. We brainstormed the idea on camera and outlined the beats in the episode. I’ve put a link down below if you want to watch the birth of our latest short film.

Instead of trying to knock out a formatted script from the get-go, write your beat sheet and use this as a brainstorming session for developing the story.

Right now, it’s all just playing around with ideas so nothing has to be concrete. Remember, you can’t edit a blank page!

As an example, these are the beats for BACKSTAGE:

Story Beats - 1.jpg
Story Beats - 2.jpg
Story Beats - 3.jpg
Story Beats - 4.jpg
Story Beats - 5.jpg
Story Beats - 6.jpg
Story Beats - 7.jpg

So now you have your basic story elements, it’s time to write up the script, right? I’d advise against this for now.

At the moment you have a simplified template for your film, and swapping and changing the beats inside the template is a lot easier to wrap your head around than swapping and changing the beats inside a formatted script.

You currently have the ingredients to your cake on the counter. But before you mix them together, you want to measure them out. Don’t be so hasty to bake the cake if you currently have too little flour, too much sugar, and have misplaced the eggs.

There are a few simple methods you can use to make sure your film is as tasty to an audience as possible. At the end of the day, you are making this film for someone to watch and enjoy - they won’t enjoy taking a bite if it tastes horrible.

Character Conflict Goal.jpg

The first thing I measure are the three main ingredients: “Character -> Conflict -> Goal”. This is a structure storytellers have been using for thousands of years, and without it, your cake might be too sweet or may not rise in the oven.

Who are they, what do they want, and who or what is stopping them? All the tools you use to create your film; the camera, lenses, the sound, the acting, the lighting, it’s all just there to give the necessary information to the audience.

In BACKSTAGE, we tried to help the audience understand The Medium using a few methods.

Firstly, his character: we are shown his pantomime-aggressive Wrestling persona in the cold open at the beginning, then we see his contrasted personality and commitment to his cause once we cut into the locker room, then when the conflict occurs, we see him rise to the occasion. He’s a character of passion, he’s heartfelt, confident, and he’s a bit weird.

His goal is to fight in the ring. This is clear because he literally says it at the beginning, his face is on all of the posters, and he’s concentrating so hard as he looks at his reflection in the mirror. Everything points towards this guy being a big deal.

What’s stopping him from fighting in the ring? The Flyswatter. The Flyswatter is the guy he is supposed to fight. If he doesn’t get this guy out of the cubicle and into the ring, he doesn’t achieve his goal.

The Flyswatter is a little bit different. We learn about his character more through empathy than anything else. We’ve all been in a situation we are pushed into and feel trapped. He is literally boxed in a cubicle, and the over-the-cubicle shot is a deliberate choice to emphasize this information to the audience.

His goal is to leave, it’s as simple as that. We know this through his negative reaction to The Medium’s tales of his past - we know this as he is quietly removing his costume throughout the scene - and we know this when he finally tells the Medium after letting it build up inside his head.

Stopping The Flyswatter from achieving his goal is shame. He is nervous, he wants to leave, but at the same time he is completely ashamed to let these people down. The clock is ticking for The Flyswatter, he is given 20 minutes, and he knows with every cue of music he can hear coming from the stage that his time is coming to an end.

At the end of the film we have resolution. The Medium gets to fight his final match, and he successfully convinces The Flyswatter to fight. The Flyswatter is courageous, he actually achieves his original goal of leaving, but that goal suddenly reveals itself to be more than just fleeing; it’s an internal struggle of anxiety which he overcomes in the most peculiar way.

Your characters, their goals, and their conflict don’t always have to be multi-layered, perfectly crafted pieces of the plot, but without these elements at all, your film may feel alien.

Film is a language, and that language derives from campfire tales and slumber party ghost stories. They all share a common tongue, and it’s up to us as filmmakers to deliver that information in an entertaining and visually-cinematic way using the tools we have available.


This video was Sponsored By

🎵 http://bit.ly/stanza-pack - If you're looking for stylish transitions for your video, then check out "Stanza" by RocketStock. You’ll be cutting from scene to scene like a pro with this bold pack of 200 plus video transitions.

http://bit.ly/pbtrack-links - Click here to download this episode's track. Check out Premiumbeat.com to discover a huge range of exclusive royalty free music!


Storytelling 101

DISCLAIMERS:

Some of these links are affiliate links, if you purchase gear via these links The Film Look will receive a small commission, but there will be no additional cost to you. Thank you!

Season 4 is here!

Season 4 is here! We have over a dozen episodes ranging from writing to shooting to costume design. We have broken down the process of the whole film so you can learn exactly how we made it!


DISCLAIMERS:

Some of these links are affiliate links, if you purchase gear via these links The Film Look will receive a small commission, but there will be no additional cost to you. Thank you!

Pergear a7s Review | The Best Budget 7 inch Monitor?

A year ago we made a video on the Feelworld 759: a really decent budget 7 inch monitor which we thought was a great introductory bit of kit.

But now we’ve found something around the same price that blows the 759 out of the water.

PerGear a7s Monitor Review.jpg

This is the Pergear a7s. It has a really stupid name, but for the price, it’s packs one hell of a punch. Welcome to The Film Look.

Before you ask, yes, the Pergear monitor does work with any camera using HDMI, not just the Sony a7s like it’s daft name might have you believe. 

Today we are going head to head to see just how much better it is compared to our current budget 7 inch monitor, the Feelworld 759. Let’s get started!

The points for {Build Quality} go to Pergear:

Per Gear - Build Quality.jpg

Both of these monitors have a budget look and feel to them. They both have a plastic body, but both are pretty solid in the twist test. There is almost no flex to them.

The Pergear is a bit sleeker-looking once you move the protective gel cover because of it’s lack of face buttons - instead they are sunken on top.

It also has a jog wheel on the side, which is a lot faster and easier to navigate the menus than using the buttons on the Feelworld.

Per Gear - Buttons.jpg

The Pergear comes with a thread on it’s top as well as the bottom, incase you want to mount it in a hanging position.

{I/O} - Pergear wins again:

Both of these monitors use HDMI in, a 3.5mm headphone jack, and a DC 12volt socket for plug-in power.

The Feelworld includes a socket for an OSD controller, an AV socket, and a USB port for firmware upgrades - none of which I have any use for.

The Pergear trumps these features with an HDMI out, which means you can daisy chain this monitor to another. This is useful if you are using an additional monitor off the camera for pulling focus or for a director's viewing screen.

The Screen - Another point to Pergear:

At 1200p you get a full HD monitor when shooting at 16:9, which really does make the difference when checking your focus.

The Feelworld is only 800p, and at first I didn’t think it would make much of a difference.

But look at the difference when trying to focus on some text in the distance.

The colour accuracy isn’t great for both of these monitors. But the Pergear IS sharper, brighter, has a better contrast ratio, and a better viewing angle.

Software Features - again, a point to Pergear, and this is where the difference is staggering:

PerGear-a7s-Monitor-Review.jpg

They do both come with a load of similar features, some of the more useful ones being: centre markers and image flip.

They both have focus assist, but I will say now the focus assist on the Feelworld is terrible. Instead of identifying your focus field with a coloured line it just makes everything super sharp, which doesn’t help at all.

The additional features that come with the Pergear that I think are invaluable are:

Zebras for exposure checking, false colour for exposure and lighting ratios, it has a histogram, on-screen audio levels, and the safety markers and letterbox overlays are customizable too, so you can choose the thickness and colour of the lines, and the darkness of the letterbox overlay.

Per Gear - False Colour.jpg

The Pergear even has a battery gage, so you know when you’re about to lose power!

When I started this review I thought I’d be tallying up the scores and dividing it by the price to get an average value of each product. But considering the Pergear has won in every category and is only an extra $20, it’s safe to say it’s the winner.

If you are looking at getting your first camera monitor, or you want to pick up something with a few more features, grab yourself a Pergear.

The ones I saw advertised didn’t come with any batteries, so if you do order one get a bunch of NPF750s. I have linked the Pergear and batteries in the description.

And if you haven’t already, consider subscribing. We do reviews like this and a load of other filmmaking videos to help you get closer to achieving the film look.


This video was Sponsored By

🚀 http://bit.ly/pack-emulsion - Make your video look like it was tailor-made for the silver screen with RocketStock’s film grain overlay pack, Emulsion!

🎵 http://bit.ly/track-losinggames - Click here to download this episode's track. Check out Premiumbeat.com to discover a huge range of exclusive royalty free music!


Equipment Links

🎥 This episode's kit/gear/equipment:

US links:

Pergear a7s: http://amzn.to/2hQYkvS

NPF750 Batteries: http://amzn.to/2hIJZOi


UK links:

Pergear a7s: http://amzn.to/2jI1Xon

NPF750 Batteries: http://amzn.to/2jJNckM


DISCLAIMERS:

Some of these links are affiliate links, if you purchase gear via these links The Film Look will receive a small commission, but there will be no additional cost to you. Thank you!

4K Video Editing PC 2018

4K Video Editing PC 2018

My computer is lagging, crashing, and just general zapping away my creativity. It’s time for an upgrade!

MSI, the sponsors of this episode, have heard my cries and sent us their brand new X299 SLI PLUS motherboard along with a bunch of badass components that go into their new 4K Video Editing PC.

They reckon it’s the bee's knees. Let’s see what it’s all about.

CPU

The X299 SLI PLUS supports the newest Intel X-series CPUs. In here we have an i9 7900X which has 10 cores - perfect for a beasty 4k workflow.

Power phases on a motherboard control and regulate voltage. The X299 SLI PLUS has made these completely digital which aids the motherboard in controlling the voltage more precisely, giving you a more stable CPU. This results in a longer system lifespan and lower operating temperatures.

To give the CPU a test we threw up some 4k footage into Premiere Pro,, added a heavy grade, overlaid the footage with some 4K film grain, added a bunch of transitions between the clips. It didn’t drop a single frame.

We also loaded up CineBench and it gave out a reading of 2193.

CPU Cooling

4K Video Editing PC - Cooler Master.jpg

Editing can use a lot of CPU power which means that the processor is going to get hot as hell under a stressful edit. To combat this, the PC has been installed with a Cooler Master MASTER LIQUID 240.

It combines liquid and air cooling in one closed system. It’s super quiet, is unaffected by moisture, and its fiber-reinforced polymer construction resists a broad range of chemicals.

Strapping this to the CPU will stop it from overheating and thermally throttling, which is one of the main causes for your editing programme to lag and crash when you need it the most.

Graphics Card

4K-Video-Editing-PC

The graphics card inside this machine is an MSI 8gb GTX 1080. Editing programmes tend to favor the CPU but that doesn’t mean we video editors stick to just one programme.

In most video projects I am importing compositions and artwork from Photoshop and After Effects, which can favour the GPU over the CPU. Your editing programme can also benefit from GPU acceleration, giving you another bump in performance and improved export times.

We also tested the GPU in CineBench giving a readout of 154 frames per second.

It’s also wicked for playing games, so if you’re an editor as well as a gamer, you may as well build a system that can do both.

Memory

4K Video Editing PC - 32 GB RAM.jpg

Memory is what loads up video previews in your editing application. In order to preview at full resolution without dropping frames, a 4K system will need a lot of it.

The X299 SLI PLUS has 8 slots for DDR4 memory supporting up to 128GB of RAM. This system has 32GB of Hyper X Predator memory for butter smooth 4K editing.

Memory performance can get affected by signals from components on the motherboard. This motherboard has DDR4 BOOST TECHNOLOGY which creates an isolated circuit area so the memory isn’t affected by foreign signals.

SSD

4K Video Editing PC - M.2 SSD.jpg

Installing your OS on a SSD over a hard drive turns start up times and application loading into seconds rather than minutes.

M.2 SSDs are the fastest drives currently out available. The X299 SLI PLUS features two m.2 SSD slots for this exact reason. One slot has an m.2 shield with a thermal pad for improved heat dissipation. Installed in this machine is a 256GB Intel 600P.

We timed the start up of the PC at 31 seconds including POST menus and BIOS logos.

USB

Whether it's external hard drives, card readers, or simply peripherals, the USB port is essential to an editor.

The motherboard in this system has two LIGHTNING USB 3.1 Gen2s, one Type A, and one new Type C. These are the fastest USB ports to date and will eventually become the norm, so you’re covered in terms of future proofing. The X299 SLI PLUS also has 10 USB ports on the back panel ranging from USB 2.0, 3.1, and 3.1 Gen 2.

I use a graphics tablet for drawing in Photoshop as well as a USB keyboard and mouse so having a bunch of extra USB 2.0s just for plugging in peripherals is a well thought out addition.

Not to mention the four ports on the front of the case: two USB 2s, and two USB 3s.

The motherboard even comes with X-BOOST software which boosts USB speeds for mass transfer.

Dual Intel LAN Ports

The motherboard also has two Intel LAN ports. This is great if you are connecting to the internet as well as a internal server. The connections won’t interfere with one another, so you won’t ever have to compromise on download and upload speeds.

Hard Disk Drive

Videos take up a shed load of storage space. But worse than running out of storage is having a hard drive failing to spin or corrupt your precious footage. This is why this build has a 8TB Seagate BarraCuda Pro, the fastest 3.5 inch drive on the market, and specifically designed for creative professionals. This hard drive comes with a 5-year limited warranty and a 2-year rescue plan.

Case

4K-Video-Editing-PC-MSI

There are three things which make a great PC tower: cool, clean, and classy.

The CoolerMaster MasterCase H500P features two 200mm RGB fans at the front, giving superb airflow to keep core temperatures at an all time low and it’s grill-less front design is incredibly sleek. It has a tempered glass side cover which is easy to remove and lets you show off the parts inside. And it even has cable management covers for a sleek cable-less look.

4K Video Editing PC 2018.jpg

PSU

This build also features a Cooler Master v750 compact power supply. It’s small, quiet, fully modular, and has more than enough juice to power this machine.

Outro

When you make 2 videos a week for YouTube, shoot and edit short films, and run a video production company, every minute you can save is a massive improvement in productivity.

This PC might not be in everyone’s price range, but for a video professional, it’s a necessity. Don’t let your equipment stop you from making something great.

MSI Vegas Pro Offer

If you do decided to go for a build like this, MSI is offering customers a 60-day trial of Vegas Pro if you buy a Z370 SLI PLUS or the X299 SLI PLUS. You just need to register the product on the MSI website or follow the link below.


This video was Sponsored By

https://msi.com/to/edit-video-uk-film... - Thanks to MSI for sponsoring the episode! Check out their new 4K Video Editing Build for a PC which won't let you down.


DISCLAIMERS:

Some of these links are affiliate links, if you purchase gear via these links The Film Look will receive a small commission, but there will be no additional cost to you. Thank you!

Editing and Feedback | Episode 7: Video Production Guide

You’ve finished shooting your client’s video - now you need to edited it. 

Welcome to The Film Look and episode 7 of the Video Production Guide.

Video Production - Editing.jpg

So you have finished shooting your client’s video. You have a bunch of cards you need to unload onto the computer which contain the picture and sound elements to piece together the video.

Before you begin editing, you’ll want to create a clear folder structure. To do this we use a program called Post Haste which is free.

Post Haste - https://www.digitalrebellion.com/posthaste/

Video Production - Post Haste.jpg

Post Haste comes with a few folder structured templates for different creative workflows. You can also create a custom project folder structure which suits your workflow. This is the one we have created that works the best for us as each type of media for your project has it’s own folder. You could just create the folders the normal way you do on windows or mac, but Post Haste saves time and everything is always structured correctly and consistently.

We keep the bin structure in our editing software the same as the Post Haste folder structure as it helps to keep everything organised. To save more time when setting up your project, create a project template that has only this bin structure and save it on your hard drive. When you create the project folder structure with Post Haste you can set it to import this template into your project, again saving more as you only have to create it once.

Make sure you have all of the main files in your editor and you can start to edit.

Interviews

The way I edit interviews is to first get the full interview in a sequence, bring in the B camera shot if I have one and the audio. Then I sync everything up. Lets call this sequence INTERVIEW_1_SEQV1.

Then I duplicate this sequence calling the new sequence INTERVIEW_1_SEQV2 and I lock and close sequence 1. I do this just encase I make a mistake or need to go back and check something I have cut out. In sequence 2 I cut out all of the dead space in between the person's interview, you can do this quickly by just looking at the wave form as you can clearly see where they are speaking. I also cut out anything they have spoke about which I know will not be used in the final video.

When you have edited about 100 interviews you learn what you can just cut straight out.

I duplicate the sequence once more, then i start to assemble the interview, moving and cutting out parts until I have something that tells the right story.

The length and structure of your interview will all depend on the subject, for the video we made for Sian Jordan Designs the interviews was very linear. We started of with an introduction, how she got started in watercolour, and then talking about the type of work she creates.

The video we made for Pamplemousse Recording Studio was very structured as they were talking about the services they sell, and was a lot more direct.

B-Roll

Video Production - Editing B-Roll.jpg

Once you have cut down your interview and it has a structure, you can start add your B-Roll. Go through the B-Roll you have shoot and pick the section you think you might use. You can subclip these into subfolders or just simply but them onto your timeline is a rough order. Go through and place shots that compliment what your interviewee is talking about. Your B-Roll is also used to place over and hide the cutting points on the timeline.

Logos

Video Production - Company Logos.jpg

Most client videos will require you to add their company logo and contact details to the edit. My advice would be to send your client a draft edit which have placeholder slides for where this information will go. I say this because companies have many different logo version, phones numbers and email address. Save time and let them send you the correct information.

Music

We spoke about how to choose the right music for your projects in the last video, so if you missed it, go check it out.

Send to client

Once you have a good first draft it’s time to send it to your client to see what they think. We use a website called Screen Light were you upload the video file and your client can leave feedback which is linked to the time code. You get a 1GB of storage for free as well which is more than enough, as you don’t need to upload the highest resolution video since this is only a draft.

Video Production - Screen Light.jpg

Screen Light - https://screenlight.tv/ 

The Feedback/Changes

When you get the feedback from your client take on board what they say and make the changes, but remember they are paying you not just because you have a camera, they are paying you for your creative knowledge so if there is a change that you know will not work, advice them.

If they still want the change, do it and let them decide if it works.

Video Production - Edit Versions.jpg

Have a limit to how many changes your client can have, we normally say when they have seen the 3rd draft this is when everything should be 100% complete.

Delivery

Once the video is complete it is time to export and deliver it. The quick and easy way is to just send the high resolution version via WeTransfer, but if you can take it to them in person this might get talking about the next video they want making.

Over Deliver

When we deliver the final video we always try to over deliver when possible. Normally this is done by giving them many different version of the video for different social media platforms. If the final video is 2 minutes long give them a 20 second version they can use as a preview, or for Instagram. You can also give them any stills you took during the shoot.

Your client may not be paying for these extra videos or even use them, but it just shows that you have gone above the original brief. It should only take you about 30 minutes to create them, and it might help you get the next job.  


The Video Production Guide is a step by step series teaching you the basics of shooting videos for clients.

Episodes released Weekly:

Want to make videos for a client: https://youtu.be/bBkQpobfAjU

How to get the job: https://youtu.be/A1-09ESSZew

How much to charge: https://youtu.be/3Djuh-xTL6Y

Preparing for a client shoot: https://youtu.be/sDbbKaaPjc4

How to shoot an interview: https://youtu.be/8TRdmj0Ao4k

Shooting b-roll: https://youtu.be/RYc2y_dsexI

Editing and Feedback: https://youtu.be/ipMmMp-241o

The Client Video: https://youtu.be/X9VZTuxvT9w


This video was Sponsored By

http://bit.ly/synergy-pack - Get professional assets for your video from RocketStock.com. Their "Synergy" video pack is perfect for video editors and animators looking for versatile elements for any type of project.

http://bit.ly/track-hot-fusion - Click here to download this episode's track. Check out Premiumbeat.com to discover a huge range of exclusive royalty free music!


DISCLAIMERS:

Some of these links are affiliate links, if you purchase gear via these links The Film Look will receive a small commission, but there will be no additional cost to you. Thank you!

Snowing at The Film Look | VLOG #39

In this week Vlog we screen our short film Backstage for our cast and crew for the first time. MSI send us over a computer to test and make a review video. Since we live in the North East of England it snowed at The Film Look HQ.

Links to all do the videos mentioned in the Vlog can be found below.


DISCLAIMERS:

Some of these links are affiliate links, if you purchase gear via these links The Film Look will receive a small commission, but there will be no additional cost to you. Thank you!

Choosing the right Music | Episode 6: Video Production Guide

In this video we are going to talk about some things you need to take into consideration when choosing music for your next short film or client project.

Welcome to The Film Look and episode 6 of the Video Production Guide.

Video Production - Music.jpg

Adding music to your film is another way to tell your story and the wrong music can change the mood and tone very easily and tell a different story than you intended.

With each scene in your film you need to think about a few things; what do you want the audience to feel? Will the music drive the scene?

For this scene in our short film Keep The Change, our main character is at his highest level of stress as his car has just broken down and if he does not deliver the pizza on time he is going to get fired.

Video Production - Music 2.jpg

In this scene we want our audience to feel the same tension our delivery delivery is feeling. 

Another question you need to ask when picking music for your film is ‘Will the music work with the other audio in the scene?’. 

The other audio in your scene could be your character's dialogue and the foley sound effects which also help you tell the story. If you add music into your scene and it is taking away from the story because the other sounds are being drowned, think about having no music, not every scene needs it.

Client video

Just like a short film a client video has a theme and a mood.

Video Porduction - YouTube Music Libary.jpg

There are lots of different places you can get music for your productions. Places like the YouTube music library is a good place to start and it is free, but after a while you will find it a little limited.

We have been using a website called premiumbeat to get all of our music for client videos and short films for over 2 years now. They have a wide range of genres and subgenres, and all of the music you have heard in this video is from premiumbeat.

Video Production - Prmium Beat.jpg

Finding the right song can be time consuming. Sometimes you will find the perfect track right away and other times it will take hours. 

One of the main reasons we use premiumbeat is because they allow you to download a range of different lengths of the preview track. This allows you to add the track to your edit and see if it fits the tone of your film. On other sites you have to play the track in your web browser, then click play in your editor which can be pain.

Just remember to tell your client that music is a preview track, so they aren’t confused when they hear a voice saying ‘premiumbeat.com’ in the background.

For the videos we made for this guide we edited the videos to a suitable track we found on premiumbeat, then sent a draft version of the videos to our client. If they did not like the track for whatever reason we can change it without paying for the music. When the video has been signed off by your client, that is when you can purchase the track as you know they are 100% happy with it. 


The Video Production Guide is a step by step series teaching you the basics of shooting videos for clients.

Episodes released Weekly:

Want to make videos for a client: https://youtu.be/bBkQpobfAjU

How to get the job: https://youtu.be/A1-09ESSZew

How much to charge: https://youtu.be/3Djuh-xTL6Y

Preparing for a client shoot: https://youtu.be/sDbbKaaPjc4

How to shoot an interview: https://youtu.be/8TRdmj0Ao4k

Shooting b-roll: https://youtu.be/RYc2y_dsexI

Editing and Feedback: https://youtu.be/ipMmMp-241o

The Client Video: https://youtu.be/X9VZTuxvT9w


This video was Sponsored By

🎵 Click here to download this episode's track. Check out Premiumbeat.com to discover a huge range of exclusive royalty free music!

http://bit.ly/track-easy-does-it2

http://bit.ly/track-storytelling-piano

http://bit.ly/track-keep-fighting

http://bit.ly/track-modern-corporation

http://bit.ly/track-elemental-glow

http://bit.ly/track-raiders

http://bit.ly/track-march-of-desire


Choosing the right Music for your video

DISCLAIMERS:

Some of these links are affiliate links, if you purchase gear via these links The Film Look will receive a small commission, but there will be no additional cost to you. Thank you!

Popcorn Sunday #06

If you want us to watch your short film simply leave it in the comments with a quick line about the film. We can't put them all in the videos but we comment on every single one with some constructive feedback!

Links to the short film can be found below - 

Twelfth Arrival by Nate’s Film Tutorials: https://youtu.be/fkw4-9v5Lw8

BITE! by thisiscambo: https://youtu.be/G0P6L1wZ_Ns

Also check out Nate's awesome channel: https://www.youtube.com/user/natejames17


DISCLAIMERS:

Some of these links are affiliate links, if you purchase gear via these links The Film Look will receive a small commission, but there will be no additional cost to you. Thank you!

Shooting B-Roll | Episode 5: Video Production Guide

In the last episode we spoke about how to shoot an interview. Most videos will need some form of B-Roll to layer over the interview and that is what we are going to talk about in this video.

Welcome to The Film Look and episode 5 of the Video Production Guide.

Video Production - Shooting B-Roll.jpg


Capturing B-Roll can be done in many different ways, but it will also depend on the type of kit you can afford, and don’t worry if you can not afford the best equipment now. Concentrate on the equipment you do own and make as much money with it as you can.

But if you have a slider, use a slider, if your client needs a drone shot price for a drone shot, but remember if you only have a camera and a tripod, a well composed shot always trumps the fancy ones.

B-Roll doesn’t just help you shape the interview or voice over into a story, it also helps you hide the cuts you’ve made to the footage. B roll will hide the unnecessary answers, pauses, ums and errs. 

By using some audio transitions you can blend the audio cuts together and prevent the sound from popping. 

There are loads of different techniques when it comes to capturing B-Roll, but each shot needs to represent what your client is trying to sell, offer, or promote.

Slider

Clients love slider shots as the clean movement turns a boring conference room into something more interesting. With some distance between the background and subject, you can create a parallax sliding effect, which can really enhance the shot of a product or piece of art. We have a video all about how to use a slider on our channel.

Drone

In the last couple of years drone shots have become the new slider shots. Just like slider shots, they can be overused and 95% of jobs usually don’t need them. Unless you have a passion for flying drones, budget in for a professional who already has their wings. It will save you time and money, as getting a drone pilot's licence is expensive and time consuming. If the client is asking for a drone simply because it looks cool, let them know a solid story is always the better option. It’s not all about the fancy shots.

Handheld

Video Production - Handheld.jpg

Handheld shots can help you move quickly, and create dynamic shots. The cliche video production handheld shot is to follow your subject walking. [Shots from Projects]

When shooting a busy event there is never really a safe space to setup a tripod, so handheld is definitely the way to go. Using a shoulder rig will allow you to move around freely, and combining that with a monopod will give you the chance to also capture static shots. [Shots from Projects and equipment set up shot]

Slowmo

Slow motion is great to shoot in if the subject in the frame is moving. Clients love it and it’s really easy to do. Just adjust your settings from 24 fps to, for example 60, and double your shutter speed from 1/50 to 1/100. Then you can half the speed of the footage in your editor.

In episode 2 of this guide we spoke about preparing a shot list and storyboards before the shooting day. 

Use this on the day and tick off everything you wrote down as you don’t want to miss something your client asked you to capture.

Take your time when capturing the B-Roll. At first it may seem like it’s less important than any other footage, but the quality of your b roll will make or break the final video. Be patient, and do multiple takes if necessary. 

Don’t Over shoot

When you start to shoot videos you will have the tendency to overshoot, it’s not a bad thing but you will start to realise the more you shoot, the more time you’ll be sorting through the footage, and the more storage space you will need.

If the final video length needs to be 2 minutes you don’t need to shoot an hours worth of B-Roll shots.

Whatever tools and techniques you use to capture your b-roll shots, remember that every shot needs to help you tell a story. Practice makes perfect, and eventually you will be able to turn up at a location and know exactly what will look good because you’ve likely shot somewhere like this before. 

And remember to enjoy it! It might feel stressful to begin with, but just remember to take your time and enjoy yourself.


The Video Production Guide is a step by step series teaching you the basics of shooting videos for clients.

Episodes released Weekly:

Want to make videos for a client: https://youtu.be/bBkQpobfAjU

How to get the job: https://youtu.be/A1-09ESSZew

How much to charge: https://youtu.be/3Djuh-xTL6Y

Preparing for a client shoot: https://youtu.be/sDbbKaaPjc4

How to shoot an interview: https://youtu.be/8TRdmj0Ao4k

Shooting b-roll: https://youtu.be/RYc2y_dsexI

Editing and Feedback: https://youtu.be/ipMmMp-241o

The Client Video: https://youtu.be/X9VZTuxvT9w


This video was Sponsored By

🎵 http://bit.ly/stanza-pack - If you're looking for stylish transitions for your video, then check out "Stanza" by RocketStock. You’ll be cutting from scene to scene like a pro with this bold pack of 200 plus video transitions.

http://bit.ly/track-under-the-spotlight - Click here to download this episode's track. Check out Premiumbeat.com to discover a huge range of exclusive royalty free music!


Shooting B-Roll Video Production Guide
Video Production Guide Shooting B-Roll

DISCLAIMERS:

Some of these links are affiliate links, if you purchase gear via these links The Film Look will receive a small commission, but there will be no additional cost to you. Thank you!

How to shoot an interview | Episode 4: Video Production Guide

Knowing how to shoot an interview is an essential part of making documentaries and videos for clients, but how do you shoot one?

Welcome to The Film Look and episode 4 of the Video Production Guide.

Video Production - Interviews.jpg

There are two different parts to shooting an interview, one is the interview setup and the other is the actual conducting of the interview. Let's talk about the setup first. 

Framing

Video Production - Interview Layout.jpg

Every location will be different but before you set up your camera, look at the room and see where might be best for the interviewee to sit, then where the camera, lights and microphones can go.

Your subject’s eyes should be positioned in one of the thirds of the screen, this can be on the left or the right depending on what is in your background. Having your subject placed like this is little more applying to the eye rather than placing your subject right in the middle of the frame.

How to shoot an interview - Rule of thirds

You can do this but it’s normally when your subject is talking directly to the camera like I am right now.

Your interviewee’s eyeline should be always looking into the space and not away from it when being interviewed. The interviewer should be sat next to the camera looking across the space towards the subject's eyeline.

Second Camera Angle

If you have a second camera and tripod, capturing a second angle will give you more cutting room as you can cut between the different angles.

One setup could to be position your B camera right next to your A camera and having them set at two different focal lengths.

A very popular B camera setup is a profile shot of the interviewee.

Video Production - Interview Profile Shot.jpg

If you have a second shooter they can operate the B camera on a shoulder rig or a slider and change the framing between each question, achieving many different angles. Just make sure you give them enough time to move before you ask the next question.

Lighting the Interview

The interview in a client video is there to tell the viewer certain information. This could be about a product or service the company is offering, or someone talking about their experiences.

The way the interview looks needs to represent the subject matter. 

For the example client video we shot for Pamplemousse Recording Studio we wanted to match the mood of the studio, so we used turned on the practical lights in the studio. Then we added an Apture H267c LED panel 2 meters away from the subject, set the brightness to 100%, and the colour temperature to 5500 kelvin.

Then we added a 160 LED right of frame with gave Jordan a edge light, which also separated him from the background by lighting up the guitars behind him.

There are lots of different types of interview setups, sometimes you will only add one light and sometimes you will need to add three. 

Here is a basic lighting kit which will work for most situation.

Video Production - Interview Lighting Setup.jpg

Key Light

We use an Aputure HR672C. You can change the colour temperature, but it’s not the brightest of lights so sometimes you need to get it very close to your subject. The good thing is, it’s a LED light so it doesn’t get very hot.

Fill Light

Our fill light is usually a reflector which is used to fill in the hard shadows on our subject’s face.

Edge Light

For an edge light we normally use one of these 160 LED panels. Its colour accuracy isn’t going to win any awards, but they are small and for £30 you can’t really go wrong.

There are loads of lights and modifiers you can use, but this kit will get you started.

Sound

There are several different types of microphones you can use when recording an interview. We’ve used on-board video mics, shotgun mics, and clip mics, and they all have their advantages and disadvantages.

Video Production - Sound Kit.jpg

A Rode videomic pro is a good place to start. They are reasonably priced and have a solid sound. When recording an interview, it’s best to get the microphone off the camera and bring it closer to your subject in order to capture something cleaner and louder. You can extend the length of the cable by using a 3.5mm extension cable like this one. Then throw it on a microphone stand to boom it without an operator.

We use a larger shotgun mic for the majority of our setups. This one here is a Rode NTG2. It gets a really nice sound and has very low noise, but it does require an XLR input so if your camera only has a 3.5mm socket, you can pick up something like this Saramonic Smart Rig which will adapt and connect the foreign inputs.

Clip Mics are great to use if your subject is moving a lot, or is far away. For a wedding it’s a great way to capture people's vows, or if you’re shooting a conference talk.

We recommend to start with a Rode Video Microphone, then upgrade to a shotgun mic when you can. We think a shotgun microphone is a lot more versatile than a set of clip mics as you can record interviews, voice overs, sound effects and Foley with it.

Conducting an interview

Setting up your camera, lights, and sound equipment is not the only thing you will need to do if you’re shooting an interview. You’ll most likely have to conduct the interview as well.

If you’ve never done this before, like when we started, there are a lot of little things to learn that comes with experience.  

Questions

For an interview you will need to ask the interviewee some questions. It’s best to ask the client what questions to ask they know more about the subject matter than you do, but do a little research into the person or subject beforehand. 

If a person is nervous about being interviewed, just sit and chat to them. Go over the questions and answers, ask them questions that are not about the interview, like if they are going on holiday - just get them talking. 

At times the interviewee might ramble. If this happens, ask them the question again. The rambling was just them figuring out what they wanted to say, and since they now know, the second take will likely be better.

When they are talking, try not to speak until you are sure they have finished and leave at least 3 seconds before you say anything. You’ll be picked up on the microphone, and hearing your hums and arrrs in the edit is the worst. Just listen until it is your turn to ask another question. 

Question in the Answer

When you ask a question, ask the interviewee to present the question at the start of their answer. This will help them lead into their answer and allow the audience to know what the interviewee is talking about.

Here are two examples, one without the question in the answer and one with.

Example 1

I had porridge and a coffee

Example 2

For breakfast this morning I had porridge and a coffee.

The question was ‘What did you have for breakfast this morning?’ which, by the way, is a good question to ask when your are checking your sound levels. 

That’s the basics of shooting an interview. Take what we have said and put it into practice.


The Video Production Guide is a step by step series teaching you the basics of shooting videos for clients.

Episodes released Weekly:

Want to make videos for a client: https://youtu.be/bBkQpobfAjU

How to get the job: https://youtu.be/A1-09ESSZew

How much to charge: https://youtu.be/3Djuh-xTL6Y

Preparing for a client shoot: https://youtu.be/sDbbKaaPjc4

How to shoot an interview: https://youtu.be/8TRdmj0Ao4k

Shooting b-roll: https://youtu.be/RYc2y_dsexI

Editing and Feedback: https://youtu.be/ipMmMp-241o

The Client Video: https://youtu.be/X9VZTuxvT9w


This video was Sponsored By

http://bit.ly/illuminate-pack - RocketStock’s light leak pack, "Illuminate", is sure to impress your viewers. Shot using digital cinema cameras in 4K, it’s an unbeatable way to lift your video to new, cinematic heights.

http://bit.ly/pb-brooklyn-bridge - Click here to download this episode's track. Check out Premiumbeat.com to discover a huge range of exclusive royalty free music!


Equipment Links

🎥 This episode's kit/gear/equipment:

US links

Rode Video Microphone - http://amzn.to/2zDp4mS

Rode NGT 2 - http://amzn.to/2yK4dkR

Rode Link Clip Mic - http://amzn.to/2zBSK3G

Aputure LED HR672C - http://amzn.to/2y2U9Uv

UK links

Rode Video Microphone - http://amzn.to/2lcKOmU

Rode NGT 2 - http://amzn.to/2i3xOeN

Rode Link Clip Mic - http://amzn.to/2yKjUso

Aputure LED HR672C - http://amzn.to/2i35qt7


How to shoot an interview Video Production Guide

DISCLAIMERS:

Some of these links are affiliate links, if you purchase gear via these links The Film Look will receive a small commission, but there will be no additional cost to you. Thank you!