Season 2

Get the Bloody & Beaten Look | Season 2: Episode 8

We wanted the bad guys in Corpse to look beaten and bruised, and in some cases they needed to look like they had been bleeding. With Rob and myself knowing absolutely nothing about how to achieve that look, we brought in special effects make up artist Natasha. Here is how she made the characters in Corpse looked like they had survived all 12 rounds.

We got our friend Natasha to take over from here:

Makeup-Artist---The-Film-Look.jpg

Hi, I'm Natasha. I did the bruising and bloody faces make up in Corpse.
Here is what you'll need to make your actors look bloody and beaten up.

  • Face wipes.
  • Moisturiser.
  • A pale foundation.
  • A bruise wheel which contains purple, red, blue face paint.
  • Additionally, you'll need yellow, black, and brown face paint.
  • Vaseline.
  • A variety of fake blood.
  • A bunch of sponges.
  • Smaller brushes for detailed work.
  • A big brush for blending.
  • A cup of water.
  • And some Bin Bags.
Makeup-Artist-Supplies.jpg

Firstly, is preparation.

Wipe the subject's face to make sure you get rid of any sweat, oils, and dirt. You want to start with a clean canvas.

Makup-Clean-Canvas.jpg

Take a generous amount of moisturiser and apply it to the subject's face. This will increase the durability of the make up, and make the subject look sweaty. It's stressful being beaten up.

Apply the foundation to the entire face. This will take out any red in the face, making the subject appear lifeless.

Take the brown face paint and contour the face following the bone structure. Apply it very sparingly.

You can make the subject appear tired by adding further colour under the eye. This depends on the natural colour of the person's under eye. Purples and reds, mainly.

The next step is adding bruises.

Decide where you want to add your wound. In our case, we have chosen the eye, lip, and forehead.

Makeup-Eye-Bruise.jpg

For smaller cuts, a bruise isn't as necessary, but for bigger impacts it is essential.

The bruises I am adding today will resemble something a few days old.
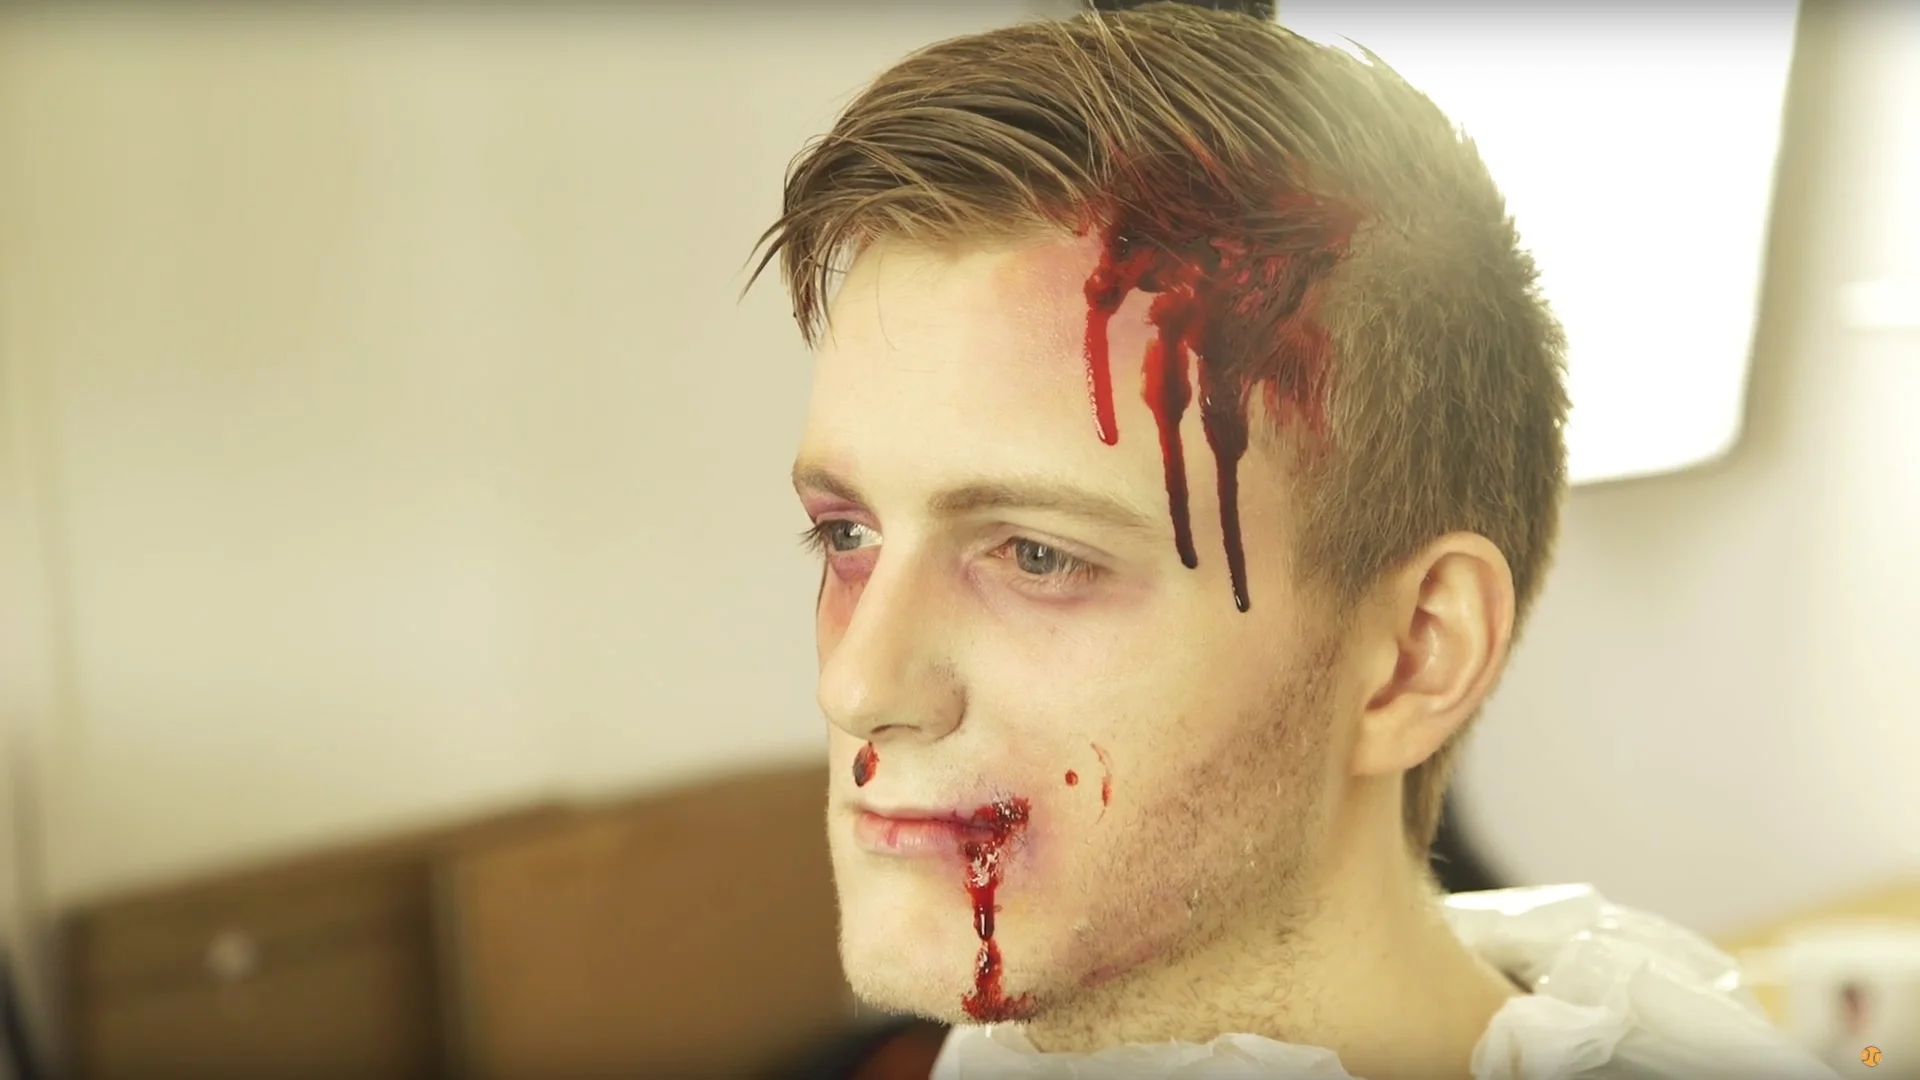
A day old bruise will have tones of blue or purple because the swelling causes the oxygen to be cut off.

Start with a red base, patting and stippling. Then add darker colours, such as blues, purples and a touch of black, to give it more depth. Add yellow to the outsides of the bruised area to give it an aged look.

The skin around the eye is thin so it easily bruises. When the eye is injured, blood pools in the orbital bone below the eye. So the bruise is darkest across this bone.

Take a small amount of vasoline on your finger and dab it onto cheek bone, under the eye brow, and along the eye lid.

It's called a shiner for a reason.

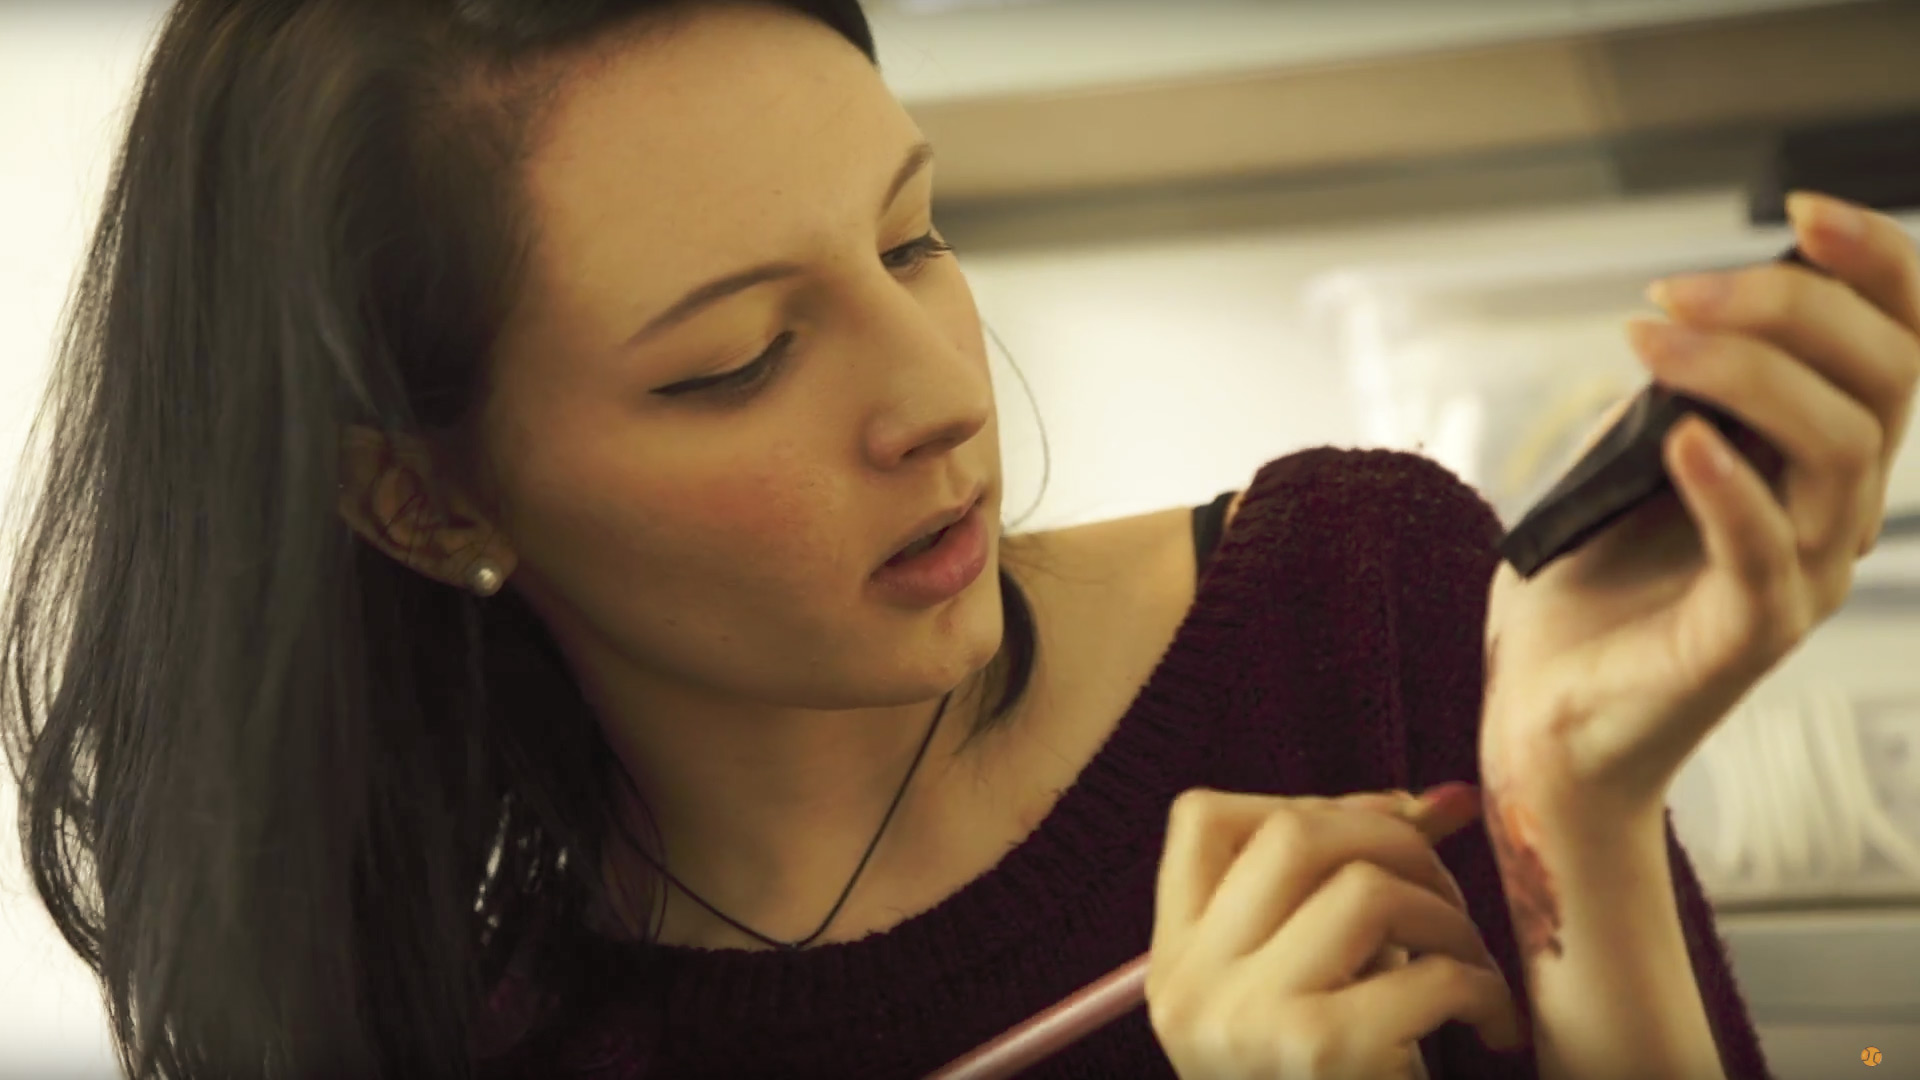
Now it's time to add the bloody wounds.

Outline where you want your wound using the dark red paint as a base. Your blood will lie on top of the paint, so the size of the area will depend on your wound.

If it is a cut, a thin line is all you'll need. If it is a head wound, you'd use a larger area.

Using black paint, you can fill in the deepest part of the wound. Then, use some thick blood and cover the base and let it drip down the subject's face.

Get-the-Bloody-&-Beaten-Look.jpg

With some thinner, lighter blood, apply long drops in the way they would naturally fall. When the blood dries, it will go flaky, making it look older.

And there you have it. Your subject now beaten and bloody.


Get the Bloody & Beaten Look.jpg

DISCLAIMERS:

Some of these links are affiliate links, if you purchase gear via these links The Film Look will receive a small commission, but there will be no additional cost to you. Thank you!

Condense Your Shotlist | Season 2: Episode 7

Here are the original storyboards for the gang scene in Corpse.

Poorly drawn and all over the place. We re-created the storyboards using photos taken in my living room.

Story-Boards.jpg

By test shooting it allowed us to find common trends in the shots, which allowed us to combined them, and reduced it down to this. Reducing your shot list is actually a really helpful way to achieve the film look, and today we'll show you how.

Here is a prime example of too many shots in a storyboard. You have 3 close ups in a row here. Gino giving the knife. Tilly's face. Gino eating some pills.

Condense-Your-Shotlist.jpg

But these shot types are to similar to each other and cutting them together would not look right. So we turned these 3 shots into 1 with movement by stitching them together and using a pan and tilt.

Here is another example. The scene in the tunnel:

Jason crouches. CU of pills. Jason picks them up. Jason's reaction.
Or: Jason crouches, and picks up the pills, then we see his reaction.

In a way, you can think of stitching shots together as adding commas to a sentence instead of using full stops. Commas create sentence flow, just like how pans and tilts make the movie flow.

Condensing your shot list will do 2 things:

It increases the efficiency of your shot list, which results in a quicker and more efficient turnaround on set.

And it makes you think about your shots as more than just a compilation of coverage.

As they say, limitation drives creativity.


Condense Your Shotlist.jpg

DISCLAIMERS:

Some of these links are affiliate links, if you purchase gear via these links The Film Look will receive a small commission, but there will be no additional cost to you. Thank you!

Run and Gun Sound Setup | Season 2: Episode 6

Here at the film look, we often double up and sometimes triple up on crew roles. As well as directing Corpse, I was also the sound recordist for the film. So I needed a quick and easy way to go from a sound guy to a director and I think I found a decent solution.

This is my run and gun sound recording setup.

Shotgun mic, housed in a furry blimp, with a pistol grip. A micro boom pole ready on standby.

Run-and-Gun-Sound-Setup.jpg

Tascam dr40, tied to my belt, set in dual record mode. It records a 2nd audio file 12db under. This is really handy incase you clip the audio and don't have time for another take.

Tascam-DR-40-Peak-Line.jpg

A carabiner, attached to my belt loop, ready to clip the blimp and the XLR leads away when I needed to use both of my hands.

This setup was fast and efficient, and was used on every shooting day once I figured it out.


Run and Gun Sound Setup.jpg

DISCLAIMERS:

Some of these links are affiliate links, if you purchase gear via these links The Film Look will receive a small commission, but there will be no additional cost to you. Thank you!

Make Your Costumes Look Filthy | Season 2: Episode 5

Our short film Corpse is based in a world of scavenging and depleting resources, and our character's clothing needed to match. Here are a few simple methods to make clothing look worn and dirty.

I've got this simple white t-shirt. To make it look like it's been unwashed for weeks, I grabbed a few simple household items:

  • Teabags
  • A cup of warm water
  • Sandpaper
  • Shoe Polish
  • Newspaper
  • and a Sponge
Make-Your-Costumes-Look-Filthy.jpg

Firstly, for a base weathering, give the clothing a complete sand down.

Once this is done, you can pay close attention to areas like the collar and give them little details.

After you have weathered it down, take a brewed teabag and dab the clothing, giving it stains. I add more tea stain to the collar and underarms to make it look like stale dried sweat.

Grab the sponge and add a bit of shoe polish. Then dab the sponge onto your newspaper until most of the polish is off of the sponge. This method is very similar to dry-brushing with a paint brush. It only applies to the top-most part of surfaces, like the collar here.

Make-Your-Costumes-Look-Filthy-dry-brushing.jpg

We used these methods for all of the costumes in our film Corpse. For some costumes, we cut a hole at the stitching point and ripped it open to damage the clothing.


Make Your Costumes Look Filthy.jpg

DISCLAIMERS:

Some of these links are affiliate links, if you purchase gear via these links The Film Look will receive a small commission, but there will be no additional cost to you. Thank you!

Bone Breaking Sound Design | Season 2: Episode 4

A scene in our recent short Corpse requires a guy getting his head kicked in.

Now WE follow the rule of "working with the resources you have in the best possible way", and getting a fake head to stand on, or doing it with VFX was going to cost a lot of time and money. So instead, we decided we wouldn't show it at all.

Now we could have shown his head being caved in, but what would that achieve? A cheap gimmick, a shock horror moment, sure.

But the story would be the same, so what's the point?

Anyway, here's how we did it.

Try to record audio in the original location. If you can't, find a similar alternative. We shot the scene in forest, but we recorded in my back garden.

They were both outside, the wind levels were similar, and there was very little background noise.

Bone-Breaking-Sound-Design.jpg

We used bell peppers to get a good crunch for the skull crushing sound, and used a water melon for the juicy brain sounds. It had also been in the back of my fridge for a very long time, so it went REALLY juicy!

Bone-Breaking-Sound-Design-with-Melon.jpg

Also...before you start standing on them, don't wear your favourite green chinos like Rob did. It's messy stuff.

I cut up the best sound effects and matched them with the foot stomps. For added brute force, I added a punch sound effect to every kick and stomp. And finally for extra ambience, I added some thunder in the background.

And there you have it. A cheap and effective way to smash your friends skull in!

You can find the sound effects from this video in our store to download for free.


Bone Breaking Sound Design.jpg

DISCLAIMERS:

Some of these links are affiliate links, if you purchase gear via these links The Film Look will receive a small commission, but there will be no additional cost to you. Thank you!

Storyboard Using Photos | Season 2: Episode 3

If you have the same lack of drawing talent like we have, drawing storyboards can be a pain. You don't know who is who, your perspective is all wrong, and only you can understand them.

Bad-Story-Boards.jpg

Here is a really simple and productive way of creating storyboards without having to pick up a pencil.

There was one particular scene in Corpse which needed to be thoroughly planned. 6 cast, 4 crew, a trek to the location, and the likelihood of heavy rain; for us, with was a big deal. With this in mind, figuring out the shots from poorly drawn storyboards was a disaster waiting to happen. So instead, we rehearsed.

We all got together in my living room and rehearsed the scene. The actors, the crew, everyone. We tested the make up, we tried different lines, and we shot the scene.

"You shot the scene!? In your living room!? Are you mad!?", ahh, but this is where storyboards come in. We worked around the actors as they rehearsed, positioning and finding our shots. Then it was a case of getting the footage on the computer, and exporting the frames.

Story-Boards.jpg

Line them up in Photoshop, add some shot info, and there you have it; you got a visual shot list ready to take out on location.


Storyboard Using Photos.jpg

DISCLAIMERS:

Some of these links are affiliate links, if you purchase gear via these links The Film Look will receive a small commission, but there will be no additional cost to you. Thank you!

Make Your Gunshots Sound Better | Season 2: Episode 1

Guns. The staple foundation for a lot of young film-makers when they get started, myself included.

But there's one thing that makes gunshots seem to stick out like a sore thumb.

Repetition. The sound of it being copied and pasted on the timeline over and over. It pulls you out of the film.

Well here's a quick tip to help make your gunshots sound a little more organic.

So you have your sound effect. 

A pistol shot. 

Match it to your muzzle flash and you have a gun firing! 

But if your subject fires in quick succession...like here...it starts to sound synthetic.

Editing-gun-shot-sounds.jpg

To avoid this, alter the speed of each sound. So this one is 90%, the next can go at 110%, and so on. Between 80-120% of your normal speed is usually a good bracket.

Editing-gun-shot-sounds_1.jpg

It sounds more embedded into the scene.

The sound of gunfire is just the bi-product of gun mechanics. It's a natural sound, and natural sounds are never identical. This method places the sounds back into reality.


Make Your Gunshots Sound Better.jpg

DISCLAIMERS:

Some of these links are affiliate links, if you purchase gear via these links The Film Look will receive a small commission, but there will be no additional cost to you. Thank you!